 Tutorials
Books
Videos
Forums
Tutorials
Books
Videos
Forums


This is an archived tutorial from the kirupa.com legacy collection. It covers software that may no longer be available, but it is kept online because the ideas still hold up.
Ever wanted to build a real-time chat room or build a high speed multiplayer game but couldn't figure out how to do that? Sockets are what your missing! PHP sockets are indeed very nice to use when creating real-time chat applications or to build an instantaneous multiplayer game. Unfortunately most people do not use them because they are hard to grasp. In this tutorial, I will be showing how to write a simple PHP5 socket shell script for Apache servers, and how to set up a Flashoc file to connect to it.
Here is a snap shot of the chat room you'll be creating in this tutorial:
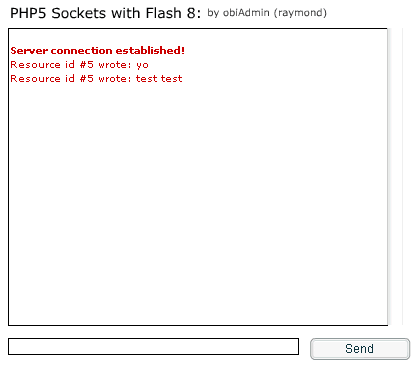
[ an example of the chat program you will create ]
This tutorial has many parts to it, to help you navigate and understand what it is I am trying to explain it has been expanded to many pages. This tutorial does have a lot of information to cover even for a simple application like what you will create. Here are some things I will be covering in my tutorial:
Building the Flash client to connect to the PHP5 socket.
Script the PHP5 socket.
Write a Batch file to run the PHP5 socket through command prompt.
Other steps to making this chat more advanced.
Before we begin, I am assuming you have Apache2.x installed along with PHP5 and Flash 8. To install Apache2.x and PHP5, go here.
Let us begin with the client side. Go ahead and create a new html file called flash.html. We will place the flash chat room in there. With that done, let's get into creating the Flash document.
Start a new Flash document and make the width '550 px' and height '400 px'. Create a new layer and name it actions. Lock your newly created actions layer, for it will serve for just coding only.
Place a Dynamic Text box onto the stage of your other layer and give it an instance name of "msgArea". Also check to make sure your dynamic text box has the HTML box selected:
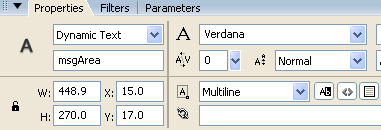
[ make sure your properties looks like mine]
Now place an Input Text box right below your msgArea box and give it an Instance name of "inputMsg":
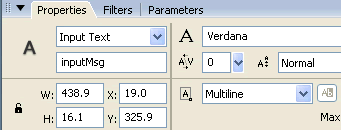
[ notice the multi-line text in case people want to type a lot! ]
So right now, we are still missing some things, go ahead and drop a UI scrollbar on to your msgArea so the content inside may be scrolled. You can find these by going to Window tab, and clicking on Components. The UI Scrollbar will automatically resize to the height of your msgArea. Also, drag and drop a Button component into the stage. Your Flash stage should look something like this right now:
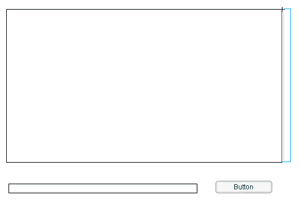
You need to give the newly added button an Instance Name of "pushMsg". Once you have done that, you can then select the parameters tab located by the properties tab and change the label to "Send":
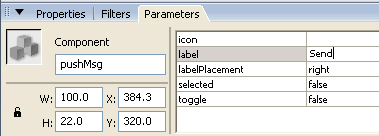
Alright, so now we need to start adding some ActionScript to this mighty beast! In the next section I will show you the ActionScript and explain what it will do.
Now we need to add in the guts to this flash chat room. Make sure you have the actions layer selected and hit F9 to open the Actions panel. Highlight all of this coding and paste it into the actions panel.
mySocket = new XMLSocket();
mySocket.onConnect = function(success) {
  if (success) {
  msgArea.htmlText += "<b>Server connection established!</b>";
  } else {
  msgArea.htmlText += "<b>Server connection failed!</b>";
  }
};
mySocket.onClose = function() {
  msgArea.htmlText += "<b>Server connection lost</b>";
};
XMLSocket.prototype.onData = function(msg) {
  msgArea.htmlText += msg;
};
mySocket.connect("dyn.obi-graphics.com", 9999);
//--- Handle button click --------------------------------------
function msgGO() {
  if (inputMsg.htmlText != "") {
  mySocket.send(inputMsg.htmlText+"\n");
  inputMsg.htmlText = "";
  }
}
pushMsg.onRelease = function() {
  msgGO();
};
If you tried testing the movie you should not get a connection. That is because it is trying to connect to my socket server, but flash is being denied access. Do not worry about that for now. Instead, I will go through the ActionScript to explain what is going on:
mySocket = new XMLSocket();We are declaring a new object called mySocket to handle any socket connections flash might receive or send.
mySocket.onConnect = function(success) {
  if (success) {
  msgArea.htmlText += "<b>Server connection established!</b>";
  } else {
  msgArea.htmlText += "<b>Server connection failed!</b>";
  }
};
This will ensure that our mySocket object will connect to the PHP socket we will run later. When it receives the big OK, it will display our first message of "Server connection established!" but a no-go will give us the failure message.
mySocket.onClose = function() {
  msgArea.htmlText += "<b>Server connection lost</b>";
};
For whatever reason, if the PHP socket connection is lost, .onClose will pick that up and run this function.
XMLSocket.prototype.onData = function(msg) {
  msgArea.htmlText += msg;
};
Unlike the other functions where we could use mySocket, here we can only use XMLSocket with onData. This prototype.onData function handles the incoming packages.
Note- When Using XMLSocket.onData
XMLSocket.onData is called every time a package is sent from the server (or whatever it's connected to) and can only invoke this event handler when the package is terminated with a zero byte. This will be explained in detail later on.
mySocket.connect("dyn.obi-graphics.com", 9999);This .connect will try and connect to dyn.obi-graphics.com on port 9999. Make sure that your address (or IP) is that of your own.
function msgGO() {
  if (inputMsg.htmlText != "") {
  mySocket.send(inputMsg.htmlText+"\n");
  inputMsg.htmlText = "";
  }
}
msgGO() function will handle the messages people write. It is simply checking to make sure the inputMsg html area is not blank. The second part we are using flash's .send built in function. It will send the message to our socket script.
pushMsg.onRelease = function() {
  msgGO();
};
This is just a function built to call on our msgGO() function when the 'Send' button is released.
Go ahead and save the Flash document as socketClient. You can also go back to your flash.html page and add in a .swf version of this. In our next section we will build our PHP5 socket script to handle all clients and their messages.
In our last section, we built the client chat room so people can go on and message each other. In this section we will build the PHP5 socket script to handle the client connections and messages.
Go ahead and copy and paste all of the following code into a new PHP file. Save it as socketShell.php.
#!/usr/bin/php -q
<?php
/*
Raymond Fain
Used for PHP5 Sockets with Flash 8 Tutorial for Kirupa.com
For any questions or concerns, email me at [email protected]
or simply visit the site, www.php.net, to see if you can find an answer.
*/
error_reporting(E_ALL);
set_time_limit(0);
ob_implicit_flush();
$address = '192.168.0.16';
$port = 9999;
//---- Function to Send out Messages to Everyone Connected ----------------------------------------
function send_Message($allclient, $socket, $buf) {
  foreach($allclient as $client) {
  socket_write($client, "$socket wrote: $buf");
  }
}
//---- Start Socket creation for PHP 5 Socket Server -------------------------------------
if (($master = socket_create(AF_INET, SOCK_STREAM, SOL_TCP)) < 0) {
  echo "socket_create() failed, reason: " . socket_strerror($master) . "\n";
}
socket_set_option($master, SOL_SOCKET,SO_REUSEADDR, 1);
if (($ret = socket_bind($master, $address, $port)) < 0) {
  echo "socket_bind() failed, reason: " . socket_strerror($ret) . "\n";
}
if (($ret = socket_listen($master, 5)) < 0) {
  echo "socket_listen() failed, reason: " . socket_strerror($ret) . "\n";
}
$read_sockets = array($master);
//---- Create Persistent Loop to continuously handle incoming socket messages ---------------------
while (true) {
  $changed_sockets = $read_sockets;
  $num_changed_sockets = socket_select($changed_sockets, $write = NULL, $except = NULL, NULL);
  foreach($changed_sockets as $socket) {
  if ($socket == $master) {
  if (($client = socket_accept($master)) < 0) {
  echo "socket_accept() failed: reason: " . socket_strerror($msgsock) . "\n";
  continue;
  } else {
  array_push($read_sockets, $client);
  }
  } else {
  $bytes = socket_recv($socket, $buffer, 2048, 0);
  if ($bytes == 0) {
  $index = array_search($socket, $read_sockets);
  unset($read_sockets[$index]);
  socket_close($socket);
  }else{
  $allclients = $read_sockets;
  array_shift($allclients);
  send_Message($allclients, $socket, $buffer);
  }
  }
  }
}
?>
As you can see, there is a lot that makes this stuff work! I hope your not running away already. Tackling this thing isn't as bad as you think. In the downloadable zip file I have provided at the end of this tutorial, I have included all the comments that you will need to understand this bad boy!!
In the next section I will briefly go over some things that you see here.
So onwards to the next section!
In the previous section, I displayed the PHP script for the sockets. Here I will briefly go over what you see. As I said earlier, all the comments needed to understand it are located in the zip file I have provided for download. So lets check this stuff out a bit!
#!/usr/bin/php -qThis line states that this script is a PHP shell script and not a PHP web script. A -q denotes that all HTTP headers will be suppressed.
error_reporting(E_ALL);
set_time_limit(0);
ob_implicit_flush();
$address = '192.168.0.16';
$port = 9999;
function send_Message($allclient, $socket, $buf) {
  foreach($allclient as $client) {
  socket_write($client, "$socket wrote: $buf");
  }
}
//---- Start Socket creation for PHP 5 Socket Server -------------------------------------
if (($master = socket_create(AF_INET, SOCK_STREAM, SOL_TCP)) < 0) {
  echo "socket_create() failed, reason: " . socket_strerror($master) . "\n";
}
socket_set_option($master, SOL_SOCKET,SO_REUSEADDR, 1);
if (($ret = socket_bind($master, $address, $port)) < 0) {
  echo "socket_bind() failed, reason: " . socket_strerror($ret) . "\n";
}
if (($ret = socket_listen($master, 5)) < 0) {
  echo "socket_listen() failed, reason: " . socket_strerror($ret) . "\n";
}
$read_sockets = array($master);
Just setting up and declaring any variables that we will use throughout the script. A master socket has been created so that others can attempt to connect. As you can see, the socket is bound to your IP and desired Port. In the last step, a listen method is applied to the socket so that anything attempting to connect is heard and then dealt with.
Anytime you need to have Flash connect to any port, you must have the port equal to or higher than 1024. This is a default precaution Flash takes to ensure connections are not crossing with other ports such as 21, 24, or 80.
while (true) {
  $changed_sockets = $read_sockets;
  $num_changed_sockets = socket_select($changed_sockets, $write = NULL, $except = NULL, NULL);
  foreach($changed_sockets as $socket) {
  if ($socket == $master) {
  if (($client = socket_accept($master)) < 0) {
  echo "socket_accept() failed: reason: " . socket_strerror($msgsock) . "\n";
  continue;
  } else {
  array_push($read_sockets, $client);
  }
  } else {
  $bytes = socket_recv($socket, $buffer, 2048, 0);
  if ($bytes == 0) {
  $index = array_search($socket, $read_sockets);
  unset($read_sockets[$index]);
  socket_close($socket);
  }else{
  $allclients = $read_sockets;
  array_shift($allclients);
  send_Message($allclients, $socket, $buffer);
  }
  }
  }
}
This piece makes a continuous loop to obtain any connections made to the master socket and process them accordingly. If a socket sends data to the server it will send that data package out to everyone else connected. If a socket sends a disconnect signal, the socket is then closed out completely and removed from the master array of sockets.
Just remember, all the comments are included with this PHP file in the ZIP at the end of this tutorial!!
Now it's time to write a Batch file to run our PHP Shell script to make our chat room work. The next section will show you the Batch file we will write and show you what is happening.
A batch file is just a master file of lists of commands and/or programs that need to be executed. Of course this only pertains to MS-DOS users and Windows users. To create a Batch file, all you need is Notepad. You can even use Adobe Dreamweaver, just as long as you do not add any extra markups.
So in Notepad or Dreamweaver open a new document and copy paste this coding to it.
c:/web/php/php.exe -q c:/web/Apache2/htdocs/socketTut.phpSave this file as socketRun.bat. Notice the .bat at the end? Well that will signify that this file we wrote is a batch file. When it runs, it will automatically start up in a new Command Prompt window. Now let's take a glimpse at it.
The first part just calls on the php.exe to execute and run our socket shell script. Notice the -q again? Well it also will suppress any HTTP headers.
The next part is our location to the php shell script that php.exe needs. As you can tell you will need to alter this to your needs. Where ever your php.exe and socketShell.php is, you need to supply that into the batch file. Once that is complete it is time to check out your chat room.
Open up your command prompt (start -> run -> cmd.exe). Type in the exact location to your socketRun.bat and hit enter. Yours should look something like this:

[ it should look like its thinking... ]
From here you can go ahead and run your flash.html page. If everythings golden you should be in business!
In the next section I will go over some possibilities you can achieve with what you have.
In the previous section you learned how to create both a flash client and php server side script to use and handle socket data between each other. You also might have written your first batch file to use php shells.
Here I can just give some leads on how to develop a more rich PHP shell script to work with.
Notice how Flash uses XMLsockets to connect and handle socket data? Well XML is growing ever larger everyday, and you can build your flash client and php shell script to handle XML statements. Right now the PHP shell script just passes on any data to everyone it's connected to. Well if you build an XML parser within PHP, you can create attributes that give PHP directions on what to do (like message only certain people, aka private messages, or even set up IRC like commands).
So what steps must you take to advancing this simple yet complex PHP script? Learning more PHP helps, but XML would be the next step. XML gives you the ability to create messages that both PHP and Flash can take apart and understand. Given the example of:
<CHATROOM ACTIONS="private_message" TO="Joe" FROM="Fred" MESSAGE="blah blah" />You can have the PHP shell script have a generic parser that takes in anything with CHATROOM and checks to see what ACTIONS it may have. Based on that, you can see some other attributes it can contain, making this a little more complex everytime. Now remember, you can have the server itself send messages out to connected sockets, but remember to terminate each message with a zero byte. The best way I found out to do this is something like this:
$errormsg = '<SERVER TEXT="*NOTICE* Please choose a different game title." />' .chr(0x00);Notice that I have the normal text that I'm sending out to the socket, but I have added a .char(0x00) to the end of the message. This is a message that has been terminated with a zero byte. Now flash will read this message. Without it, flash just ignores the data being sent to it completely.
Now since the PHP shell is running through command prompt, debugging can actually be easy to setup. It will be on your part to come up with some effective methods to achieve this but, by using a PHP command print_r( ), you can see errors or variables that can be displayed in the command prompt. It works just like the normal print( ) command but it only shows up in the command prompt window and has no overall effect on the script.
Ok so you developed a flash client that connects to a PHP shell script running by command prompt located on an Apache 2 server. WHEW!! That is actually a lot to think about! The flash client uses some simple functions and methods to handle the incoming data and sending data. The PHP shell script handles incoming socket connections, incoming data, and spits out any data it receives to all the sockets connected to it. The PHP shell script also unsets any sockets that have disconnected and closes them out.
You can download this ZIP file that contains the PHP
shell script, chat room FLA, and Batch file. It would be
recommended that you download this to read up on the
comments I have made in the PHP shell script. That way
you can get an understanding of how everything works!

I really hope you have learned a lot from this tutorial! If you have any questions or comments, don't delay. Just ask them in the kirupa.com Forum. After you post your question, either I or some of the forum members will answer it!
Arizona State University
Raymond Fain (obiAdmin)  [Army ROTC]
Just a final word before we wrap up. What you've seen here is freshly baked content without added preservatives, artificial intelligence, ads, and algorithm-driven doodads. A huge thank you to all of you who buy kirupa's books, became a paid subscriber, watch the videos, and/or interact on the forums.
Your support keeps this site going! 😇

:: Copyright KIRUPA 2026 //--
