 Tutorials
Books
Videos
Forums
Tutorials
Books
Videos
Forums


This is an archived tutorial from the kirupa.com legacy collection. It covers software that may no longer be available, but it is kept online because the ideas still hold up.
For many games, simply detecting a collision when an object hits another object is enough. That sort of collision, covered in an earlier tutorial, is great for games such as pool or mini-golf where collisions occur only when two objects physically touch each other.
But, you also have a different type of of collision. Many games today feature opponents who dodge and weave as you try to hit them. Games such as Zelda have opponents who slide and weave when you fire a slow-moving projectile such as a bow from your arrow, etc. You need some way of having your opponents be able to predict collisions from your attacks.
Being able to predict a collision and react accordingly adds some primitive level of intelligence to your targets. I will explain one simple way of predicting collisions that Flash can computationally handle:
Click near any of the above balls and notice that they move out of the way if they lie in the path of the darker blue ball.
Unlike other tutorials on this site, I will not have you go through the formalities of drawing the circles, making them movie clips, giving them instance names, and copying and pasting some code. Instead, I will provide the final source code for you to download so that I can focus more on explaining the idea and code behind predicting collisions.
Download FLA for Flash 8 and Flash MX 2004
Once you unzip and open the above FLA file, you should see a lot of circles displayed in your Flash window:
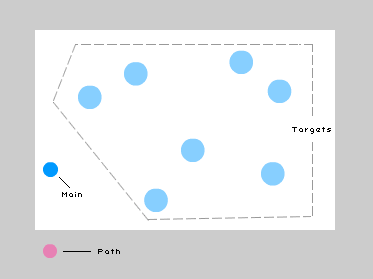
[ a guide of all elements displayed in our FLA file ]
In the above image, I have labeled the three main elements of our image. First, we have our main circle that moves to the point where you click your mouse.. The targets are obstacles that will move out of the way when our main movie clip approaches.
The path circle is different, and I have explicitly made it visible for the purposes of explaining what it does. Preview your animation in Flash and click somewhere in your movie clip. Notice that your path circle propagates itself towards the area of your click:
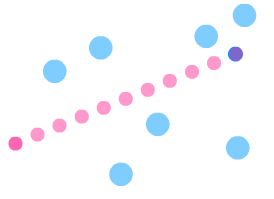
[ our path circles in action ]
The circle movieclip (the pink circle) acts like the guide that scouts out the path your main movieclip passes through. Any target circle that happens to collide with any of the pink guide circles will move out of the way. In my example above, I have set the path circles to be invisible, for it is a detail that the user does not need to be aware of.
For reference, the path movie clip has the instance name circle. The main circle that moves has the instance name circleMain, and the 7 target movie clips contain the names t1, t2, t3,...,t7.
The structure of this animation can be divided into 4 parts:
Moving the main circle after a mouse click
Drawing the path of circles to our destination
Detecting Collision
Moving colliding circles away
In the next section I will start to explain the code that gets everything working.
In the previous section, I explained the basic idea behind how our collision prediction system works. There is a substantial amount of code for this effect, so I would like to start with the code now!
You can view the code by selecting the first frame of your action layer and pressing F9 or by going to Window | Development Panels | Actions.
circleInit = function () {
  speed = 10;
  this.onMouseDown = function() {
  endX = _root._xmouse;
  endY = _root._ymouse;
  drawpath("circleMain", endX, endY);
  diffX = Math.abs(circleMain._x-endX);
  diffY = Math.abs(circleMain._y-endY);
  };
  this.createEmptyMovieClip("circleHelper", -2);
  circleHelper.onEnterFrame = function() {
  circleMain._x += (endX-circleMain._x)/speed;
  circleMain._y += (endY-circleMain._y)/speed;
  };
};
circleInit();
This is our circleInit function. Its main job is to move our circleMain movie clip to the point on the stage where you clicked. There is a slight ease, and as you can tell, the code behind it is fairly straightforward. The code is a revised version taken from Lostinbeta's Easing on Mouse Click Tutorial, and he explains how the easing works in his tutorial.
Next, I want to point your attention to these three lines of code:
drawpath("circleMain", endX, endY);
diffX = Math.abs(circleMain._x-endX);
diffY = Math.abs(circleMain._y-endY);
The first line calls a function called drawpath that takes in three arguments: the movieclip name, the destination x value, the destination y value. The variables endX and endY store the x and y position of our mouse pointer when you clicked on the stage. For movieclip name, we provide the instance name of our circle - circleMain.
The above lines of code execute only when you click and release your mouse button. So, even if you move your mouse around after having clicked, the values of endX and endY will only have the stored x and y mouse positions from your click.
initial_targets = ["t1", "t2", "t3", "t4", "t5", "t6", "t7"];The above array, initial_targets, stores the instance names of our path circle movie clips found on our stage.
If you make any changes to the instance names on your stage, be sure to edit the appropriate entry in the array. Likewise, if you change any entry in the array, make sure that the change is reflected in the instance name of your movie clips on the stage.
drawpath = function (startMC, finalX, finalY) {
  initial_paths = [];
  step = 10;
  circle._x = startX=eval(startMC)._x;
  circle._y = startY=eval(startMC)._y;
  for (i=0; i<=step; i++) {
  duplicateMovieClip(circle, "circle"+i, i+10);
  eval("circle"+i)._x += i*(finalX-startX)/step;
  eval("circle"+i)._y += i*(finalY-startY)/step;
  initial_paths.push(eval("circle"+i)._name);
  }
  collisionDetect();
};
The above is our drawpath function that is responsible for duplicating our path circle movie clip from where your circleMain movieclip is to where you want the circleMain movieclip to go.
This function takes in three arguments that I briefly outlined above in the function call for the circleInit function. The first argument refers to the x and y position our path circles will originate from. In our case, that will always be our circleMain movieclip. The finalX and finalY values are the x and y positions of the point where you clicked in your stage.
In the next section, I will cover the drawpath function in greater detail and tackle more of the remaining code.
Forward to the next section!
In the previous section, I started explaining the code. Let's pick up where we left of with the code for our drawpath function.
initial_paths = [];
step = 10;
In the first line, I create a new, empty array called initial_paths. I initialize a variable called step with a value of 10 in the second line. The step variable specifies the number of path circles that will duplicate from your starting and end point.
The larger the number for step, the larger the number of path circles that will display. While that leads to a more precise collision detection, more circles also lead to a more CPU intensive collision detection.
circle._x = startX=eval(startMC)._x;
circle._y = startY=eval(startMC)._y;
We start by specifying the x and y positions of our circle movie clip. The starting point is determined by the x and y position of our circleMain movie clip. If you recall, circleMain is what is passed through to our drawpath function's startMC argument.
By using the eval statement, I am able to take the string circleMain and allow it to access the properties of the movie clip of the same name. I use the _x and _y properties to designate the x and y positions.
Notice that I am also storing the positions from our eval statements into our variables startX and startY.
for (i=1; i<=step; i++) {
  duplicateMovieClip(circle, "circle"+i, i+10);
  eval("circle"+i)._x += i*(finalX-startX)/step;
  eval("circle"+i)._y += i*(finalY-startY)/step;
  initial_paths.push(eval("circle"+i)._name);
}
I am creating a for loop that executes some code. Notice that I am starting the loop at 1 and ending the loop when i equals the value of step you specified earlier.
Note
The following pieces of code are placed inside our for loop. Each line of code is executed repeatedly for each value of i in our loop where i is less than or equal to the value of step as outlined above.
duplicateMovieClip(circle, "circle"+i, i+10);In this line, I specify our circle movie clip to be duplicated. The new duplicated movie will have an instance name of circle plus whatever the value of i is for that particular iteration of our loop. So, you would see circle1, circle2, circle3, etc. as the instance names of the new circles.
Fixed Depth vs. nextHighestDepth()
Unlike my other tutorials, I am not using the nextHighestDepth function. Instead I use a real number, 10 and the index variable i as the offset. The following is my reasoning behind that design choice.
To simplify our code, I do not have a system where our existing duplicated circles are removed when you click on a new target in the stage. If I use the nextHighestDepth function, future path circles will simply appear along with my existing path circles from previous clicks on the stage.
That becomes a problem if I click on the stage multiple times. I would start to see a large number of path circles that are left over from previous clicks. But, if the depths were recycled, Flash will have to delete the earlier path circle to make room in the 'depth' for the new path circle.
By not using the nextHighestDepth function, no matter how many times you click around your stage, you will never exceed a depth of i+10. Therefore, by setting the value of our depth to be fixed, Flash automatically overwrites any old duplicated object at the depth with a newly duplicated object. In the end, you only see the number of path circles you specified in your step variable no matter how many times you click around.
eval("circle"+i)._x += i*(finalX-startX)/step;
eval("circle"+i)._y += i*(finalY-startY)/step;
These two lines specify the x and y position of each of our duplicated circles as you progress through the loop. Notice that I am again using the eval statement to access a movieclip instance by using a combination of variables and strings.
The expression to the right of the incrementing operator ( += ) specifies the actual position our circle will be stored. It is just simple trigonometry once you think about it. Basically the expression ensures that all of our circles are spaced apart evenly, and that our circles neatly reach our final destination regardless of what our value of step is.
initial_paths.push(eval("circle"+i)._name);Do you remember the initial_paths array we declared earlier? It is finally used here. Each of our path circles' named are added as a value to our initial_paths array by means of the push function.
At the end of our for loop, our initial_paths array will contain the name of each path circle duplicated.
collisionDetect();The last thing I do in our drawpath function is make a call to a function called collisionDetect. In the next section, I will explain what collisionDetect does and the code behind it.
In the previous section, I started explaining the code. Let's pick up where we left of with the drawpath code.
numTargets = initial_targets.length;
numPaths = initial_paths.length;
final_paths = [];
final_targets = [];
I first declare and initialize four variables. The first two variables store a number representing the number of items in our initial_targets and initial_paths arrays. The next two variables refer to arrays, and I initialize them with brackets representing an empty set.
for (m=0; m<numTargets; m++) {
  cirA = initial_targets[m];
  for (j=0; j<numPaths; j++) {
  cirB = initial_paths[j];
  if (eval(cirA).hitTest(eval(cirB))) {
  if (contains(final_targets, cirA) != 1) {
  final_targets.push(cirA);
  }
  if (contains(final_paths, cirB) != 1) {
  final_paths.push(cirB);
  }
  }
  }
}
This large section of code should look familiar to you if you have already taken a look at Page 2 of the Multiple Object Collision Detection tutorial. There is one major difference between our code and the code used in that other tutorial, though, and I will be covering that difference in detail here. I strongly suggest you look and understand how the code works in the above underlined link. It will better help you to appreciate the subtle change in the code for this tutorial.
In our multiple object collision code, the initial value condition of our inner for loop was j = m + 1 where m was the index variable for the outer for loop. That would work great if you are checking for collisions among a handful of the same objects. In our case, we are not checking for collisions among our target movie clips. Instead, we check collisions among two different sets of objects. We are checking for a collision among our target movie clips and among our circle path movie clips. The names of those movie clips are are stored in our initial_targets and initial_paths arrays.
Our earlier code would have worked only if we are checking for a collision among either only movie clips referenced in our initial_targets array or our initial_paths array. Since we are combining our collisions to work among both sets of movie clips stored in both arrays, our shortcut method will not work. We have to scan through the full range of movie clips for both arrays.
if (contains(final_targets, cirA) != 1) {
  final_targets.push(cirA);
}
I created a separate function called contains that very closely resembles the indexOf function. indexOf searches through an array containing string values. If a specified search term is found within the array, the indexOf function returns the position the string appears in.
In my function, you are not limited to only searching for strings. You can search for numbers, objects, etc. The variable cirA and cirB store a movie clip name from our initial_targets and initial_paths arrays, so I search our final_targets array to see if cirA is one of the values it contains. If that particular value is not contained in our array, I add the movie clip reference from cirA to our final_targets array by using the push command.
The reason I do that is to avoid duplicate references to the same movie clip stored in our final_targets array. In the future if the same value is found, the contains function will return a 1, thus making sure that the particular value of cirA will not be added again to our final_targets array.
if (contains(final_paths, cirB) != 1) {
  final_paths.push(cirB);
}
This is the same as the above section of code I explained. The only difference is that I check for a collision with objects in our final_paths array and add those collided objects to our array while, at the same time, ignoring duplicates.
moveAway();Finally, I call a function called moveAway. It is the last thing that our collisionDetect function executes. The moveAway function moves any squares that collide with your path circles. This function ensures that your main circle movie clip has a clear target out.
Onwards to the next section where I discuss the moveAway function. You are almost done!
In the previous section, I started explaining the code. Let's pick up where we left of with the moveAway code.
count = 0;
this.createEmptyMovieClip("temp", 1000);
In the first line, a variable count is initialized with a value of zero. In the second line, I am creating an empty movie clip called temp that will be used to store event handlers. The empty movie clip will be created at a depth of 1000.
temp.onEnterFrame = function() {I quickly put our temp movie clip we created earlier to good use! I set our temp movie clip to hold an onEnterFrame event handler that executes any code contained in it as fast as our frame rate.
count++;
if (count == 5) {
  delete temp.onEnterFrame;
}
In our onEnterFrame function, I first increment the value of count by one. If our count variable increments to a value of 5, I decide to kill our onEnterFrame function by deleting it.
for (i=0; i<final_targets.length; i++) {
  tempA = eval(final_targets[i]);
  // horizontal movement
  if (diffX>diffY) {
  if (tempA._y>circleMain._y) {
  tempA._y += 10;
  } else {
  tempA._y -= 10;
  }
  } else {
  // vertical movement
  if (tempA._x>circleMain._x) {
  tempA._x += 10;
  } else {
  tempA._x -= 10;
  }
  }
}
This code seems complicated, but it is really straightforward. What I am doing is going through each target movie clip that is in the way of our path circles and moving them out of the way. Our final_targets array stores the instance names of every movie clip that collided with our path circles, so knowing which circles to move has already been done for us.
With a for loop, I am able to loop through each movie clip referenced in our final_targets array and move them out of the way. I deliberately planned how I want to move the circle out of the way. If you remember, very early in my code explanation, I mentioned the diffX and diffY variables.
What both the diffX and diffY variables do is store the horizontal distance and the vertical distance needed for our mainCircle movie clip to travel to reach the final destination. If diffX is larger, that means you are moving further horizontally than vertically. The opposite is true if our diffY variable is greater - your mainCircle moves more vertically as opposed to horizontally.
Once I determine in which direction our mainCircle movie clip predominantly moves in, I can adjust how I want our target circles to move to avoid the collision. If there is a collision, it is easier to move our target circles perpendicularly away from the direction of our mainCircle's movement. In short, that is all our above code does.
If our circle is moving more horizontally, I move our target movie clips vertically. Of course, if our circle is moving vertically, I move our target movie clips horizontally.
In the previous section, I finished explaining what all of the ActionScript code does. In this page, I will summarize what was discussed in the past five pages.
Occasionally, for longer tutorials, I will try to provide a quick English-only summary of the code in a few paragraphs. That may help to give you a better idea of how the code spread across the previous sections fits together.
When you click your mouse at a target, your mainCircle movie clips begins to move in that direction. The code for the movement is based on Lostinbeta's tutorial. Here is your objective: you want any objects that lie in the mainCircle's path to move out of the way. You need to predict a collision before it happens.
You check for collisions by sending out a number of path circles that propagate towards your final target. The number of circles you send out is determined by your steps variable. Any object that collides with any of the path circles is instantly added to an array (final_targets). In the end, the final_targets array contains the name of every obstacle that is in the mainCircle's path.
Once you have a list of names in your final_targets array, you realize that they must be moved or else face collision with mainCircle. Using the moveAway function, you cycle through each name found in the final_targets array and move those named objects out of the way.
All of the above happens before your mainCircle has even moved a few pixels!
External Tutorials Referenced
This tutorial relied heavily on code and ideas from the following tutorials:
Easing on Mouse Click (by lostinbeta)
Collision Detection Among Multiple Objects
Finding Values in an Array
 |
Just a final word before we wrap up. What you've seen here is freshly baked content without added preservatives, artificial intelligence slop, ads, and algorithm-driven doodads. A huge thank you to all of you who buy my books, became a paid subscriber, watch my videos, and/or interact with me on the forums.
Your support keeps this site going! 😇


:: Copyright KIRUPA 2026 //--