 Tutorials
Books
Videos
Forums
Tutorials
Books
Videos
Forums


This is an archived tutorial from the kirupa.com legacy collection. It covers software that may no longer be available, but it is kept online because the ideas still hold up.
This is the second tutorial of the "isometric game" series. The first one, in case you haven't read it, involves isometric transformations. Anyway, in this tutorial I'll explain hit testing in the 3d isometric perspective.
So what is this all about? What's wrong with the good old
hitTest function?
Well, this:
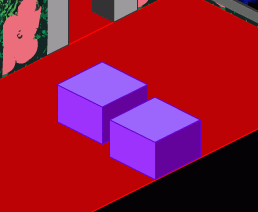
[ two objects that are NOT overlapping ]
Look at the figure above. You can see two boxes that are lying on the floor and not touching each other.
But, since Flash's
hitTest function works only in plain 2d, the result of
testing a hit between these two objects would be
true.
Now, what can we do to avoid that?
As I said in the previous tutorial, the way out of this is to do all our calculations in 3d isometric space, and then transform it into plain 2d Flash graphics.
Back to 2d
For the sake of simplicity, the next example will
be using a "top" projection, and will be dealing with 2
dimensions only. When the logic is understood, the third
dimension is added in a minute, and we have a perfectly
functional 3d hit test.
Introducing new function called
hitTest2:
function hitTest2(obj1, obj2) {
  if ((Math.abs((obj1.x+obj1.a/2)-(obj2.x+obj2.a/2))<(obj1.a+obj2.a)/2) and (Math.abs((obj1.y+obj1.b/2)-(obj2.y+obj2.b/2))<(obj1.b+obj2.b)/2)) {
  return (true);
  }
}
This function calculates the relationship between two objects.
The parameters are 2 objects; it returns
true if they are
overlapping, false
if not.
The x,
y,
a and
b are the
properties of each object. They represent x and y coordinate and
objects width and height.
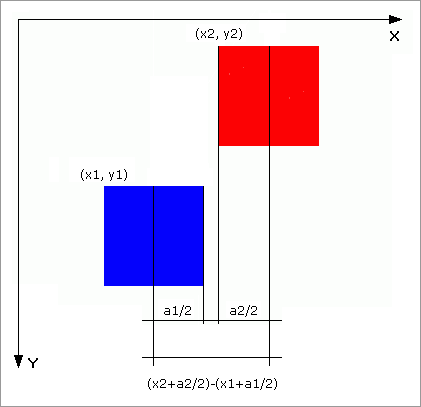
[ checking the (x axis) distance between centers ]
The math behind rectangular hit testing is pretty simple. Basically, it checks if the distance between centers of the objects is less then sum of the halves of their widths. If it is - they overlap on that axis.
The figure above shows checking that distance for x direction (x axis). In this particular case, the objects don't overlap on an x axis.
The function does the same thing for x and y direction (and z
direction, later in 3d).
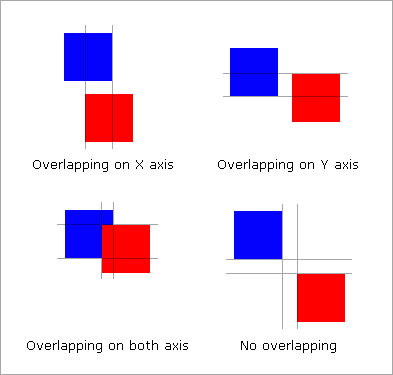
[ overlapping in 2d ]
If objects overlap on x and y axis at the same time - they overlap in general.
 |
Note |
|
As
you see, I use the upper left edge coordinates
of the object to represent the object's
position. Since
|
|
Let's try it:
[ click the screen and use arrow keys to move the red square ]
 |
Note |
|
The drawback of this function is that it assumes all objects are rectangular. A ball can be drawn as a ball, but for a hit testing purposes - it's a cube. There's nothing wrong with it - all filmation isometric games use rectangular objects. |
|
I owe you some explanations about previous code. Let's look at the functions.
|
|
Note |
|
In my isometric experiments - for some reasons - I didn't go with extending the MovieClip class to create objects. I've rather created "abstract" objects which among other methods and properties hold coordinates for attached MovieClips from the library. |
|
So, at object creation, we have to supply this MovieClip
library name (clip)
and it's on-screen instance name (instance),
as well as coordinates and sizes.
function object(instance, clip, x, y, a, b) {
  this.x = x;
  this.y = y;
  this.a = a;
  this.b = b;
  this.clip = clip;
  this.instance = instance;
  ...
Initializing the new on-screen MovieClip with the
init function:
// object initialization
this.init = function() {
  // putting object on list
  linkedList.push(this);
  _root.level++;
  // attaching MovieClip
  attachMovie(this.clip, this.instance, _root.level);
  // positioning it
  setProperty(this.instance, _x, this.x);
  setProperty(this.instance, _y, this.y);
};
In the previous code, you see an array called
linkedList. It's
the list of objects which is filled during populating room's
objects, and then processed in every program loop.
linkedList.length
is a parameter which is then used in for..next loops.
|
|
Note |
|
In later stage depth sorting will be done by changing object's positions in the linked list. |
|
Next function places the MovieClip to the new screen position:
this.placeIt = function() {
  // positioning MovieClip
  setProperty(this.instance, _x, this.x);
  setProperty(this.instance, _y, this.y);
};
Next two functions are not so important for the whole deal - they are just popping up and removing the balloon with "I OVERLAPPED OBJECT" text:
this.say = function(text) {
  _root.level++;
  eval(this.instance).swapDepths(_root.level);
  eval(this.instance).cloud.text = text.toUpperCase();
  eval(this.instance).cloud.gotoAndStop("start");
};
this.shutUp = function() {
  eval(this.instance).cloud.gotoAndStop("stop");
};
This is the main moving function:
this.moveObject = function() {
  hit = false;
  if (this.direction == 2) {
  this.x -= _root.speed;
  }
  if (this.direction == 8) {
  this.x += _root.speed;
  }
  if (this.direction == 1) {
  this.y += _root.speed;
  }
  if (this.direction == 4) {
  this.y -= _root.speed;
  }
  // checks linked list elements
  for (i=0; i<linkedList.length; i++) {
  that = linkedList[i];
  // if it isn't the same object (player)
  if (that != this) {
  // hitTesting
  if (hitTest2(this, that)) {
  this.say("I OVERLAPPED\n "+that.instance);
  hit = true;
  }
  }
  if (!hit) {
  // if no overlapping at all
  this.shutUp();
  }
  }
  // place it into new coordinates
  this.placeIt();
  // zeroing direction
  this.direction = 0;
};
In moveObject
function, hit testing is being performed between main character
and all objects on the linked list. If overlapping happens, a
little balloon with the text pops up.
The next code shows the creation of objects using the functions above:
// --- initialization ----------------------------
// main character
object1 = new object("player", "MC1", 50, 50, 50, 50);
object1.init();
// other objects
object2 = new object("object1", "MC2", 300, 50, 25, 100);
object2.init();
object3 = new object("object2", "MC3", 250, 250, 75, 25);
object3.init();
object4 = new object("object3", "MC4", 250, 200, 50, 25);
object4.init();
object5 = new object("object4", "MC5", 50, 150, 50, 100);
object5.init();
object6 = new object("object5", "MC7", 150, 150, 50, 50);
object6.init();|
|
Note |
|
A data for populating an isometric space with objects can be contained in a database or in external XML file. More about isometric maps in later tutorials. |
|
The main loop:
// --- main program loop ----------------------------
this.onEnterFrame = function() {
  control(object1);
  object1.moveObject();
};
This loop is performed once for a program cycle.
Since only a main character (player) can be moved in this
example, a
moveObject
method is performed only on it.
Function control
tests the cursor keys and supplies the
moveObject
function with the
direction parameters:
function control(object) {
  // controls given object
  if (Key.isDown(Key.LEFT)) {
  object.direction |= 2;
  } else if (Key.isDown(Key.RIGHT)) {
  object.direction |= 8;
  } else if (Key.isDown(Key.UP)) {
  object.direction |= 4;
  } else if (Key.isDown(Key.DOWN)) {
  object.direction |= 1;
  }
}
The numbers 1, 2, 4 and 8 are chosen because of something that is needed in the next tutorial; at this stage it can be any numbers or letters.
You can control more than one object with this function. For example, the following code moves 2 objects at the same time:
this.onEnterFrame = function() {
  control(object1);
  control(object2);
  object1.moveObject();
  object2.moveObject();
};
Huh, that was it! Now, let's get back to 3d...
Back to 3d
You can easily imagine this 2d view being
converted into 3d isometric view - with only difference that y
axis becomes z axis with adding a new y axis.
hitTest2 function then becomes:
// --- hit test function --------------------------------
function hitTest2(obj1, obj2) {
if ((Math.abs((obj1.x+obj1.a/2)-(obj2.x+obj2.a/2))<(obj1.a+obj2.a)/2) and (Math.abs((obj1.y+obj1.b/2)-(obj2.y+obj2.b/2))<(obj1.b+obj2.b)/2) and (Math.abs((obj1.z+obj1.c/2)-(obj2.z+obj2.c/2))<(obj1.c+obj2.c)/2)) {
  return (true);
}
Using grey buttons, try to hit a purple box with the blue one (box sizes are 50x36x50):
[ rectangular hit testing in 3d ]
Never mind if objects are displayed with wrong depth - that's because depth sorting cannot be done at this stage (the objects are still overlapping).
Cheers!
 |
Danko DKOZAR.COM |
 |
Just a final word before we wrap up. What you've seen here is freshly baked content without added preservatives, artificial intelligence, ads, and algorithm-driven doodads. A huge thank you to all of you who buy kirupa's books, became a paid subscriber, watch the videos, and/or interact on the forums.
Your support keeps this site going! 😇

:: Copyright KIRUPA 2026 //--
