 Tutorials
Books
Videos
Forums
Tutorials
Books
Videos
Forums


This is an archived tutorial from the kirupa.com legacy collection. It covers software that may no longer be available, but it is kept online because the ideas still hold up.
Platform games are an increasing popular form of game for online gaming. This tutorial will help you on your way to creating your own by deconstructing a very simple game you see below:
[ the example of my game; refresh the page if you die or fall off ]
Use your arrow keys to have your character move and jump around. The space key fires your weapon once you have it. Since this is more of a case study than a tutorial, I will go ahead and provide you with the source to the above animation below:
We will start off by drawing 2 objects on the stage and making them movie clips (MC’s).
The first MC is your character. For now, we will draw a circle. Draw your circle, select it and press F8. Once you circle is a movie clip double click it. Then select all of the shape. Press Ctrl + K and align the shape horizontally centered and bottom edge We now need to give it an instance name, for this tutorial we will call it char.
Your next MC will be your ground. So, draw a rectangle about 20px thick underneath your character, so when we add jumping he has something to fall on to. Once you have created it give the instance name of ground.
Now for our first bit of code, in a platform game, you will need left and right movement. The following code also has friction in it. Friction gives the game a more realistic feel:
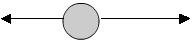
Go down to the actions for your character movie clip and add this code:
onClipEvent (load) {
  speed = 0;
  maxmove = 15;
}
onClipEvent (enterFrame) {
  if (_root.dead) {
  this.gotoAndStop("dead");
  } else {
  speed *= .85;
  if (speed>0) {
  dir = "right";
  } else if (speed<0) {
  dir = "left";
  }
  if (dir == "right"){
  this._x += speed;
  _root._x -= speed;
  }
  if (dir == "left") {
  this._x += speed;
  _root._x -= speed;
  }
  if (Key.isDown(Key.LEFT)) {
  if (speed>-maxmove) {
  speed--;
  }
  this.gotoAndStop("run");
  this._xscale = -100;
  } else if (Key.isDown(Key.RIGHT)) {
  if (speed<maxmove) {
  speed++;
  }
  this._xscale = 100;
  this.gotoAndStop("run");
  }
  if (speed<1 && speed>-1 && !attacking) {
  speed = 0;
  this.gotoAndStop("idle");
  }
  }
}Next up we need jumping. This code will give you jumping; it would be inserted after the other key.isDown events:
if (speed<1 && speed>-1 && !attacking) {
  speed = 0;
  this.gotoAndStop("idle");
}
if (Key.isDown(Key.UP) && !jumping) {
  jumping = true;
}
if (jumping) {
  this.gotoAndStop("jump");
  this._y -= jump;
  jump -= .5;
  if (jump<0) {
  falling = true;
  }
  if (jump<-15) {
  jump = -15;
  }
}
The above code simulates jumping similar to the following image:
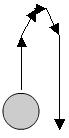
You would
also need to set jump to 0 and jumping true within the load event for the
character so when the game starts he falls to the ground. Therefore, your load
events being (the bold is the new code):
onClipEvent (load) {
  jumping = true;
  jump = 0;
  speed = 0;
  maxmove = 15;
}
Even though we now have jumping we will fall through the ground. To resolve that we need hitTest events. Insert this directly after the jumping events. Place it after this part of the jumping code:
if (jump<-15) {
  jump = -15;
}
}
if (_root.ground.hitTest(this._x, this._y, true) && falling) {
  jump = 12;
  jumping = false;
  falling = false;
}
That code checks that the char is hitting its X and Y positions on the ground
and they are falling. Then is sets the variables to prevent errors.
Thus, all of your code should look like the following:
onClipEvent (load) {
  jumping = true;
  speed = 0;
  maxmove = 15;
  jump = 0;
}
onClipEvent (enterFrame) {
  if (_root.dead) {
  this.gotoAndStop("dead");
  } else {
  speed *= .85;
  if (dir == "right") {
  if (speed>0) {
  dir = "right";
  } else if (speed<0) {
  dir = "left";
  }
  if (dir == "right"){
  this._x += speed;
  _root._x -= speed;
  }
  if (dir == "left") {
  this._x += speed;
  _root._x -= speed;
  }
  if (Key.isDown(Key.LEFT)) {
  if (speed>-maxmove) {
  speed--;
  }
  this.gotoAndStop("run");
  this._xscale = -100;
  } else if (Key.isDown(Key.RIGHT)) {
  if (speed<maxmove) {
  speed++;
  }
  this._xscale = 100;
  this.gotoAndStop("run");
  } else if (speed<1 && speed>-1) {
  speed = 0;
  this.gotoAndStop("idle");
  }
  if (Key.isDown(Key.UP) && !jumping) {
  jumping = true;
  }
  if (jumping) {
  this.gotoAndStop("jump");
  this._y -= jump;
  jump -= .5;
  if (jump<0) {
  falling = true;
  }
  if (jump<-15) {
  jump = -15;
  }
  }
  if (_root.ground.hitTest(this._x, this._y, true) && falling) {
  jump = 12;
  jumping = false;
  falling = false;
  }
  }
  }
Now test you movie. You will notice that if you walk off the edge without jumping you do not fall. However, if you constantly check if your character is not touching the ground and that they aren’t jumping you can make them fall by setting a fall speed and setting jumping true.
Simply insert this code after the enterFrame code:
…
onClipEvent (enterFrame) {
  if (!_root.ground.hitTest(this._x, this._y, true) && !jumping) {
  this._y += 6;
  }
  if (_root.dead) {
  this.gotoAndStop("dead");
  } else {
  …
Now it is actually beginning to look like a game. There is more of this game
coverage in the next section!
Onwards to the next section!
Next up we will put in some animations for you character. So, for now, we will
put in the idle, run and jump animations. To do this we need to put in some key
frames. So, in the timeline of your character MC go to frame 2, and hit F6
(insert New Key Frame). Once you have done that repeat, on frame 3.
Now you should have 3 Key Frames. Frame 1one is your idle frame, so put in your
idle image. Once you have done that you need to give the frame a Frame Label,
this should be at the bottom left of you screen in the properties tab. Give it
the label idle.
Repeat this with the next two frames. On one of the frames draw in your run animation, and give it the frame label run. And on the other frame draw in your jump animation, and give that frame the label jump:
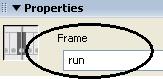
[ give one of your frames the label run ]
I guess you will want walls now? The easiest, and probably smoothest way is to
create a different MC for each side. So, create one MC for your wall to stop
right movement and give it the instance name leftblock and another to block left
movement and give it the instance name rightblock. They are named the other way
around because they are they side they go on if they were together (as seen in
the image to your right).
For this to stop them, we need to check if they are touching before we move the
character. To do this, we would edit this part of the code:
if (dir == "right" && !_root.leftblock.hitTest(this._x+20, this._y, true)) {
  this._x += speed;
  _root._x -= speed;
}
if (dir == "left" && !_root.rightblock.hitTest(this._x-20, this._y, true)) {
  this._x += speed;
  _root._x -= speed;
}
Pick Ups
What type of game is a platform game without any pickups you ask? Well in my
opinion, not a very good one.
The easiest way, but not necessarily most CPU efficient, is to make each pick up
item check if they are hitting the character, and then, if they are touching set
the score up, and unload (remove) that MC.
Here is what you would need to do. First of all, whenever you are setting a
number variable up or down, it always needs to be set to a digit prior to that
action. So on the actions for the main timeline put:
score.text=0;
Any code that is on the main timeline is equivalent to _root.your_code. For
example; that speed code which we have place on the actions is the same as
_root.speed=0;. This is because the main timeline is the _root.
-Next up, we need to make our actual pickups. So, draw your pick up. I used a
clipart of a gun for example. Select it and press F8 to make it a MC. Now on
this we need the following code:
onClipEvent (enterFrame) {
  if (this.hitTest(_root.char)) {
  _root.score.text += 1;
  unloadMovie(this);
  }
}
Now, we have all these codes but no visible score. To make a visible score
you need to create a dynamic text box. So select the Draw Text tool, draw your
text box and set it to dynamic text. Now the text is dynamic we can edit it with
our codes, but still it will not show anything because we have not given it a
instance name. To do this go to the instance name input text box on the left of
the screen down the bottom, and type in score, as that is the name in which we
have called it by via script.
Now that we have our score going, you will notice it moves with the screen. You
will fix this using the same method we have to stop our character from going off
screen, moving it the opposite way to the root timeline. Edit this into your
characters code to fix your problem:
if (dir == "right" && !_root.leftblock.hitTest(this._x+20, this._y, true)) {
  _root.score._x += speed;
  this._x += speed;
  _root._x -= speed;
}
if (dir == "left" && !_root.rightblock.hitTest(this._x-20, this._y, true)) {
  _root.score._x += speed;
  this._x += speed;
  _root._x -= speed;
}
To create multiple pickups choose the arrow tool, hold control and click this
first pick up and drag away from your first pickup and it should duplicate it.
Or, alternatively you can copy and paste your pickups.
Enemies are equally important to a good game as pickups. So, lets make one.
Firstly we will need a picture. Place in your enemy picture and make that a MC.
Then, with that enemy MC we will need some codes. This is the code for movement
(left to right) that we are using in this tutorial:
NOTE
Only Enemies and AI is explained in detail in this tutorial. All other codes are explained more in the FLA only.
onClipEvent (load) {
  enemyspeed = 2;
  //this sets the speed your enemy will move at
  enemystepsright = 0;
  //how far it has moved right
  enemystepsleft = 0;
  //how far it has moved left
  enemydir = "left";
  //its direction is set left
}
onClipEvent (enterFrame) {
  if (!dead) {
  //if NOT dead
  if (enemydir == "right") {
  //if the direction (enemydir) is right
  enemystepsright += 1;
  //its amount of steps (enemystepsright) right goes up 1
  this._xscale = -100;
  //_xscale (flips character) is set to neg. 100
  this._x += enemyspeed;
  //its X goes up the value of enemyspeed
  } else if (enemydir == "left") {
  //otherwise if the direction (enemydir) is left
  enemystepsleft += 1;
  //its amount of steps (enemystepsright) left goes up 1
  this._xscale = 100;
  //_xscale (flips character) is set to 100
  this._x -= enemyspeed;
  //its X goes down the value of enemyspeed
  }
  if (enemystepsright == 100) {
  //if enemystepsright is equal to 100
  enemystepsright = 0;
  //enemystepsright is set to 0
  enemydir = "left";
  //direction is set to left
  } else if (enemystepsleft == 100) {
  //otherwise if enemystepsleft is equal to 100
  enemystepsleft = 0;
  //enemystepsleft is set to 0
  enemydir = "right";
  //direction is set to right
  }
  }
}
What good are enemies without being able to kill them? Yes, they’re not too fun
here’s how we will kill them. Go back into the character MC and insert another frame with the label attack. In
this frame insert a picture of you enemy and a MC at the hit point where the
enemy will die on. On this hit point image make the _alpha 0, and then give it
the instance name attack point. From here we need to do three more things,
insert 2 code fragments on to your character, and one on the enemy.
The first part we need to put on your character is to check if they press
control:
} else if (Key.isDown(Key.RIGHT)) {
  if (speed<maxmove) {
  speed++;
  }
  dir = "right";
  this._xscale = 100;
  this.gotoAndStop("run");
} else if (Key.isDown(Key.CONTROL)) {
  this.gotoAndStop("attack");
  attacking = true;
  speed = 0;
}
Then the next part is to go on your characters actions also, but this stops it from going to the idle frame which it will do, due to our code that sets the character idle when the speed is below 1 and greater that negative 1. So we need to add this into our code:
} else if (speed<1 && speed>-1 && !attacking) {
  speed = 0;
  this.gotoAndStop("idle");
}
The last code is for the enemy, it needs to check if the enemy is hitting our attack point, which we placed on, our characters attack frame. Insert this on the enemy object:
onClipEvent (enterFrame) {
  if (this.hitTest(_root.char.attackpoint)) {
  enemyspeed = 0;
  enemystepsright = 0;
  enemystepsleft = 0;
  dead = true;
  this.gotoAndStop("dead");
  }
  if (this.hitTest(_root.char) && !dead) {
  _root.char.jumping = false;
  _root.dead = true;
  }
When doing this it is vital you put the italic part (the part that kills you character) after the bold part, as the script reads down, and it sets that you enemy is dead before it hits your character.
Now we have set attacking true, we need to set it false, when control is released. So add this to the bottom of your char.
if (_root.ground.hitTest(this._x, this._y, true) && falling) {
  jump = 12;
  jumping = false;
  falling = false;
}
}
}
onClipEvent (keyUp) {
  // on Key Up
  if (Key.getCode() == Key.CONTROL) {
  // if the release is control
  attacking = false;
  // attacking is false
  }
}In both your character and enemy MCs you need to put it a new frame, with the label dead. This is the frame where it shows your dead characters.
Probably the easiest things in the game to do are the obstacles such as spikes, etc. With this code we will not kill the enemy but set the _root timeline position back to 0 and send the character to a specified position and then resets all our variables. All you need to do is insert your obstacle image, make it a MC, and give it this code:
onClipEvent (enterFrame) {
  if (this.hitTest(_root.char)) {
  _root._x = 0;
  _root.char._x = _root.char.startX;
  _root.char._y = _root.char.startY;
  _root.char._y = _root.char.startY+Stage.height/2;
  _root.char.speed = 0;
  }
}
We also need our characters’ Y position to be collected at the start of the game, so flash knows where to moves the character to:
onClipEvent (load) {
  jumping = true;
  speed = 0;
  maxmove = 15;
  Ypos = this._y;
  jump = 0;
}Now for health we need to do multiple things. We firstly need to make another dynamic text box with the instance name health. We then need to set all our variables.
So, on the frame we will need to add:
score.text=0;
health.text=100;
Then on our obstacles we need to check if the health is smaller than or equal to 0, which is italics (you only need this on one obstacle) then we need to check that they are not dead before we set health down, so insert this:
onClipEvent (enterFrame) {
  if (this.hitTest(_root.char)) {
  if (_root.health.text<=0) {
  _root.dead = true;
  }
  if (!_root.dead) {
  _root.health.text -= 5;
  _root._x = 0;
  …
  …
  _root.char.speed = 0;
  }
  }
}
And we need to make the health move with the screen, so with the character edit in:
if (dir == "right" && !_root.leftblock.hitTest(this._x+20, this._y, true)) {
  _root.health._x += speed;
  _root.score._x += speed;
  this._x += speed;
  _root._x -= speed;
}
if (dir == "left" && !_root.rightblock.hitTest(this._x-20, this._y, true)) {
  _root.health._x += speed;
  _root.score._x += speed;
  this._x += speed;
  _root._x -= speed;
}
To set the health up with a pickup you would put _root.health.text += 1 instead of the score so:
onClipEvent (enterFrame) {
  if (this.hitTest(_root.char)) {
  _root.health.text += 1;
  unloadMovie(this);
  }
}
Now we get to the hardest part of the whole game, being able to pick up, and
then shoot a gun. From the start, when I was creating my gunning abilities:
First of all, I drew my picture of a gun, made that a MC, and gave it a code a
code similar to the pickup items codes but setting a variable (gotgun) true, and
then this is later checked and if it is true it will fire.
Here it is:
onClipEvent (enterFrame) {
  if (this.hitTest(_root.char)) {
  _root.gotgun = true;
  unloadMovie(this);
  }
}
I then had to draw in my shooting frames into my character MC, and then gave it a frame label of shoot. After that I added in 2 points of codes to my character.
onClipEvent (load) {
  jumping = true;
  speed = 0;
  maxmove = 15;
  jump = 0;
  _root.maxshoottime = 100;
}
onClipEvent (enterFrame) {
if (!_root.ground.hitTest(this._x, this._y, true) && !jumping) {
this._y += 6;
jump = 0;
jumping = true;
}
if (!_root.shooting) {
_root.timer = 0;
_root.mvsp = _xscale/20;
}
…} else if (Key.isDown(Key.CONTROL)) {
this.gotoAndStop("attack");
attacking = true;
speed = 0;
} else if (Key.isDown(Key.SPACE)) {
if (_root.gotgun == true && !_root.shooting) {
_root.attachMovie("bullet", "bulleter", 1, {_x:_root.char._x, _y:_root.char._y-25});
_root.shooting = true;
with (_root.bulleter) {
onEnterFrame = function () {
if (_root.timer>_root.maxshoottime) {
_root.shooting = false;
unloadMovie(this);
}
_root.timer++;
_x += _root.mvsp;
};
}
speed = 0;
this.gotoAndStop("shoot");
}
} else if (speed<1 && speed>-1 && !attacking) {
…You now have to draw your bullet. Once you have drawn it press F8 to make it a MC. Then open your library, find your bullet, Right-click it, go to linkage and click it. Then select the checkbox next to “Export for Action Script”. Now go to the Identifier field and type bullet.
One final thing is, you may notice that after a while of playing your game
all your objects go out of place. To fix that you would insert in a code to
re-enforce them. To re-enforce objects when moving your _root timeline you need
to set their x position to the position in which they started at minus the
current position of the _root.
So for that you need to place in a code into your characters load actions to get
the starting x co-ordinates of your objects. We will also get the y position of
your character for when he dies.
onClipEvent (load) {
  jumping = false;
  speed = 0;
  maxmove = 15;
  healthX = _root.health._x;
  scoreX = _root.score._x;
  Xpos = this._x;
  Ypos = this._y;
  _root.maxshoottime = 100;
}
And in the enterFrame events you re-enforce their positions:
onClipEvent (enterFrame) {
  _x = Xpos-_root._x;
  _root.score._x = scoreX-_root._x;
  _root.health._x = healthX-_root._x;
  if (!_root.ground.hitTest(this._x, this._y, true) && !jumping) {
  ---
Test, and you should now have a nice platform game! If you have any questions, feel free to post them on the kirupaForums.
 |
Nathan Stockton |
 |
Just a final word before we wrap up. What you've seen here is freshly baked content without added preservatives, artificial intelligence, ads, and algorithm-driven doodads. A huge thank you to all of you who buy kirupa's books, became a paid subscriber, watch the videos, and/or interact on the forums.
Your support keeps this site going! 😇

:: Copyright KIRUPA 2026 //--