 Tutorials
Books
Videos
Forums
Tutorials
Books
Videos
Forums


This is an archived tutorial from the kirupa.com legacy collection. It covers software that may no longer be available, but it is kept online because the ideas still hold up.
Hardly a day goes by where I do not come across a really cool Flash site that features a background that loads randomly when loaded. Each time you press Refresh, the page loads, and, you guessed it, a new background appears! This seems simple doesn't it? A variable randomly assigns a number, and that number then plays a corresponding keyframe in a movie clip with background images stored in numerous keyframes.
As it is true in anything Flash related, there is a wrong way and a right way to create a randomly loading background. The method I outlined above is easy, but the more efficient method I will explain in this tutorial is far easier.
[ reload this page to see a new background image ]
There are several parts to making the above animation - both of which are relatively simple. The first part involves converting background images into a SWF movie.
Transferring a JPG to SWF:

[ use the above image ]

[ all the animations are
stored in the same folder ]
You may be wondering why you had to first
learn how to convert a jpg into a swf, and then why I
suddenly decided for you to download the SWF instead. The
reason is, I wanted you to know how to make a JPG into a SWF
using Flash MX, and I did not want to hassle you with having
to find five more images and converting to Flash.
|
|
note |
| When naming the SWF for the background images, make sure you end them with a number that signifies the order in which they were created. The first image would end in a zero, the second image would end in a one, etc. In Flash, all numerical lists, etc. start with a zero. While the first image would be a "one", it is actually a "zero". You will understand more as you progress through the tutorial. | |
Now that you have the background images (in the SWF) format downloaded to a folder, we will randomly load the images when the animation you create loads:

[ the convert to symbol dialog box ]

[ the scene 1 tab ]
I think this calls for a short break. Once you are ready, press the next section link below:
 |
Now that we finished adding the movie clip, your movie clip should look like a hollow circle:

[ the empty movie clip should look like a hollow circle ]
Let's continue on with the rest of the steps:
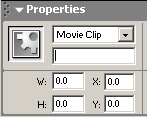
[ enter a zero in the w, h, x, and y fields in the movie clip's properties ]
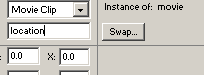
[ give an
instance name to the movie clip (hollow circle) ]
                      choice = Math.round(Math.random()*5);

switch (choice) {

case 0 :

 location.loadMovie("image0.swf");

 break;

case 1 :

 location.loadMovie("image1.swf");

 break;

case 2 :

 location.loadMovie("image2.swf");

 break;

case 3 :

 location.loadMovie("image3.swf");

 break;

case 4 :

 location.loadMovie("image4.swf");

 break;

case 5 :

 location.loadMovie("image5.swf");

 break;

}
[ copy and paste the above code in a blank keyframe of your movie ]
I have compiled a list of questions people have asked regarding this effect, and I have provided my answers to those questions.
                      on (release) {

 choice = Math.round(Math.random()*5);

 switch (choice) {

 case 0 :

  location.loadMovie("image0.swf");

  break;

 case 1 :

  location.loadMovie("image1.swf");

  break;

 case 2 :

  location.loadMovie("image2.swf");

  break;

 case 3 :

  location.loadMovie("image3.swf");

  break;

 case 4 :

  location.loadMovie("image4.swf");

  break;

 case 5 :

  location.loadMovie("image5.swf");

  break;

 }

}
You are using the exact same code as the one you used in the tutorial, but the above code has the button's on (release) handler to ensure that the code works when the user clicks on the button.
This concludes this version of the tutorial. Click the download source link below to download the final source code for this tutorial:
 |
 |
Just a final word before we wrap up. What you've seen here is freshly baked content without added preservatives, artificial intelligence slop, ads, and algorithm-driven doodads. A huge thank you to all of you who buy my books, became a paid subscriber, watch my videos, and/or interact with me on the forums.
Your support keeps this site going! 😇


:: Copyright KIRUPA 2026 //--
