This effect is a prolongation of the draggable menu effect,
and since both effects have a lot in common, I will not
explain everything. That's why I'd recommend you to complete
the draggable menu tutorial before you start this one.
Take a look at the effect:
[
Just click on the buttons to see the effect ]
The main idea:
There are 2 very important things in this effect : the clip
that is going to scroll, and the buttons that clip.
Basically, this is how this effect functions : by pressing
on the buttons, you set a destination that you have
calculated with your little hands, and then the clip goes
there with Actionscript. The difference between that effect
and the draggable menu is that the destination was set by
the position of the dragger, whereas now it is set
automatically. But the idea is exactly the same.
The tutorial:
When you open the .fla, you'll see 3 layers, buttons,
mask and fond. On the fond layer,
there's a large clip containing 4 numbers. If you open your
library, you'll find it under the name clipgeneral.
On the mask layer, you'll find a mask, a movie clip
in fact, called mask in the library.
On the
buttons layer, there is an instance of clipgeneral,
called scroller in the library, only it has been
resized to 1/10. Actually, it is not an instance of
clipgeneral, but a clip containing a small instance of
clipgeneral.
Now, what we want is to click on that scroller, and
make clipgeneral move. You sense that somehow we are
going to have to put buttons inside scroller.
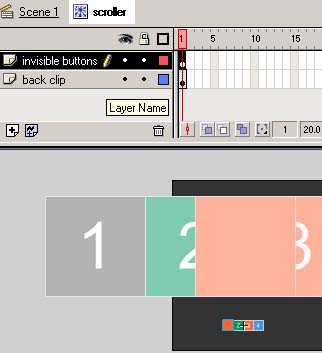
Edit scroller by double clicking it, or right
clicking it and choosing "edit in place". You can now see
that the rest of the scene has faded. There's one layer in
the timeline called backclip that contains a small
instance of clipgeneral.
Open your library with Ctrl + L. There is a button called
button. It has the same size as one little square so
that it covers it perfectly. Create a new layer that you
will name invisible buttons. Drag and drop in that
layer an instance of button, and put it on top of the
1 of the scroller. Don't hesitate to zoom in (View
> Zoom in) as much as you need to see what you're doing.
Check out the orange button on top of 1
Do the same for all the numbers, so that you don't see the
scroller anymore. Save your work.
Now select any of your buttons, and open the Effect
panel, choose Alpha and set it to 0. Do the
same for all the buttons. We can now see the scroller
under the buttons.
Now we have all the objects we need on the stage. Time to
write some code ! Open the Actions panel of the first
button. (Remember that we are presently in Scene1, editing
the scroller movie clip, in which there are 2 layers.
To open the Actions panel, right click on a button and
choose Actions, or click on the blue arrow at the
bottom right of the screen). Click inside the window and
press Ctrl + E to switch to Expert Mode. Put the code :
That code sets a new destination xnew for
clipgeneral. _root.xnew =
_root.mask2._x +(4-1)*100/2; sets the destination to
the current position of mask2 plus a certain offset.
In the second button, just replace 4 by 2, and
so on (0, and then -2). If you've completed
the Dragging menu tutorial, everything is similar
from this point on. If there's something I overlook, just go
to that tutorial, you should find an explanation.
Now click at the Scene 1 vignette. You're back at
the root of your scene. We have to put that mask2
thing or Flash won't know where to go. On top of the
buttons layer, create a layer called mask position.
Drag an instance of mask from the library on that
layer. Make it match exactly the position of mask
with the Info panel. Open the Instance panel
and give it the name mask2. There it is ! Now open
the Effect panel and set the alpha to 0.
Lock the layer because you won't be modifying it. Save your
work.
We want to use the variable xnew from
clipgeneral because it is the destination it has to go
to. Click on clipgeneral and open the Actions panel.
In expert mode, copy that code :
Save your work. Now save it under a new name, because I'd
like to see what we're doing here. In that copy, delete teh
mask layer. Test your movie now. When you click on
the buttons, you should see the right numbers appear. Do you
see what's happening now ?
You can finish your work with that file and add the mask
at the end (more interesting), or with the first one. We
need to make the transition between frames a little bit more
fluid, so we'll change the code we just wrote in
clipgeneral. Make that :
In the
onClipEvent (enterFrame) handler, we just made so
that the clip gets to his new position little by little,
adding to its position 1/10 of the way it has to go.
In the
onClipEvent (load) handler,
we make so that when the clip loads, the 1 appears.
Save your work. If you didn't delete the mask, set it as
a mask of the layer fond. Everthing should work fine
now. But to make it clearer, you can decide to declare
functions, or even movie clip prototypes, like I did in the
other tutorial. Anyway I leave this part to you.
You can find here all the source code of that sliding menu.
This
tutorial is written by Ilyas Usal. Ilyas is also known as
ilyaslamasse
on the
kirupa.com forums!
![0]](http://www.ezboard.com/intl/aenglish/images/emoticons/alien.gif)


