


This is an archived tutorial from the kirupa.com legacy collection. It covers software that may no longer be available, but it is kept online because the ideas still hold up.
You might be wondering what a gradient art is. It is simply any design piece whose main feature is a gradient or collection of gradients. The following OS X wallpaper is a popular example of this style:
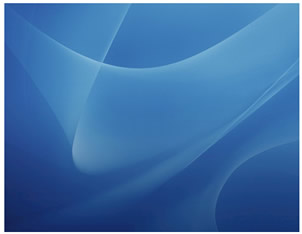
The above image can easily be re-created using Flash, and we will try to get something close to it in this tutorial. Before I proceed, let me display the few drawing tools that you might use.
You can find the following icons in your Tools toolbar:
 |
Fill Allows you to change your shapes' fill color. |
 |
Gradient Transform Tool When you select a gradient fill and click on this toolbar item, you can change the orientation and spread of your gradient beyond the default horizontal effect. |
 |
Resize/Skew/Rotate Any selected shape can be resized, skewed, and rotated when this toolbar item is selected. |
 |
Pencil The pencil allows you to draw freehand on your stage. |
 |
Draw Rectangle You can draw a rectangle using this tool. |
 |
Draw Line Allows you to draw a straight line. |
 |
Envelope Allows you to skew and transform your rectangle in non-linear ways. |
Basically, from my view, the above image can be recreated using gradient colors and transparencies. With that in mind, let's proceed.
First, set your background to be a solid color. I'll use a darker shade of blue:

Now, let's create a shape. To create a shape, you can start with whatever you are comfortable with. You may use the pen tool or create some basic shape and then modify it. I created a rectangle and created a curve by dragging the right edge of it:

After a shape is created, now it is time to give it a gradient fill color. You can change the gradient settings from the Color Mixer panel. Here, I have selected a lighter color than what I had for the background. On the left side, I set the alpha to 0, and on the right side, I set alpha to 33:

Feel free to use whichever colors you want. Regardless of which colors you picked, you will notice that you have now created a fading gradient. A fading gradient essentially means that the one side of the gradient will tend to blend to the original background color thanks to our low Alpha setting.
After you have your gradient setup, the shape you created will reflect the new color. If it has not, select the Fill Color tool from the toolbox and click on the shape you created to give it the gradient fill:

Let's add a few more shapes and gradients in the next section!
Now, similar to how you created a shape in the previous section, create another shape (or as many as you want). I created second shape that looks similar to the shape I drew earlier.

Right now, the gradients are moving horizontally. You can tell by the vertical bands in the above image. By playing with the Gradient Transform Tool, I was able to create a more obvious fading effect by rotating the gradient and shrinking the spread:
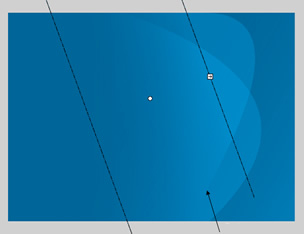
Now draw a shape like what is shown below using the rectangle, pen tool, line tool, or whatever you find easier. What we are trying to do is create an outline to enclose a odd curved shape.
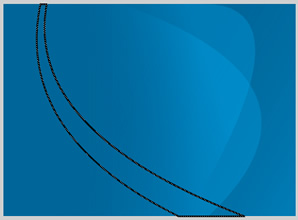
With that done, select the inside of the shape. You will find that your selection area is the same as that of the area enclosed by the outline shape you just created. Let's create another gradient; except this time, we will be using three colors.
The following image should help:
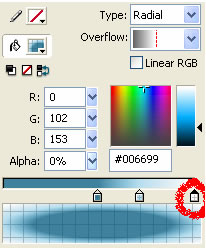
The selected area should now have the gradient applied to it. If it doesn't, use the Fill Tool to set it in. If you step back and look at your image, it should have a gradient effect similar to the image you saw on the first page:
In order to create more realistic gradients, you will need to look outside of Flash and into a program such as Photoshop. Some of the built-in effects make creating the above image a snap.
I hope the tutorial helped. If you have questions, post them on the kirupa.com Forums.
Best Wishes,
 |
Maulik |
Just a final word before we wrap up. What you've seen here is freshly baked content without added preservatives, artificial intelligence, ads, and algorithm-driven doodads. A huge thank you to all of you who buy kirupa's books, became a paid subscriber, watch the videos, and/or interact on the forums.
Your support keeps this site going! 😇

:: Copyright KIRUPA 2026 //--