 Tutorials
Books
Videos
Forums
Tutorials
Books
Videos
Forums


This is an archived tutorial from the kirupa.com legacy collection. It covers software that may no longer be available, but it is kept online because the ideas still hold up.
The thing that got me into Flash many many years ago is learning how to make things move using code. One of the first things I ever did was have circles move around the screen...randomly. Random movement is fun because it isn't boring. Unlike animations where things move in a pre-defined fashion, the technique you will learn in this deconstruction article will help you create animations that are more life-like and unpredictable.
The following is the example whose code I will deconstruct in this article:
[ click the green Refresh icon to see the pre-loader in action again ]
While you won't be creating an application from scratch, you will still learn some interesting details on how to make things animate to a random destination using nothing but a single movie clip and less than 100 lines of code.
First, go ahead and download the source for the Flash CS5 application:
Once you have downloaded the files, extract all of them to a location on disk. You should see four files:
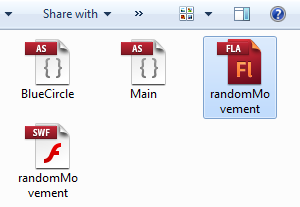
[ your extracted files ]
Launch Flash CS5 and go ahead and open randomMovement.fla (or randomMovementCS4.fla if you are using Flash CS4) and the two AS files BlueCircle and Main. Once you have done this, you have an exact copy of the application whose output you saw happily moving around earlier.
Switch into your FLA file randomMovement and Press Ctrl + Enter (Control | Test Movie | Test):
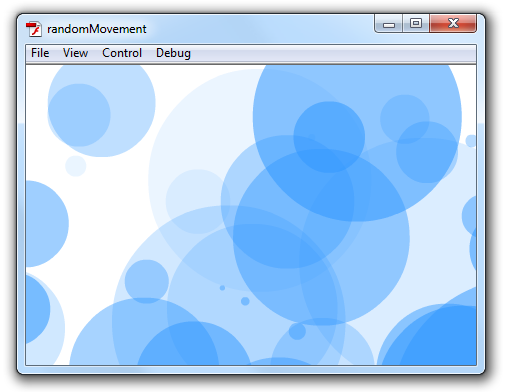
[ the circles are moving randomly! ]
You should see on your Flash player a replica of the randomly moving blue circles you saw earlier.
Deconstructions are only fun if you understand end-to-end how everything fits in. This article is divided into several sections alternating between describing code and taking a higher level look at what is being done. With that, let's start with our first attempt at describing what is going on:
At the very beginning, the application loads a blue circle that you had drawn and converted into a MovieClip. This MovieClip has a class associated with it, and that class is called BlueCircle. What this means is that if you instantiate a BlueCircle object in code and add that to your stage, a lovely blue circle will greet you when you run your application.
Getting the circles to display, and getting them to move are two separate things each handled in their own class file. Getting the circles to display is handled by Main.as, and the Main class is the document class for your Flash file.
Once a BlueCircle object is added to your stage, everything from randomly positioning itself initially to moving to a random destination are specified entirely within the BlueCircle class.
In the next few pages, let's take the above summary and dive much deeper into how exactly it was done.
In the previous section, you learned a little bit about what it is that you will be seeing deconstructed. In this page, you will hopefully learn a lot more about what it is that you will be seeing deconstructed!
The first thing we are going to do is look at how the circles make their way from your Library and into your Stage. All of that is handled in the Main class, and this class lives in Main.as:
package
{
  import flash.display.MovieClip;
  public class Main extends MovieClip
  {
  public function Main()
  {
  PopulateCircles();
  }
  private function PopulateCircles():void
  {
  for (var i:int=0; i < 50; i++)
  {
  var blueCircle:BlueCircle = new BlueCircle();
  this.addChild(blueCircle);
  }
  }
  }
}
The reason this class automatically runs when your application loads is because this isn't a normal class. It is our document class which is associated with the FLA file:
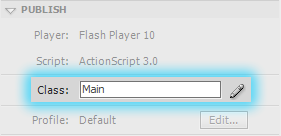
[ where your Main class is being defined ]
If you don't know anything about what the document class is, just note that it is what gets run automatically when your application loads. The full tutorial (Document Class) will give you more information on it.
The first thing that happens when your Main class gets instantiated is that the constructor runs:
public function Main()
{
  PopulateCircles();
}
The only thing our constructor does is call the PopulateCircles function:
private function PopulateCircles():void
{
  for (var i:int=0; i < 50; i++)
  {
  var blueCircle:BlueCircle = new BlueCircle();
  this.addChild(blueCircle);
  }
}
As its name implies, the PopulateCircles function is responsible for actually getting the circles displayed on screen. That is done by using a for loop that creates the BlueCircle objects and adds them to the root of our stage.
The BlueCircle class is nothing more than a movie clip of a blue circle that I have stored in my Library:
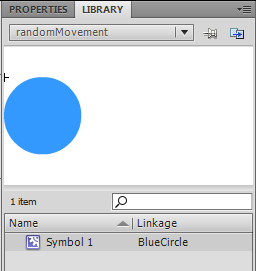
[ where the BlueCircle lives ]
With the BlueCircle objects instantiated, what remains is to have it be displayed on our stage. That is handled by the following line:
this.addChild(blueCircle);Each time the code inside the loops runs, the above line line gets called, and another BlueCircle object is created and added for display on the stage. Speaking of times the above line gets called, that is entirely controlled by the for loop itself. In this case, The loop simply goes from 0 to 49:
private function PopulateCircles():void
{
  for (var i:int=0; i < 50; i++)
  {
  var blueCircle:BlueCircle = new BlueCircle();
  this.addChild(blueCircle);
  }
}
This means that 50 circles are added to your application. You can adjust this number up or down to change the number of circles that you want to deal with. While having a large number of circles may seem really cool, it can bring your animation to a crawl on slower machines.
That is all there is to the Main class. Its main (ha!) job is to get all of the BlueCircle objects added to your stage. From there, each BlueCircle is responsible for itself. Let's look at how they are so responsible starting in the next section.
In the previous section, we covered the all important Main class that has the distinctiction of being responsible for getting your circles to display on the stage. In this page, let's look at the BlueCircle class that is responsible for actually getting the displayed circles to move around.
While the Main class is responsible for getting the blue colored circles to appear, it is the blue circle itself that handles moving from one random location to another. All of the code for the blue circles resides in the aptly named BlueCircle.as file:
package
{
  import flash.display.MovieClip;
  import flash.events.Event;
  public class BlueCircle extends MovieClip
  {
  private var newX:Number = 0;
  private var newY:Number = 0;
  private var speed:Number;
  private var speedX:Number;
  private var speedY:Number;
  private var totalDistance:Number;
  private var previousDistance:Number = 0;
  private var currentDistance:Number = 0;
  public function BlueCircle()
  {
  this.addEventListener(Event.ADDED_TO_STAGE, Setup);
  }
  private function SetNewPosition()
  {
  this.newX = this.GetRandomXPosition();
  this.newY = this.GetRandomYPosition();
  this.totalDistance = GetDistance();
  var time:Number = this.totalDistance / this.speed;
  speedX = (this.newX - this.x)/time;
  speedY = (this.newY - this.y)/time;
  }
  private function Setup(e:Event)
  {
  this.x = this.GetRandomXPosition();
  this.y = this.GetRandomYPosition();
  this.alpha = .1 + Math.random() * .5;
  this.scaleX = this.scaleY = .1 + Math.random() * 5;
  speed = Math.round(.5 + Math.random() * 5);
  this.addEventListener(Event.ENTER_FRAME, MoveCircle);
  }
  private function GetRandomXPosition():Number
  {
  //
  //basic formula: Math.floor(Math.random()*(1+High-Low))+Low;
  //
  return Math.floor(Math.random() * (1+ (stage.stageWidth + this.width) + this.width) - this.width);
  }
  private function GetRandomYPosition():Number
  {
  //
  //basic formula: Math.floor(Math.random()*(1+High-Low))+Low;
  //
  return Math.floor(Math.random() * (1+ (stage.stageHeight + this.height) + this.height) - this.height);
  }
  private function GetDistance():Number
  {
  return Math.sqrt(Math.pow(this.x - this.newX,2) + Math.pow(this.y - this.newY,2));
  }
  private function MoveCircle(e:Event)
  {
  this.previousDistance = this.currentDistance;
  this.currentDistance = this.GetDistance();
  if (this.currentDistance < this.previousDistance)
  {
  this.x += this.speedX;
  this.y += this.speedY;
  }
  else
  {
  this.SetNewPosition();
  }
  }
  }
}
Don't let the size of the code scare you. We'll break it up piece by piece and explain how exactly it does what it does. First, let's just look at some basic things in the code that can be explained easily without you having to understand how our algorithm for moving you randomly works.
At the very top of this file are the various variables that store the information that makes your circles come alive:
private var newX:Number = 0;
private var newY:Number = 0;
private var speed:Number;
private var speedX:Number;
private var speedY:Number;
private var totalDistance:Number;
private var previousDistance:Number = 0;
private var currentDistance:Number = 0;
I will not describe them here, but instead, I will call them out as appropriate when they are actually being used in our code.
The first piece of code that runs, obviously, is the constructor:
public function BlueCircle()
{
  this.addEventListener(Event.ADDED_TO_STAGE, Loaded);
}
The only thing that I do here is associate the Added to Stage event with an event handler called Setup. As the name implies, this event gets fired when this BlueCircle object gets added to the stage via the addChild method you saw earlier. This is important because we want to defer doing any work involving the rest of the application until this object is actually added to the visual tree. Otherwise, your code may be calling for properties that are simply not accessible or storing anything useful besides null.
The code that gets called once your BlueCircle object gets added to the stage is the Setup event handler:
private function Setup(e:Event)
{
  this.x = this.GetRandomXPosition();
  this.y = this.GetRandomYPosition();
  this.alpha = .1 + Math.random() * .5;
  this.scaleX = this.scaleY = .1 + Math.random() * 5;
  speed = Math.round(.5 + Math.random() * 5);
  this.addEventListener(Event.ENTER_FRAME, MoveCircle);
}
The first thing we do is position our object in a random location. That is handled by the following lines of code:
this.x = this.GetRandomXPosition();
this.y = this.GetRandomYPosition();
The GetRandomXPosition and GetRandomYPosition functions return a random number that is used to position our BlueCircle appropriately. The Random Numbers in Flash tutorial describes how a random number is generated, so I will not cover that in great detail here.
Related to the position, we also specify the alpha (transparencey), scale, and speed with some random values as well:
this.alpha = .1 + Math.random() * .5;
this.scaleX = this.scaleY = .1 + Math.random() * 5;
speed = Math.round(.5 + Math.random() * 5);
There is nothing too scary or complicated going on so for. All of the lines you have seen so far in the Setup function (event handler actually) have just been about initializing some of the variables you saw earlier. Don't worry - you'll start to see some more action shortly.
The last thing that happens inside the Setup function is that we associate the Enter Frame event with an event handler called MoveCircle:
this.addEventListener(Event.ENTER_FRAME, MoveCircle);The ENTER_FRAME event gets fired at each frame tick, so as you will see in the next section, it is what is responsible for smoothly animating our BlueCircle object.
Ok, we've pretty much gone as far as we can without explaining the algorithm for randomly moving circles. Let's take a break from deconstructing code and take a better look at what exactly we are doing.
In the previous section, you started to get a feel for the things the BlueCircle class does. In this page, let's take a detailed look at the approach used for moving our circles from one position to another. Otherwise, the rest of the code will make no sense.
At the very beginning (between the 4th and 5th day of Creation), the circle gets placed in a random location on the stage:
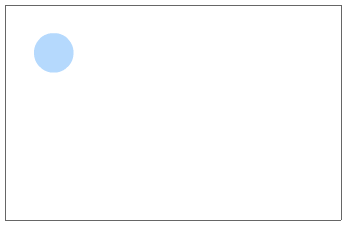
Once its initial position has been set, the next thing to calculate is where its random destination is going to be. Let's represent the random destination by a gray, dotted circle:
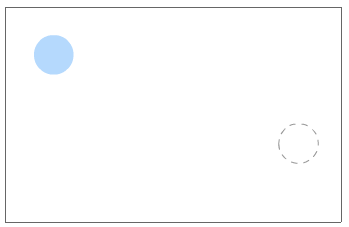
We are almost half way there now! With the start and destination picked, the next step is to calculate how far we have to go. That is done by calculating not only the straight line distance but also the horizontal and vertical distance the circle needs to traverse:
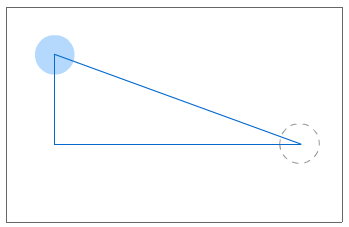
The goal is to have, at each frame tick, our circle get one step closer to reaching the destination that is represented by the dotted circle. The path the circle would take in our example is shown below:
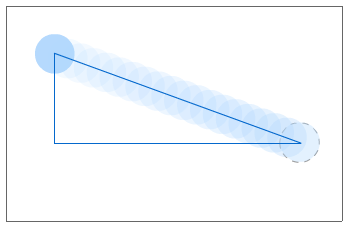
To elaborate a bit more on our goal, we need to ensure that after a specified period of time, the circle does reach its destination. That is done by simultaneously moving our circle both horizontally as well as vertically. The only tricky part is figuring out by how much to move/increment our circle in each of the horizontal and vertical directions.
The level of incrementing cannot be equal. The reason is that, as shown in this example, your circle may have a greater horizontal distance to cover as opposed to a vertical distance. This means that we need to calculate by how much to move horizontally and vertically so that, in the end, our circle has reached its destination.
Surprisingly, calculating that is fairly straightforward. It just requires some simple manipulation of ratios and a very basic understanding of physics. First, let's figure out the time it will take to travel in a straight line from your origin to the destination.
If you recall from Physics, when everything is linear like it is in our example, the value for time is distance divided by the speed:
time = distance / speedThis means that, no mattter what happens, we will need to ensure that our circle hits its destination in the alotted time. Once you have this figured out, everything else falls into place. If the equation for time is what is shown above, the equation for speed is basically:
speed = distance / timeI just moved some stuff in the equation around to get that. For the horizontal speed, the equation can be elaborated as follows:
speedX = (startXPosition - endXPosition) / timeThe distance you have to travel horizontally is the circle's current horizontal position subtracted by the circle's final horizontal position. The time is something you calculated earlier. Divide those numbers up, and what you have in the end is the horizontal speed that you need to travel at each time tick. If you had to visualize it, what you will see is little segments whose width is a representation of the horizontal speed:
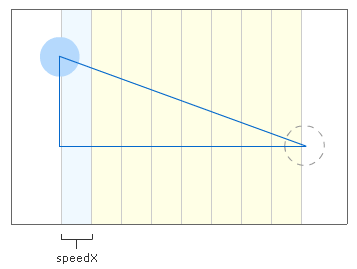
At each frame tick, we will need to move our circle by that amount.
Let's look at the vertical side of things next. The way you calculate the vertical speed is almost identical to what you did for calculating the horizontal speed. Continuing the earlier logic, the vertical speed can be found by:
speedY = (startYPosition - endYPosition) / timeThe equivalent visualization would look as follows for the vertical movement:
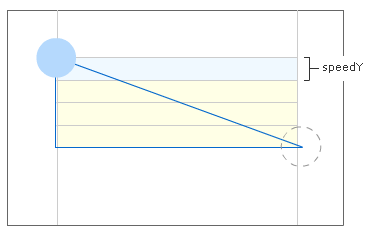
Putting it all together, at each frame tick (which is 24 times a second by default), our circle will move a unit of horizontal and vertical distance that corresponds to the speedX and speedY values.
In the next section, you will see how the code we've written corresponds to the behavior described in this page.
In the previous section, you started to get a better understanding of the things the BlueCircle class does. In this page, we put words into code and explain how what you learned in the previous section applies to what is actually in your BlueCircle class.
The function that is responsible for getting our circles to move at each frame tick is MoveCircle, and that is largely also because this function is the event handler for the enterFrame event:
private function MoveCircle(e:Event)
{
  this.previousDistance = this.currentDistance;
  this.currentDistance = this.GetDistance();
  if (this.currentDistance < this.previousDistance)
  {
  this.x += this.speedX;
  this.y += this.speedY;
  }
  else
  {
  this.SetNewPosition();
  }
}
The first two lines are pretty interesting:
previousDistance = this.currentDistance;
currentDistance = this.GetDistance();
What I am trying to do with these two lines is get a gauge for whether the circle has reached its target or not. The way I do that is by measuring how far my circle has to go now compared to how far it had to go a frame ago. That is done by using two variables (previousDistance and currentDistance) to cycle an old and new value between each other. When the circle is approaching its target, its current distance will be less than its previous distance from earlier because one would assume that it has moved towards target in that frame. Using these two values, I can gauge whether the circle has reached its destination or not. This approach is similar to what I employ in the Detecting Direction of Mouse Movement in AS3 tutorial.
In the first line, I set previousDistance's value to be what the value of currentDistance was earlier. In the next line, I set the currentDistance variable's value to the current distance between where the circle is and where it goes. That is calculated via the GetDistance function. Let's look at that next:
private function GetDistance():Number
{
  return Math.sqrt(Math.pow(this.x - this.newX,2) + Math.pow(this.y - this.newY,2));
}
The GetDistance function returns the distance between two points...Pythagorean style. I am not going to describe the Pythagorean theorem in this article, but just know that it is what is used to find a straight line distance given two x,y coordinates. What I am doing is providing the net horizontal and vertical coordinates.
If everything goes as planned, each time this function is called, the distance will be a little bit less than what it was earlier because your circle is hopefully getting closer to your destination.
Ok, let's go back to our MoveCircle function:
if (currentDistance < previousDistance)
{
  this.x += this.speedX;
  this.y += this.speedY;
}
else
{
  SetNewPosition();
}
There is an if statement that checks whether the value of currentDistance is less than previousDistance. This is done to ensure that you are still making progress towards reaching the destination. As long as your circle is approaching its destination, this answer will always be true.
When this statement is true, we increment the current X and Y position by the speedX and speedY values:
if (currentDistance < previousDistance)
{
  this.x += this.speedX;
  this.y += this.speedY;
}
else
{
  SetNewPosition();
}
You will see more about the speedX and speedY variables shortly.
When the if statement is false, we call the SetNewPosition function:
if (currentDistance < previousDistance)
{
  this.x += this.speedX;
  this.y += this.speedY;
}
else
{
  SetNewPosition();
}
The false will occur only when currentDistance is greater than or equal to the value stored by previousDistance. Do you know when something like that happens? A situation like this happens when our circle has reached its destination and is now moving past it. The moment that happens, this if statement will trigger a false and the SetNewPosition will get called.
The SetNewPosition function is pretty awesome in its own way, so let's take a look at that in the next section!
In the previous section, you started to receive the inside scoop on how our MoveCircle function helps move the circle along its randomly chosen path. In this page, we will look at the SetNewPosition function which gets called once our circle has reached its destination.
Once our circle has hit its destination, the next thing is to pick a new destination that the circle can happily bounce off to. The picking of the new destination is controlled by the SetNewPosition function:
private function SetNewPosition()
{
  this.newX = GetRandomXPosition();
  this.newY = GetRandomYPosition();
  this.totalDistance = GetDistance();
  var time:Number = this.totalDistance / this.speed;
  speedX = (this.newX - this.x)/time;
  speedY = (this.newY - this.y)/time;
}
This function is basically responsible for specifying the new destination and resetting any variables needed to get there. Obviously, the first two things we do in a function called SetNewPosition is specify a new X and Y position:
this.newX = GetRandomXPosition();
this.newY = GetRandomYPosition();
This uses the GetRandomXPosition and GetRandomYPosition functions that you briefly saw earlier to get you the new destination.
Next, now that we set the new X and Y positions, it is time to calculate the total distance from where you are now to where you need to be going:
this.totalDistance = this.GetDistance();That is handled by the GetDistance function that uses the Pythagorean theorem to get you to your destination, and the value returned by the GetDistance function is stored in the totalDistance variable.
With your distance now calculated, you can figure out what the total time will be by using your pre-existing value of speed:
var time:Number = this.totalDistance / this.speed;By now, all of this should look very familiar. You saw a higher-level overview of this when describing the algorithm used to make the circle actually move. The algorithm materializes to a large degree here!
The next two lines are where speedX and speedY are calculated:
speedX = (this.newX - this.x)/time;
speedY = (this.newY - this.y)/time;
They correspond to the following two images you saw earlier:
Our MoveCircle function is where the position changes are actually made. The SetNewPosition function is what sets the various variables used by MoveCircle to make it all move. Putting them both together, you get a well-oiled machine that can moves your circles around randomly.
Well, that's all there is to this tutorial...well, deconstruction. As you can see, making things move to a random position seems difficult, but like most things, is actually quite simple once you have a basic understanding of how it all works.
This is one of my favorite examples to showcase how you can use code to create some beautiful motion, and hopefully you found learning how this all works to be equally as rewarding as I found it fun to write.
Just a final word before we wrap up. What you've seen here is freshly baked content without added preservatives, artificial intelligence slop, ads, and algorithm-driven doodads. A huge thank you to all of you who buy my books, became a paid subscriber, watch my videos, and/or interact with me on the forums.
Your support keeps this site going! 😇


:: Copyright KIRUPA 2026 //--