If
you are going to be creating games in Flash, you will need
to learn how to allow the user to move an object around on
the screen. While we could use drag and drop, but where's
the fun in that?? You will learn in this tutorial how to
move an object across the screen by using the arrow keys in
your keyboard.
You will have created
something like this by the time you reach the end of this
tutorial:
[ Click
anywhere in the animation and use your arrow keys to move
the circle around. ]
I will first tell you what
code to input to create something similar to the above
animation, and I will explain the logic behind the code near
the end of the tutorial.
The following instructions will help you in making an object
(movie clip) move around in the screen:
Instead of making you create the interface, I will provide
the interface for you:
Download the partial source code by clicking here.
Don't worry, the FLA you just downloaded does not include
the coding and other goodies. You will do that yourself by
following this tutorial.
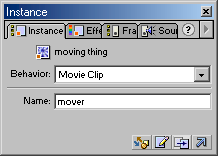
Once you have opened the FLA file, we can begin! Select
the circle and select the Instance panel. Give the circle
the instance name: mover
Now, right click on the circle and select Edit in Place.
You will see the circle again, except this time, as a
button instead of a movie clip.
Right click on the button (circle with the Edit in Place
command) and select Actions. Press Ctrl + E or select the
right arrow from the Objects Actions window and select
Expert Mode. Copy and paste the code found in the
following text box:
Once the code has been entered, click the Scene 1 tab
found on the top-left corner of Flash. You should be back
to the main timeline. Right click on Frame 1 and select
Actions. Copy and paste the following code (make sure you
are in Expert Mode [Ctrl + E]):
var h;
var v;
h = mover._x;
v = mover._y;
Preview the animation and you will be able to move the
little circle around by pressing the arrow keys.
Why the
Animation Worked Because you copied and pasted the code, I
will explain why the code worked so you can replicate this
cool technique in your own animations. I will explain each
line of the code:
var
h;
var v;
h = mover._x;
v = mover._y;
What I have done with above
code, is that I got the x and y position of the movie clip.
The movie clip is called mover, and the property for
generating the y value is designated as _y. The property for
generating the x value is designated as _x.
Why would I want to get the X
and Y values? The reason I want this information is because
when the movie clip is moved, there needs to be a method of
knowing where exactly to start moving from. If you didn't
have this code, when you press the Right arrow, the movie
would start at 0 on the X axis and then move right; even if
the original movie clip was located in the center of the
movie. The same is true for the Y axis movement. Without a
starting point, the movie clip's Y position would start at 0
regardless of where the movie clip is originally placed.
I declared the variables h
(horizontal) and v (vertical) so I can refer to the x and y
values of the movie clip when coding for the button.
on (keyPress
"<Left>") {
var x;
x = x-2;
lr = _root.h+x;
_root.mover._x = lr;
}
This is the first section of
code that was added to the button. While it may look
complicated, the code is really quite simple. For proof of
its simplicity press Ctrl + N on your keyboard for Normal
Mode. Most of these commands could be accessed from the
point and click Normal mode.
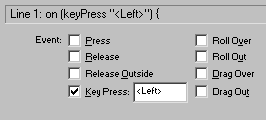
The first line is basically a
mouseEvent statement. You can access this by going to Basic
Actions | On Mouse Event. While normally, you would select
Release or Rollover, I selected the Key Press checkbox. I
then inserted the mouse cursor in the Key Press field (text
box) and pressed the Left arrow on the keyboard. You will
see something like this:
I declared the variable x in
the second line of code. Flash doesn't care if a variable is
declared prior to use, but I declared it anyway. The third
line of code is what is called an accumulator. This number
will increase or decrease according to the commands given to
it. Hit counters on Web sites work similarly except they are
set to: x = x + 1 where x is the number of visitors. In this
example, the value of
x
will continue to go down as the user pressed the left key.
The reason is, in a 360 degree circle, right of the y axis
is considered positive while the left side of the y axis is
considered negative. Because the left key is being pressed,
the value has to be negative.
The fourth line of code
introduces you to another variable,
lr.
Note that I did not declare this variable prior to use. In
this line of code, I am basically assigning a value to
lr
that is the value of
h
(the horizontal value of the movie) added to the value of
x
(the number of times the left key was pressed).
_root
is added before declaring the variable,
h,
because the variable
h
is stored on the main timeline. The final line declares what
lr
is to the movie clip for positioning. Notice that because we
are dealing with x values in the first frame, the _x is
displayed on the end. _y would be displayed for actions
corresponding to the up and down arrows, or vertical motion.
The remaining lines of code
work similarly, except there will be fewer lines of code
because there will be no need to re-declare the variables.
For the code that involves vertical motion, you will see the
variable v
from the main timeline declared as
_root.v.
Instant
Replay: Animation Walkthrough This section will help jog your memory on
how this animation works and why it works the way it does.
In the first frame of the timeline, the x and y values of
the movie clip, mover, is received. This is to ensure
that, when we code the movements, Flash knows where the
exact starting location of the movie clip is.
Edit in Place the movie clip
and view the actions for the button. In the first line, an
accumulator script checks to see how many times the left key
was pressed. Directly after that, another variable comes in
to check the value for the horizontal value by adding it to
the x value generated from the accumulator script. The final
line of code, assigns the position for the horizontal value
and x value to the movie clip, mover.
Just a final word before we wrap up. What you've seen here is freshly baked content without added preservatives, artificial intelligence, ads, and algorithm-driven doodads. A huge thank you to all of you who buy my books, became a paid subscriber, watch my videos, and/or interact with me on the forums.