|
by
kirupa | 10 August 2008
You have two ways of creating animations in Flash. You can create them using
the timeline, or you can create them using code. For code-based animations, I've
always written about using variants of EnterFrame. One thing I've never talked
about is using the tween class to create animations, and it's time to change
that with this tutorial. This tutorial is also an updated version of the
Flash 8 tutorial
that TheCanadian wrote a few years ago.
To see an example of what you will create, click anywhere in the following movie.
When you click, notice that the circle moves to the point of
your click:
The actual movement of the circle, including the slight
pull back, was created using just
one line of code thanks to the Tween class found in AS3.
In
this tutorial, I will explain how to use the Tween class to
create an animation using code. Before diving into the code
though, let's look at tweening using the timeline.
When you create an animation on the timeline, you do
several things. You set a keyframe to specify the starting
point, and you have something to animate on your
scene...such as a circle:
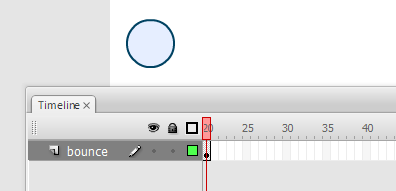
[ a starting keyframe with a target object that will be
animated ]
After you specify the starting point of your
animation, you need to specify your end point as well. For that, you
can move several frames ahead, insert another keyframe to
designate the end state, and modify your circle such as
moving it to the right:
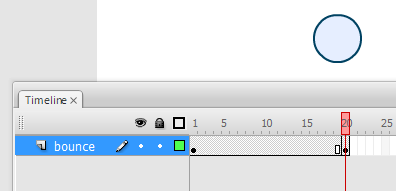
[ defining the end state of your animation ]
Right now, you have two keyframes - one at Frame 1 and another
at Frame 20. If you happen to scrub your timeline playhead
between those two frames, you will see nothing really
happening. You certainly don't see an animation.
To create an animation, right click on the keyframe on Frame 1, and
select Create Motion Tween. Once you have done that, scrub
your playhead again. Notice what you see when you are
in-between Frames 1 and 20:
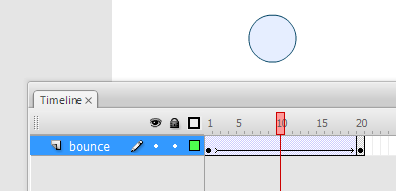
[ create a tween to create an animation ]
This time, you actually see the intermediate frames
generated between your starting and end frames located at
Frames 1 and 20 respectively. Now you have an animation!
Why did I spend this time explaining something that you
probably already knew? The reason is I want you to look at
what you did in greater detail. To create a tween, you need
a starting point and an end point. In our case, that was
designated by the keyframes you placed on Frame 1 and Frame
20.
The part where you go from having two discrete changes to
a smooth animation showing the transition between the
changes is where tweening comes in. Tweening is short for
in-betweening,
and true to its name, it is where you generate the intermediary
(in-between) frames that appear between your starting point
and end point. In our case, those intermediary frames show
the circle's progression from the left side at Frame 1 to
the right side on Frame 20. All of those frames that make up
the progression are taken care of automatically thanks to
tweening.
Ok, now that you saw with "renewed enthusiasm" the parts that
make up a motion tween when using the timeline, the rest of
this tutorial where I try to map between what you see here
and the code you'll see in the
next page will make a lot more sense.
Onwards to the
next page!
|


