 Reducing
File Size
Reducing
File SizeFlash is
known for publishing animations that do not take up a lot of
file space. The vector format of the Flash SWF file is ideal
for the Web because it uses math instead of actual images to
store animation elements. A 1 minute SWF will usually be
smaller in file size than a 1 minute GIF image because of
the use of math!
With all of the size reducing
capabilities of Flash, you will still come across bloated
animations on the Web. The animations that contain a BMP
image of their background, the full soundtrack of Final
Fantasy as the background music, and anything else the
animators could get their hands on.
This tutorial will address
how to reduce the file size for your movies. You will learn
how to compress images, customize sound, use vectorized
graphics, use fonts, and more.
Compressing
Images
A nice feature of Flash
is that images can be animated along with text and other
objects. What is not nice about Flash, is that the default
setting for optimizing and compressing images does not work
for all the images all the time. The following steps explain
how to optimize images individually in Flash instead of
using the global image compression setting found in the
Publish Settings window.
- Open an animation that contains several images.
- Go to Window | Library or press Ctrl + L.
The Flash Library will appear. Find an image file and
right click on it. Once the image has been right clicked,
select Properties from the menu that appears. The Bitmap
Properties window will appear.
- First, check to see if your image would look better as
a GIF/PNG or JPEG. If your image has a lot of colors, use
JPEG. If your image has fewer than 255 colors, use GIF/PNG.
You can change the image compression type by clicking the
Compression drop-down menu:
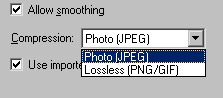
[ compression drop-down menu ]
- You can press the Test button to see how
your image would look in the image preview box located on
the top-left corner of the Bitmap Properties. To adjust
the JPEG compression settings for this image, make sure
you select Photo (JPEG) from the Compression drop-down
menu.
- Uncheck the box for either
Use Imported JPEG data or
Use Document default quality.
You will only see one of the two checkboxes displayed.
Once one of the aforementioned checkboxes is unchecked,
you will be provided a Quality field below the checkbox.
Enter a value that you want to set the compression to. You
can press the Test button to see how the image looks with
the current compression setting. Best of all, when you
press the Test button, you are provided with a size report
on the image you just compressed:
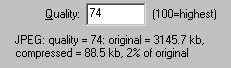
[ size report: the image had a 98%
file size reduction after compression ]
- You can select the Character tab from the
panel and adjust the text's font, weight, size, color, and
more.
The minor
settings for images are often overlooked by many developers.
Failing to set individual compression settings for images
often creates images that are either inflated or blurry.
Only by setting the compression setting for each image
(provided there are only a few), can you easily judge the
quality and make any necessary file size adjustments
selectively.
Compressing
Sound
Just like you were able
to compress images individually, sounds can be compressed
individually as well.
- Go to the Flash Library by
pressing Ctrl + L or by going to Window | Library. Right
click on a sound file and select Properties. The Sound
Properties window will appear.
- Depending upon the file format of the sound
file, you will see different options in your Sound
Properties window. If you imported a WAV file, click the
Compression drop-down menu and select a format you want to
modify/save the sound as:
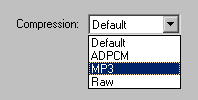
[ compression drop-down
menu ]
- Select MP3 for the Compression format. MP3
formats work best for most sounds such as loops and
voice-overs. For shorter sounds, ADPCM might work. Once
you select MP3, you will be presented the opportunity to
modify the individual properties of how your sound will
export in the MP3 format:
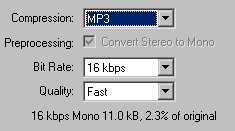
[ compressing an MP3 file ]
Two common misconceptions
that people have are that converting a bitmap image into a
vector would somehow result in a smaller file. While the
file size may go down, most of the time the file size
increases to a level larger than that of the original image.
The following section will explain how to make sure
vectorized images are optimized for the best size.
Optimizing
Vector Images
First of all, if you
don't know how to create a vector image, this section is of
little use to you. So, click the following link to learn how
to convert a bitmap image into a vector:
http://www.kirupa.com/developer/flash5/vector.asp
The following tips will help
you to optimize vectorized graphics so that they take up as
little space as possible:
- Once your bitmap has been vectorized, use the
Straighten or Smooth button from the Toolbox on your left.
- Select your vectorized bitmap. Press the
Smooth button to smooth out all of the curves. Press the
Straighten button to straighten the curves into lines:

[ the smooth and straighten buttons
]
- The more times you press each
button, the more the selected effect will be applied.
For example, the vectorized images found at the top of
the pages have been straightened and smoothed out. You
keep on pressing the Straightened or Smooth buttons
until the image does not optimize and change any
further.
- Besides optimizing your vectorized image by using the
smooth and straighten buttons, you can Optimize by using
Flash's Optimize function. I bet you didn't think that
Flash had an optimize command did you?
- Select your vectorized bitmap. Go to Modify
| Optimize. The Optimize Curves window will appear:
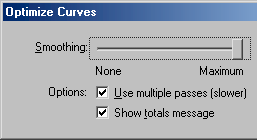
[ the optimize curves window ]
- You can optimize the curves in
your images by modifying the settings found in the
Optimize Curves window. Of course, dragging the bar to
Maximum and checking the Use Multiple passes checkbox
will produce the best result.
NOTE: it may take more than 3-10 minutes to
optimize a vectorized image if you set the optimization
settings to maximum and check the option for multiple
passes.
Using Text
While you may not know
it, the text you use on your animations may take up more
space than the sounds and images combined! Here are some
tips to reducing file size using text.
- Never break text apart!. You can break
text apart by pressing Ctrl + B, but that increases the
size of your animation dramatically. The reason is, when
text is not broken, it is stored in an ASCII format
understood by windows and interpreted in the Flash player
of the viewer.
When you break apart text, you are converting the text
into actual shapes and lines. Basically, another
vectorized image. Each shape of your letter takes up a lot
of space. Worst of all, optimizing the letters causes the
text to become illegible. Never break text apart unless
you are displaying one or two words in a cool font that no
one might have.
- The tip you will learn deals with Dynamic
Text and Input Text fields. While a novice will never
encounter this problem, I'll explain anyway for those who
might use text fields in their animations. First, go to
your Text Options tab:
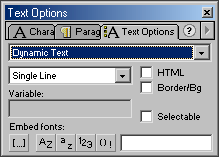
[ the text options tab ]
From the Text options tab,
you will see numerous buttons under the Embed fonts
caption. Below is an explanation of what each option does:
 |
Embeds the actual font
outline. The text will look blurry with this setting
enabled. |
 |
Embeds the outline for only
uppercase letters. |
 |
Embeds the outline for only
lowercase letters. |
 |
Embeds the outline for only
numbers. |
 |
Embeds the outline for
punctuation marks. |
As you can tell,
each of those buttons correspond to a method of embedding
text. When the text is embedded, an actual shape outline of
the text is displayed. Checking these boxes is the
equivalent of breaking apart text. While you can selectively
choose which types of text (numbers, punctuation, lowercase,
etc.) gets embedded into the SWF file, the files size,
nonetheless, increases. It is best to avoid embedding text.
This concludes this
revision of this tutorial. This tutorial was written with
input from several expert Flashers from the kirupa.com
forums. I'd like to thank the following people who gave some
input and tips about helping to reduce file size in Flash:
thoriphes, eyezberg, suprabeener, and
Mikeylzkt. You can see all of them on the forums by
clicking the Message Board link below.
I hope the information helped.
If you have any questions or comments, please don't hesitate to post them on the
kirupa.com Forums. Just post your question and I, or our friendly
forum helpers, will help answer it.
The following is a list of related tutorial and help resources that you may find
useful:
|


