Tutorials
Books
Videos
Forums
Tutorials
Books
Videos
Forums


This is an archived tutorial from the kirupa.com legacy collection. It covers software that may no longer be available, but it is kept online because the ideas still hold up.
Since I've had numerous requests for this piece, I've finally gotten around to rewriting the tutorial from Suga himself, as detailed in New Master's of Flash ISBN 1-903450-03-9. I'm hoping that my simple style of spelling out the basics will help some of you to understand this work. This is not a tutorial for experienced Flashers. You'll find that it gets exceedingly boring as you have to listen to every detail covered. Alas, this is what most newbies are missing, and it is for them that I write my tutorials. If you're an adapt, or master then do what we all do. Visit the boards and ask questions. Since you newbies get that benefit you also get to listen to a little longwinded stuff. I really ask that you read on though. I assure you that most of my long winded information is vital to completing a project. I hear it from the masters, and I pass it on to you.
Truth be told this is a great example of the transition between student and master. This is representative of that experience to me, and I like to imagine that it was so for Master Suga as well. A time when all the explanations in the world were not going to help me to solve something. A time when I began to see through Flash colored lenses at the world, envisioning it as they did. Constructing something from pure thought. . .pure energy. . .using my mind. Ray of Light is an example of what makes Flash Magical, superior.
I think it's important, first off, to let you in on the same two secrets he gave me in the book.
So remember those two things, and apply them to most Flash projects. "They are both easy and take time", and you'll do fine in this design environment.
 |
It is important to take a moment to visualize any effect before you try to work on it.
| 1a) | Start out with a blank stage. Choose menu option Modify/Movie to bring up the property sheet for the movie. Set it to 350 by 75, and give it a black background. A frame rate of 24 fps is fine. I've ended up making this movie longer than the tutorials that I've seen, but I like my movement a little slower. |
| 1b) | Save your work Ctrl+S, or Ctrl+Shift+S, or menu option File/Save. Choose a name which is descriptive, and try to come up with numbering right away. You're going to save this project dozens of times, and you should see the file names in steps. This save I'm going to use lostSoulROL1a. When I save it again, I'll save it as lostSoulROL1b and so on. It's good to get into this habit so that you can back track if necessary. |
Ctrl+S means that you hold down your Ctrl key (apple key on the Mac) and press the "s". This is used to save your file as the last name you just gave it, in the last directory you just saved it. It's a quick save and good enough for most things.
Ctrl+Shift+S, means that you hold down both the Ctrl (apple key on the Mac) and the shift key, and then press the "s". Sometimes you'll want to use this save. This is a "save as" menu option which lets you give it a new name.
Keep in mind that each time you save it as a new name, it's saving the whole FLA file. Sometimes that can get really large. If you are going to seriously get into flash, I would consider either a CD ROM burner for your files, and at the very least, a nice new 40 gig hard drive.
| 2a) | With your text tool, start a line of text. Choose a font you like. Size should be size 12, with a spacing of 2. Click on the color swatch, and choose any color, from the palette which pops up. I suggest White, but any highly visible color will do. |
| 2b) | Once you've typed out your text, select the black arrow tool from your tool panel. The text should change on the stage. A blue square should appear surrounding it. This square is called a "bounding box" and it represents the outer most edge of a Flash object., |
I HIGHLY suggest that you use something small, as few letters as possible, that is. The "Crimson Matrix" logo I made took FOREVER and a day. Try it small, because once you know how to do it, it'll be much easier going through the process. We are using "Lost Soul" as our example text. If I give you a reason why I'm using that, I'll only inundate myself with tons of E-mail, so I wont.
Also, be careful of what font you use. Something with a lot of flanges is not going to look as good as a sharp Arial.
| 2c) | Open your align panel, if it is not already open, by choosing menu option, Window/Panels/Align. Select the toggle To Stage to the on position. Click on the top row of icons, the second and the fifth icon. This will align the group, according to it's bounding box, to the center of the stage. |
| 2d) | Save your work Ctrl+S, or Ctrl+Shift+S |
| 3a) | After the text is in place and centered. Use the keys Ctrl+B or menu option Modify/Break apart to break apart the text. Each letter has now become a section of fill. You cannot edit the text after this point in time. |
| 3b) | On the timeline, move the mouse cursor over frame 1 of layer 1. It looks like a gray square with a black dot in the center. The cursor changes to a hand, click on this frame until the hand closes. The frame should now be highlighted in dark gray even if you remove your cursor. You may not be able to see it, but the text is all selected as well as anything else that is in the frame. In this case it's just the letters we created. |
| 3c) | Hit F8 or menu option, Insert/Covert to Symbol. A Symbol dialogue box will open. Select Movie Clip, and type in the name that you would like the entire project to be known. We are going to name this one, "lostSoulROL". |
This is something that is not really covered in the tutorials. It's important to build things inside of movie clips from the beginning. Copying frame from the main timeline to a movie clip timeline first may take extra time now but it's often necessary saving time later on. The 1.0 version of this tutorial was written verbatim from the book. When I finished the project I realized that my animation stretched off the stage. I had to move it. You can't really move these element after they are in place. However, if you encapsulate the entire project in a movie clip, you can simply use that movie clip over and over again in animation's, positioning it exactly as you wish. It is for this reason that I've deviated from the tutorial in the book.
| 3d) | It's important at this point to check this object. Do not skip this step. Open your Instance panel by using menu option Window/Panel/Instance. Using the black arrow tool, select the letters on the stage. If it has a blue bounding box around it, it's already selected. In the instance panel you should see information about the object. It has the Movie Clip symbol, bright blue and obvious, it has a behavior set to Movie Clip, and the name you assigned it. There is also a place here for an "instance name" should you need it in the future. You can leave it blank for the moment. If you see these things you know it's a movie clip and you can continue. |
| 3e) | Save your work Ctrl+S, or Ctrl+Shift+S |
 |
|
| 4a) | Double click on your text. It should open up the edit in place feature, allowing you to edit your movie clip on stage. You will know that you are inside the movie clip by looking at the tabs in the upper left corner of your timeline. One tab is always open there for each project, it will either say Scene 1, or what ever name you've given the scene. To it's right, another tab should be open. It should say lostSoulROL, as that is the name of our movie clip. If don't see this second tab, you haven't double clicked in the correct place in the word. Try again. |

[ These are the Frame tabs. They will continue to stack one after another depending upon how deep into something you go. ]
| 4b) | With the lostSoulROL movie clip open; on your timeline, in the lower left corner, just above the stage, there are two small icons, a white semi square with a plus symbol on it, and a blue semi square with a zig zag and a smaller plus symbol on it. Click on the white square to create a new layer. Layer 2 will appear above Layer 1 on the timeline. Click on this button 14 more times to make a total of 16 layers. If you make too many layers, the trash can icon to the right of the layer creation icons, will delete what ever layer you have selected. |
Positioning help.. Just hints, not necessary
4a1) Select the hand tool. Click and drag the stage until the black square, of the "on-stage" area is just below the frame of the timeline. Move the mouse cursor over the edge of the frame. When the cursor changes to the double arrows, you can drag the timeline frame downward. The on-stage area moves in relation to this frame border. Make enough room so that you can see all of the layers without using the scroll bars in the timeline. This project also happens to be short so you don't need a big stage area.
4a2) Select the magnifying glass tool. Click on the stage above and to the left of your text, and holding the mouse button down, drag a square which encompasses all of the letters.
This layout, with a tall timeline section, and a short stage section is pretty much the standard from here on. We need to be able to move between layers quickly. The end result is a screen layout like those in my diagrams.
| 4b) | Double click on the Layer 1 label.. It should open up an input dialogue which will let you name the layer. Name it lightL. |
| 4c) | Repeat this for each layer, the first eight layers being named "light" followed with no spaces the next letter in the word. For the last eight, just name them by letter. See below. |
| 4d) | Save your work Ctrl+S, or Ctrl+Shift+S |
| 5a) | Using the black arrow tool, click in a blank part of the stage. It's a good practice to do this before selecting elements like fills and lines. If the layer is still selected from a previous step, you can end up moving things that you don't wish to. |
| 5b) | Now drag a square around the first letter. It should fill in with a speckled gray, representing that it is selected. Choose menu option Edit/Cut. |
| 5c) | In your timeline, click on layer lightL, frame one to select it. Choose menu option Edit/Paste in Place. |
| 5d) | In your timeline, select layer L, frame one. Choose menu option Edit/Paste in Place. |
| 5e) | Repeat this process for each letter, placing each in frame one of both it's light layer, and it's non-light layer. |

As I work, I find it very important to use the locked and unlocked settings for the layers. When the over lap like this, and you're looking at all of them in place, it can get pretty confusing. Lock the layer you just edited, then unlock the layer below it. Layer o. Cycle down all eight of the "light" layers. Creating the same line structures. At this point, don't worry about how long to make them. Just make sure that the lines butt up against each other. They should if you've got the "snap to object" function on. Check out your corners with a magnifying glass just to make sure they are sharp and together. There will be an opportunity later to change around how long they are, so don't waist too much time on that. Make sure that the end of the left most letter, in this case our capital "L", is the longest of the line lengths. The "o" should be a little shorter, etc.
In this example I've also clicked on the "eye" check mark which makes those layers invisible. This ensures that they will not get in the way while we create our light effects.
Note the small circles of black on the first frame of each layer. These represent that these frames have some type of element in them, whether it be fills, lines, a Flash object like a button or a Movie Clip, or some sort of imported media like a sound file or a jpg. These are called keyframes, and they also represent places in the timeline where you can change and manipulate media. We will be talking about keyframes a lot. For now, it's just important to note that when I say keyframe, you know to look for a dot in a frame.
| 5f) | Save your work Ctrl+S, or Ctrl+Shift+S |
6a) In the
timeline, select layer lightL, frame one. Hit F8
or use menu option Insert/Convert to symbol, to make
it a Flash object. In the dialogue box, type in the same
name as the layer name ie lightL. Click on Graphic,
and hit OK.
6b) Repeat this step for all eight light layers. Be careful in that dialogue box. Default setting is Movie Clip.. Be sure to choose Graphic.
In the case of repeated letters like the second s and o, I named them s1 and s2; o1 and o2. The names are not really important at all, but you have to name them something so try to make it discriptive of what it is.
6c) In the timeline, select layer L, frame one. NOT layer lightL. Hit Ctrl+G or use menu option Modify/Group, to make it a Flash group. We will not be using these for anything other than stationary objects, but fills should be grouped as there is a rumor that they take up more bytes UN-grouped I'm not sure about that, but it doesn't hurt to group them. Groups do not have to be named.
6d) Repeat this step for all eight non light layers.
6e) Save your work Ctrl+S, or Ctrl+Shift+S If you haven't yet, you probebly should save this under a new file name.
| 7a) | This is the hardest step in this part of the process, as such, here are some hints on prepping the stage area to minimize on head aches later on. |
Choose menu option View/Grid/Edit Grid. In the grid properties box which comes up change the grid to 8 pixels by 8 pixels.Select view grid but make sure snap to grid is not checked. Click OK.
Choose menu option Edit/Snap To Objects if it is not already checked.
Lock all the non light layers. By clicking on the lock symbol to the right of the layer name. We don't need to manipulate them right now, and if you have them open, you might accidentally edit one of them instead of the light symbols. It is good practice to lock and unlock layers while manipulating various elements which are close to each other on the stage.
Something to note going into this. The "lightS" layer is the center. Because of this, it has no tween. Until I mention this layer again, don't perform any of these things to it unless I specifically tell you to. For this reason you can lock both the S layer, and the lightS layer now.
| 7b) | On the stage, double click on the L to open up it's edit in place feature. (Remember to check your tabs.) You should zoom in just enough to get a clear look at the letters. |
| 7c) | Select your line tool. In the stroke color swatch, choose a bright green color for your line. (I choose bright green, but it could be any color other than white.. that you can see well.) From the top of the letter L but as far right on the letter as you can get, draw a line out to the left edge of the stage. See diagram below. |
| 7d) | Draw another line from the bottom of the letter, as far to the right of the letter you can get, out to just below the end of the other line, again with a tilt down, instead of upwards. |
| 7e) | Draw one last line from the top line ending point, to the bottom line's ending point. See below if you need a little better idea: |

| 7f) | Repeat this process for each letter. Make sure that you're inside that symbol. You have to keep looking at those tabs, and know your Graphic symbol names. |

| 7g) |
Save your work Ctrl+S, or Ctrl+Shift+S |
|
|
|
| 8a) | Unlock the "lightL" layer, and lock all the rest. Double click on the L itself, or it's green line structure, to open up edit in place feature. |
| 8b) | Select your paint bucket tool. Open your Mixer panel, and your Fill panel. In the Fill panel, choose linear gradient. A line of color, from black to white appears below with two tabs. |
| 8c) |
Click on the left tab. You'll see the swatch to the
right turn to black. Click on that swatch and choose
color white. In the Mixer panel, the swatch has changed from black to white with your selection. In the "Alpha" field to the right of the Mixer panel, type in 0% and hit enter. |
| 8d) | Click with the paint bucket inside the green line structure. A gradient fill that looks like this should have filled up the green polygon. If it didn't then recheck the corners of the lines to make sure that it makes a completely enclosed area. If you need to fix one of the lines just move the black arrow tip near to the end of the line. When it changes to an angle symbol you can click and drag that end. Just move it near to the other line's end point and it should snap into place. Try filling it again with the paint bucket. |
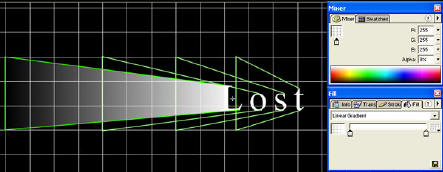
| 8e) | Lock this layer and unlock the layer below this one, go through each of the seven light layers that have green line structures. When doing the fills on the right of the "S", you will need to go back to your fill panel. Grab the tab with alpha level 0% and pull it about half way into the middle. Then grab the solid white tab on the right, and pull it all the way to the left, so that it sits where you just removed the other one from. Then grab the alpha 0% one again and drag it to the right hand side. One may also use the fill transform tool settings to flip the fill in that manner if you prefer. I do it there because I'm already in that panel. All it is is a reversal of the side which has the 0% alpha and the 100% alpha. |

Intermission
dah dah da da dahhh dah
repeat.
9a) The absolute first thing we do is edit the centers of each of the light objects. A fatal error many new to Flash make is this: They create a motion tween set down a bunch of keyframes and then all of a sudden want to alter the center point of the object. When adding keyframes Flash will take the center attribute from the previous keyframe each time. So you would need to go to each keyframe and edit it's center IF you didn't heed my advice now and do it in advance.
So...
| 9b) | Unlock the lightL layer and lock all of the other layers. |
| 9c) | Choose menu option "Modify/Transform/Edit center". |
| 9d) | Click once on the left most letter, capital "L". Where it's center was, there is a larger than usual cross hair. Grab this cross hair and move it to the right most edge of the blue bounding box which contains the whole lightL graphic. It is better to overlap on the outside of the blue bounding box than inside. But zoom in for this operation. You want it as close to that blue line as possible. |
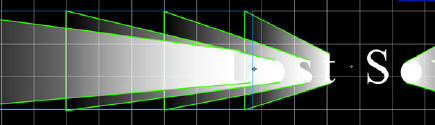
| 9e) | Lock this layer and unlock the layer below this one. Repeat this process on each light graphic symbol. |
Zoom in close if you need to. Letters on the right of the "S" must have their centers edited to the left hand side of the bounding box, not the right. Once you have altered all the center points, UN-select everything by clicking once on a blank part of the stage...make sure you click back to the timeline of the movie clip lostSoulROL too. You can be sure by looking for those tabs in the upper left corner of the timeline. If there is only two tabs, the first says, "Scene 1" and the second says lostSoulROL, then you're in the right place. If you're not, just click on the lostSoulROL tab, it will close any timelines other than the one you want open.
For this part you can unlock all the light layers. Keep the other ones locked for the moment.
| 10a) | On the timeline select the first frame of the lightL layer. Choose menu option Insert/Create Motion Tween. Select the first frame of the lighto layer and do the same. Repeat for each light layer. |
| 10b) | On the timeline select frame 15 of the lightL layer. Choose menu option Insert/Insert Keyframe. Select frame 15 of the lighto layer and do the same. Repeat for each light layer. |
| 10c) | On the timeline select frame 35 of the lightL layer. Choose menu option Insert/Insert Keyframe. Select frame 35 of the lighto layer and do the same. Repeat for each light layer. |
Exception: On the lights layer, just select frame 35 and use menu option Insert/Frame. You'll see that all the light layers have blue bars except that one which has a gray bar.
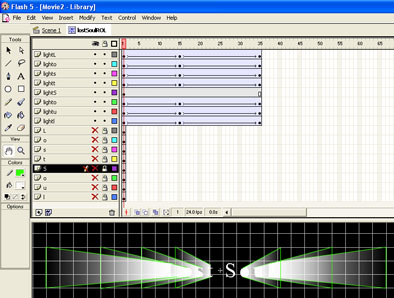
10d) Save your work Ctrl+S, or Ctrl+Shift+S
|
|
|
| 11a) | Select the first frame of lightL layer. In your Tool panel select the black arrow if it isn't already selected. Down below a button has appeared in the options section of the Tool bar. Click on the Scale button. 8 white squares appear around the bounding box of the lightL object. Grab the one on the left and stretch it out to the left about 100% longer than itself. Do not grab the corner scalar square, you only want to extend them to the left, not up and down. |
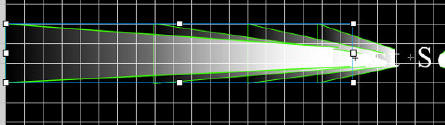
| 11b) | Repeat this process for each of the layers up to "t". When you get to the right of the "S" you have to reverse everything. Instead of grabbing onto the scaling square on the left, you will have to scale from the right hand side of the bounding box, and stretch it to the left, scaling it down, so to speak. **IMPORTANT: The graphics after "S" should be shortest at it's frame 1, and longest at it's frame 35. |
| 11c) | Select frame 35 of layer lightL. Select the Scale button. Grab the left hand scaling square and drag the light graphic towards the right. You should scale it somewhere about half it's original size the size it currently is at frame 15. |
So at frame 1 it's twice as big as it is at 15, and at 35 it's half as big as it is at frame 15.
| 11d) |
Repeat this for each of the letters up to "t", then reverse the process as you did above. Again, the graphics after "S" should be shortest at it's frame 1, and longest at it's frame 35. Play around: When you think you've got it, grab the red play head at the top of the timeline. Run it back and forth a couple of times and edit the scale of each at any keyframe, based upon what looks natural for light. |
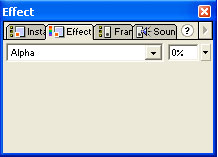
| 11c) | On the timeline
select frame 1 of the "lightL" layer. Open your
"Effects" panel, and choose Alpha. Move the slider
to 0%, or just type 0 into the input field and hit
enter. Select frame 35 and again select alpha, moving the slider to 0%. |
|
|
|
| 11d) | Repeat this for each letter. |
| 11e) | Save your work Ctrl+S, or Ctrl+Shift+S |
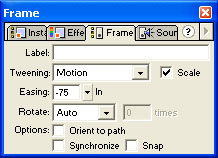
| 13a) | Select frame 1 of the lightL layer. Open your Frame panel. Use the Easing slider to change the easing level to +75. |
| 13b) | Select frame 15 on the lightL layer and change the easing to -75. |
|
|
|
| 13c) | Repeat this for each letter. |
| 13d) | Save your work Ctrl+S, or Ctrl+Shift+S |
| 14a) | The animation is done. We now need to make it so that they start and finish one after another, with slightly overlapping animation. This is pretty easy from this point on. |
| 14b) | Using the black arrow, move the cursor over a non keyframe in layer lighto. Anywhere where there is a line, and not a dot, your cursor should change to a hand icon. Click the mouse button and all of the frames between the first and thirty fifth frame will highlight. While holding down the mouse button, drag all of the frames to the right. Drop it so that the first letter is on frame 10 |
| 14c) | Do the same for each light layer, but move it further and further out, by 10 frames, on each layer. So that it looks like this. |
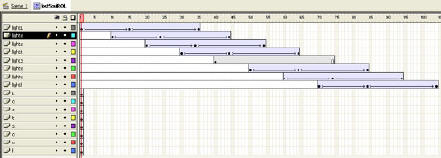
Play around: repeat the process of grabbing the play head and moving it back and forth. It's gotten a little better.
| 15a) | Select frame 104 of layer L (yeah, remember those layers?) |
| 15b) | Choose menu option "insert/frame. |
| 15c) | Repeat this for each non "light" layer. Each should have a solid gray bar running from it's keyframe at frame one, to a normal frame ending at frame 104. |
| 15d) | Select the first frame of the o layer and drag it to the right until it is on frame 10, directly below it's light layer counterpart's first keyframe. |
| 15e) | Do the same for each of these non "light" layer keyframes, except that you drag them further along so that they correspond with each of their "light" layer counterparts. |
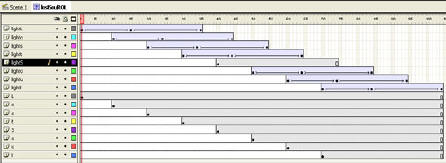
Note: It may look more realistic, if these static letters apear a frame or two later than the light goes by. Feel free to start them as far as five or so frames later than the light letter animations. Play around with these, as well as the number of frames in the tweens, to achieve differing effects.
15f) Save your work Ctrl+S, or Ctrl+Shift+S
| 16a) | The final part of this animation is the lens flare that you see in the center letter when the light passes by. It is in fact a movie clip developed by Master Suga. He gives you permission to use it to your hearts content as long as you are kind and remember to not claim credit for it. It is available for download with all of the "Ray of Light" tutorials I've seen, and so it comes with mine. If you wish to break it apart and make your own, you are welcome to do so. I'm not going to explain how here. |
| 16b) | Select the starting frame of the lights layer. Choose menu option Edit/Cut. The letter should still be on layer S so it's not necessary to have it on the lights layer. The keyframe will now be empty. Select this keyframe if it is not already selected. |
| 16c) |
Choose menu option File/Open as
Library, find and select the
rayOfLightLensFlare.FLA, available for download
here. You will need to download it first
to your hard drive before you can open it. Grab
that movie clip out of the library that opens and
drag it to the stage. Position the movie clip so
that it sits above the upper left corner of the
capital S.
You are done.
|
| 17a) | Now, you say "wait!!.. there are all these green lines in my animation" |
| 17b) | No problem. Close the library for the rayOfLightLensFlare.FLA. Open the library for this movie by choosing menu option Window/Library. |
| 17c) | Now double click on the graphic symbol to the right of the lightL name that is in the library. It will open on the stage. Select a line and Edit/Cut each one carefully. |
| 17d) | Repeat this for each light letter graphic in the library. |
| 17e) | Save your work Ctrl+S, or Ctrl+Shift+S |
Now you really are done, and it should look something like this.
Just a final word before we wrap up. What you've seen here is freshly baked content without added preservatives, artificial intelligence, ads, and algorithm-driven doodads. A huge thank you to all of you who buy kirupa's books, became a paid subscriber, watch the videos, and/or interact on the forums.
Your support keeps this site going! 😇

:: Copyright KIRUPA 2026 //--