 Tutorials
Books
Videos
Forums
Tutorials
Books
Videos
Forums


This is an archived tutorial from the kirupa.com legacy collection. It covers software that may no longer be available, but it is kept online because the ideas still hold up.
In Flash CS3, you have support for creating ActionScript 3.0 (AS3) projects. Besides allowing you to write code in the new AS3 language, there are some subtle differences that may go unnoticed unless you are actively looking for new things. One such difference is what happens when you create or convert something into a new movie clip.
With AS3 projects, when you convert or create something into a movie clip, you specify the name of your movie clip like you always did. This time around, though, what happens is that you not only create a new movie clip object, you also have access to the class that defines your new movie clip.
By accessing the class and writing code directly inside it, you can bypass adding code using the timeline. For example, the following animation was created by me adding code to the movie clip's class file:
The actual code is defined inside the class itself. In other words, I didn't write any code on the timeline at all, and that is different from what you saw in my earlier Animating Dynamic Movie Clips tutorial where everything was written on the timeline.
In this article, I will explain how to take a movie clip, create a class file for it, and write some code inside the class file to create the animation you see above. Since you are already here, I will also explain how the animation works to create the circular motion you see above :-)
First, you will need to create a movie clip. For this article, simply create a solid blue circle movie clip and, in the Library, give it the class name BlueCircle. If you don't know how to do that, feel free to read the detailed instructions below. Otherwise, jump on over to the next section!
The following instructions explain how to setup your movie and specify the blue circle:
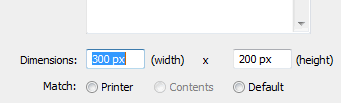
[ set your animation's width/height to 300 by 200 ]

[ draw a blue, solid, filled circle ]
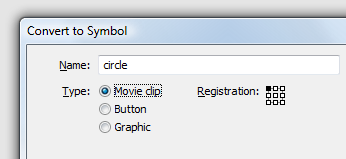
[ give your symbol the name circle and make sure it is also set to be a movie clip ]
Do not hit OK just yet. Let's make some more modifications.
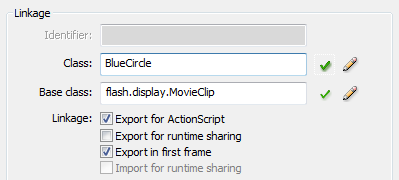
[ check 'Export for ActionScript and enter BlueCircle for your class ]
The Base class field will automatically be populated for you, but if it hasn't, make sure to enter flash.display.MovieClip as shown in the above image.
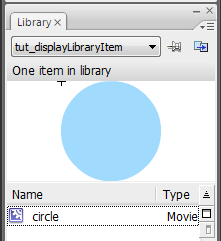
[ your circle in your Library ]
If you do not see your Library, press Ctrl + L to display it.
At this point, you should see a blank stage with your Library displaying the circle movie clip with the class name BlueCircle. Right now, nothing is really being done. We'll change that in the next section when you create the BlueCircle class file and add some code.
In the previous section, you created your circle movie clip with a class name of BlueCircle. Currently, the circle you created kind of just sits there. Let's fix that by adding some code that makes our circle move.
We are going to be adding our code to the BlueCircle class itself. But, where is our BlueCircle class? Good question. It doesn't exist in a form that we can see or access. By default, the BlueCircle class is created in the background with its contents being magically thrown into the SWF file during publish/export.
To override the default behavior, we are going to manually create the BlueCircle class. From Flash, go to File | New to display the New Document window. From this window, select ActionScript file and press the OK button:
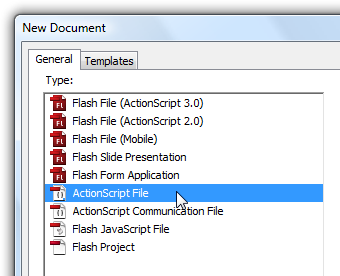
[ select the ActionScript file type from New Document ]
Once you have clicked OK, the New Document window will disappear, and your Flash drawing area will now be replaced by what is essentially a large code editor.
Before we proceed any further, let's save this file. Go to File | Save, navigate to the folder where your current Flash project is, change the current default filename to BlueCircle.as, and hit the Save button. A BlueCircle.as file will now be created in the same location as your rotatingCircles.fla:
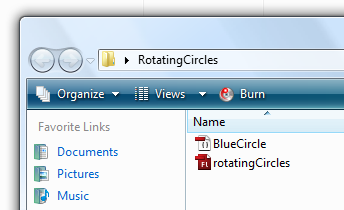
[ save your BlueCircle.as file in the same location as your rotatingCircles.fla ]
Great. We just created our BlueCircle.as file. Now, its time for us to add some code to make all of this work. With your BlueCircle.as file open in Flash, copy and paste the following code into it:
package {
  import flash.display.*;
  import flash.events.*;
  public class BlueCircle extends MovieClip {
  var radians = 0;
  var speed = 0;
  var radius = 5;
  public function BlueCircle()
  {
  speed = .01+.5*Math.random();
  radius = 2+10*Math.random();
  this.addEventListener(Event.ENTER_FRAME, RotateCircle);
  }
  function RotateCircle(e:Event)
  {
  radians += speed;
  this.x += Math.round(radius*Math.cos(radians));
  this.y += Math.round(radius*Math.sin(radians));
  }
  }
}
With the above code copied and pasted into your BlueCircle.as file, save this file by going to File | Save or by pressing Ctrl + S.
All this time, your rotatingCircles.fla file should have been open also, so tab into it by clicking on the rotatingCircles tab:
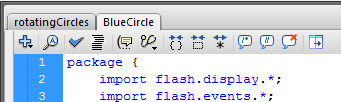
[ click on the rotatingCircles tab to switch into it ]
You'll be back to seeing what you saw in the previous section - a blank stage with a blue circle displayed. Don't worry though! Press Ctrl + Enter to see what happens. Notice that you now see your circle moving...circularly!
In the next section, let's take a detailed look at what each line of code you just copied and pasted does.
In the previous section, you created your BlueCircle.as file and copied and pasted some code. When you tested your movie, you noticed that the blue circle you had on your stage was now moving in a circular path. In this page, let's look at the code and figure out what all of the code you pasted does.
Let's look at each line of our code in BlueCircle.as in detail:
package {
  ..
  ..
  ..
}
The very first line of code in BlueCircle.as is our package declaration. If you are familiar with packages in other languages such as Java or namespaces in .NET, this should be very familiar to you.
In a nutshell, a package is like a folder under which all of your classes can be referenced through. I am not going to dwell too much on packages in this tutorial, for I plan on covering them in greater detail later. In this case, I am not specifying a package name, so specifying them is more of a formality than something that you need to consciously keep in mind when writing your code.
Let's move on:
import flash.display.*;
import flash.events.*;
The above two lines are import statements. In ActionScript 3, whenever you need to use functionality found in built-in classes, you will need to reference the path to the classes via import statements. For example, you will soon find that I use the enterframe event to create my animation. Unless I actually import the various event-related classes as shown above, the compiler will have no idea what an enterframe event actually is.
public class BlueCircle extends MovieClip {
  ..
  ..
  ..
}
This line is probably the most important line in this application. Here, I define my BlueCircle class. If you recall, when you created your circle movie clip earlier, you specified the name of the class:
With the above line of code, you create the magical link between your movie clip in your Library and the BlueCircle class you just created.
There is another important thing to note about our BlueCircle class definition. I am using the extends keyword to let the compiler know that BlueCircle is basing a lot of its functionality from the MovieClip class. This is important because, like you see in the above screenshot, the base class for our movie clip is flash.display.MovieClip.
So, why am I not writing BlueCircle extends flash.display.MovieClip? If you check a few lines earlier, you already imported flash.display.*, and the * wildcard allows you to get away with using any class stored inside flash.display without fully specifying its name. That is why I simply write extends MovieClip as opposed to the longer variant I just asked about.
var radians = 0;
var speed = 0;
var radius = 5;
The first five lines inside our BlueCircle class are pretty straightforward. I am declaring five variables that I will be using, and the radians, speed, and radius variables are initialized to some default values. I wish I had more to say about them, but I don't, let's move on :-P
public function BlueCircle()
{
  ..
  ..
  ..
}
If the class definition was the most important line of code in this movie, then our BlueCircle constructor shown here would be the second most important line of code. A constructor is the name for a method that gets called whenever you create new instances of a class. That probably made no sense, let's kick it down a few notches.
Each time you drag and drop a new circle movie clip from your library, you are basically creating a new user of of your BlueCircle class. A user of a class is known as an instance. Whenever you create a new instance by inserting another circle movie clip into your stage, a method whose name is the same as that of your class gets called. That method is known as a constructor. That is what you see above.
Notice that our class is called BlueCircle, and our constructor's name is also called BlueCircle. With the exception of it being called when an instance is created, a constructor is largely the same as any regular method. For you long-time AS programmers, feel free to add functionality in your constructor that you used to add in an OnLoad event!
Ok, so far we've covered most of the important parts of our code that are relevant to seeing the link between movie clips and classes. There is still some code left to cover, but let's first look at how to actually use this movie clip both manually and programmatically.
In the previous section, you got a brief overview of the code that makes our class work. In this page, let's look at how to actually add more circles - both manually as well as programmatically.
The easiest way to get more circles on your stage is to drag and drop more instances of your circle movie clip from your Library and onto your stage:
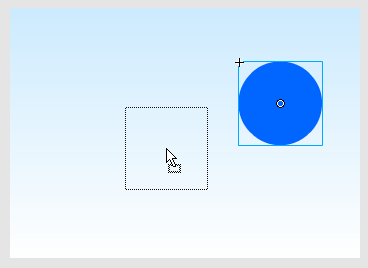
You can add as many circles as you want, adjust their size, their alpha values, etc. For example, this is what my stage looked like for the the animation you saw on the beginning of this tutorial:
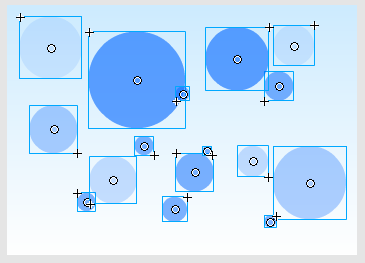
When you run your movie, each circle will move with its own independent values for speed, radius, etc. That should be pretty clear by now since you already saw from the explanation of how your BlueCircle class works, what its constructor does, etc.
While adding your movie clips manually is easy, there will be many cases where that can be tedious. For complicated scenarios where you cannot predict the quantity of movie clips to display or what properties your movie clips exhibit, you need to know how to add movie clips from your Library programmatically via code.
One tutorial that covers this topic in greater detail is my earlier Displaying Library Content in AS 3.0 tutorial, but I'll provide the code here. To add your movie clips programmatically, in your Timeline, right click on a keyframe and select the Actions item. Your Actions window will appear:
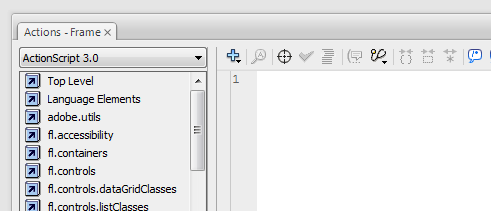
Copy and paste the following code into your Actions window:
function DisplayCircles()
{
  for (var i:int = 0; i < 10; i++)
  {
  var newCircle:BlueCircle = new BlueCircle();
  this.addChild(newCircle);
  newCircle.x = Math.random()*300;
  newCircle.y = Math.random()*200;
  newCircle.alpha = .2+Math.random()*.5;
  var scale:Number = .3+Math.random()*2;
  newCircle.scaleX = newCircle.scaleY = scale;
  }
}
DisplayCircles();
When you run your application, notice that you now display ten circles with random positions, alpha, and scale! Best of all, you didn't really have to manually drag and drop any circles in order to do that. To understand what the previous code does, take a look at this tutorial Displaying Library Content in AS 3.0.
In the previous section, you saw how to populate our stage with the BlueCircle class you created. Before that, we made quite a bit of progress and looked at packages, class definitions, and constructors. There is still some code that we need to explore - namely the parts related to creating the circular motion!
Let's look at the remaining pieces of code now:
public function BlueCircle()
{
  speed = .01+.5*Math.random();
  radius = 2+10*Math.random();
  this.addEventListener(Event.ENTER_FRAME, RotateCircle);
}
Inside our BlueCircle constructor method, I fiddle with the variables I declared earlier:
speed = .01+.5*Math.random();
radius = 2+10*Math.random();
In the above two lines, I set a random value for both our speed and radius variables. To put the values you see into perspective, Math.random() returns a number between 0 and 1. I multiply that number by 5 for speed and 10 for radius.
Because Math.random() could return a value of 0, I wouldn't want my speed or radius variables to be stuck at 0. That would lead to a very boring animation! To mitigate that risk, I am incrementing both by a specific number - .01 for speed and 2 for radius. In the worst case, our speed will be .01 and our radius will be 2.
currentX = this.x;
currentY = this.y;
The next two variables I set values for are currentX and currentY. As their names imply, I am interested in storing the current X and Y positions of my circle movie clip, and I can do that by using the this keyword followed by x or y depending on the position value I am interested in. You'll see why I am getting this information shortly.
this.addEventListener(Event.ENTER_FRAME, RotateCircle);The final line of code in our constructor declares a new event listener. An event listener takes two arguments - the event to listen for and the method that will handle the event. Because ENTER_FRAME event is fired a number of times per second equal to your frame rate, your RotateCircle event handler will get called 25 times.
For more details on event listeners, events, and event handlers, please refer to the 2nd page of my Animating Dynamic MovieClips in AS3 tutorial.
function RotateCircle(e:Event)
{
  ..
  ..
  ..
}
We next declare our RotateCircle method. In this case, this method can also be classified as an event handler because our earlier addEventListener call specifies RotateCircle as the recipient of any fired ENTER_FRAME events. Because of its event handler status, our RotateCircle method has to take an argument based on the Event type.
radians += speed;
this.x += Math.round(radius*Math.cos(radians));
this.y += Math.round(radius*Math.sin(radians));
In the first line, I increment our radians variable by the value of speed. In the version of circular motion presented, I am relying on the Cosine and Sine functions to provide the oscillatory behavior found in rotational systems.
Cosine and Sine oscillate between -1 and 1, so the value of radians determines where exactly between -1 and 1 they will find themselves in. No matter how large your radians value gets, the output from having them passed in to our Math.cos and Math.sin functions will always be between -1 and 1.
Let's look at the last two lines in greater detail:
this.x += Math.round(radius*Math.cos(radians));
this.y += Math.round(radius*Math.sin(radians));
Reading right-to-left, you see the Math.cos and Math.sin functions that I referred to earlier. I am multiplying them by the value for radius because watching all of the circles simply oscillate between -1 and 1 may not particularly be a lot of fun.
Because the values passed in contain a certain unnecessary degree of precision, I use Math.round to set them as integer values. If I didn't do this, minor variations in the starting and ending positions caused by imprecise increases in radians will cause your circle to slowly (very slowly) drift to the top-left corner at 0,0.
Just a final word before we wrap up. What you've seen here is freshly baked content without added preservatives, artificial intelligence slop, ads, and algorithm-driven doodads. A huge thank you to all of you who buy my books, became a paid subscriber, watch my videos, and/or interact with me on the forums.
Your support keeps this site going! 😇


:: Copyright KIRUPA 2026 //--