 Tutorials
Books
Videos
Forums
Tutorials
Books
Videos
Forums


This is an archived tutorial from the kirupa.com legacy collection. It covers software that may no longer be available, but it is kept online because the ideas still hold up.
A common feature, which is often featured on many Flash orientated websites, is an MP3 player that streams music tracks that placed on the Internet. The majority of these players are based on an XML data source from where Flash draws its data.
In this tutorial I will explain how to create a simple player that takes data from an XML file and displays artwork, song name, and artist.
OK, so to start off with, we will create our XML file with all the appropriate data stores. To create your XML file you can just use notepad or some other word processing program. The XML file that we will create is not the most compliant with XML programming standards, however, it will still work without any errors.
The first step in creating your XML file is to create a node - a division in your XML to place data. This node would be the main node to store each track item’s data, and we will call this main node “tracks”. At this point, our XML file would look like this:
<tracks>
</tracks>
Doesn’t exactly look like much at the moment, but we still need to place our actual data for each song within their own nodes in inside this node. Within these nodes we will have attributes with the names: trackName, artist, artwork, songURL. These attributes are placed within the tag of each of these childNodes (nodes within nodes) and can store data similar to regular nodes. With these new additions, our XML would now look like the following:
<tracks>
<track trackName="" artist="" songURL="" artwork="" />
</tracks>
You will notice in the above code, I have highlighted the word track in yellow. This track text is the name of the node which will store each track’s data, and from here on in, we do not require any new XML tags unless you require some to make your own adjustments to this tutorial.
At this point in the tutorial, we have the basic XML structure setup with no data for any of the tracks. So, for now, we will use some test data to ensure our codes are working correctly and can handle our XML perfectly. Below is the test data I will be using for my tutorial:
<tracks>
<track trackName="song1" artist="noone" songURL="./music/myTrack.mp3" artwork="./art/song1Art.jpg" />
<track trackName="song2" artist="no1" songURL="./music/myTrack.mp3" artwork="./art/song1Art.jpg" />
</tracks>
What you see above is the basic structure for the entire XML file. In your word processing application, save your file with an xml extension. For this tutorial, I will use the filename trackXMLFile. Place your XML file into the same directory as your Flash file, and now we are ready to proceed and get flash to recognize and use our xml file.
Ok, now our XML file should be complete, and we are ready
to move on to the player. This player will automatically set
itself up using data directly from your XML file, thus deeming it relatively stable, and less
likely to have major bugs to annoy your users.
The process for loading our data can be briefly summarized
in English (not code!) as follows:
For some, this may appear confusing, but I will breakdown
and rebuild this in code form so you can see how the above
logic can be fulfilled.
The first piece of the logic says we need to create our new XML object, which will enable us to get flash to load in an XML and to communicate with in order to receive all of our data values. To create an XML object in flash you simply type the following into your actions panel:
var trackXML:XML = new XML();The above code creates the XML object which we can now refer to through the variable, trackXML. Apart from that however, we also want to make sure flash disregards the white space in the XML, thus you would also need the ignoreWhite function as seen below:
var trackXML:XML = new XML();
trackXML.ignoreWhite = true;The next step seen in our logic, is to get flash to send a request load in the XML file. In order to do this, we need to simply use the XML.load() in-built flash function. Below is how you can do this, if you are following my code exact:
var trackXML:XML = new XML();
trackXML.ignoreWhite = true;
trackXML.load("./trackXMLFile.xml");
This however, will not receive the response from the XML file, it simply tells flash to load in the file specified.
In order to receive a response from the XML we need to use the XML.onLoad() function, which we can choose for it to give us the response in a Boolean (true or false) form. For this tutorial I will do this, so you can, if you wish, also use this feature. Below code displays the usage of this function:
var trackXML:XML = new XML();
trackXML.ignoreWhite = true;
trackXML.load("./trackXMLFile.xml");
trackXML.onLoad = function(success:Boolean):Void {
  if (success){
  //Data was loaded successfully
  } else {
  //Data was not loaded successfully
  }
}
So now we have our XML being loaded in, and flash is now able to let the user know if it was successful. The next step for is to place the data in the XML file into an array. This will make it easier for use to collect all of our data and use it when we are trying to load a song. We should place this next bit of code within the true part of the if (success) statement like so:
var dataArray:Array = [];
trackXML.onLoad = function(success:Boolean):Void {
  if (success){
  for (var i:Number = 0; i < this.firstChild.childNodes.length; i++){
  currentData = this.firstChild.childNodes[i].attributes;
  dataArray[i] = {name:currentData.trackName, url:currentData.songURL, artist:currentData.artist, art:currentData.artwork};
  }
  } else {
  //Data was not loaded successfully
  }
}
That code uses a for loop to cycle through all the child nodes within the first child of the XML, which in our case is the tracks node. It then places the data of each node into a multidimensional array. Ok, it’s time for us to place on the stage, our first object. This would be our status and/or error text field. Select the text tool and place a new textfield on the stage and set it’s type to dynamic. Once you have done this we need to give it a variable reference, Var, I’m going to call mine status:
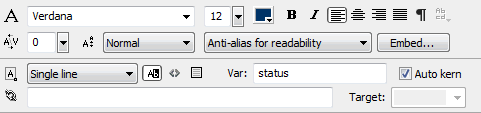
[ set your textfield's Var value to status ]
Now that we actually have somewhere to place our error messages, we can specify a message to inform our users that there was an error. Doing this is pretty straightforward, and I do this in the else clause of our success conditional statement:
var dataArray:Array = [];
trackXML.onLoad = function(success:Boolean):Void {
  if (success){
  for (var i:Number = 0; i < this.firstChild.childNodes.length; i++){
  currentData = this.firstChild.childNodes[i].attributes;
  dataArray[i] = {name:currentData.trackName, url:currentData.songURL, artist:currentData.artist, art:currentData.artwork};
  }
  } else {
  status = "Sorry, the playlist could not be loaded!";
  }
}
The next phase of our player is to make all the songs
load into a visible playlist for the users. To do this, we
will just create one item with a whole bunch of dynamic text
boxes inside it. We will keep track of all of the
information by storing a variable on each new item that
tells Flash which dataArray value to pull the
information from.
So select your drawing tool in Flash and make the main item
that will be duplicated to form your playlist. Once you have
drawn it, press F8 and make the item a movie clip. Within
this movie clip also place two empty text fields with var
names of track and artist respectively.
(place image?)
After you have created the movie clip with the two text fields, delete the movie clip from the stage and go into its Linkage properties within the library and give it a linkage id of displayItem.
(place image?)
Before we move on, we still need to specify a blank movie clip that will essentially hold our playlist. So press control and F8 to create a blank movie clip and place that movie clip onto the stage. When you have placed it onto the stage, give it an instance name of content. You will need to place this empty movie clip wherever you want your playlist to be displayed on a new layer (nothing else goes on this layer).
OK, so now you have done all that we are ready to make flash create the playlist that our users will use. When we do this we need to make flash create our playlist, display appropriate information, store an ID on each item, and to place the items down vertically. In order to display our items vertically, the easiest method would be to make a variable store the height of our item and multiply this height by i, the variable we are using to cycle through the xml. This could be achieved by the following:
var dataArray:Array = [];
trackXML.onLoad = function(success:Boolean):Void {
  if (success){
  itemHeight = 20;
  for (var i:Number = 0; i < this.firstChild.childNodes.length; i++){
  currentData = this.firstChild.childNodes[i].attributes;
  dataArray[i] = {name:currentData.trackName, url:currentData.songURL, artist:currentData.artist, art:currentData.artwork};
  var currentItem:MovieClip = content.attachMovie("displayItem", "item"+i content.getNextHighestDepth());
  currentItem._y = itemHeight*i;
  currentItem.track = dataArray[i].name;
  currentItem.artist = dataArray[i].artist;
  currentItem.id = i;
  }
  } else {
  status = "Sorry, the playlist could not be loaded!";
  }
}
At this point of the tutorial everything should work fine and your ActionScript should look like this:
var trackXML:XML = new XML();
var dataArray:Array = [];
trackXML.ignoreWhite = true;
trackXML.load("./trackXMLFile.xml");
trackXML.onLoad = function(success:Boolean):Void {
  if (success){
  itemHeight = 20;
  for (var i:Number = 0; i < this.firstChild.childNodes.length; i++){
  currentData = this.firstChild.childNodes[i].attributes;
  dataArray[i] = {name:currentData.trackName, url:currentData.songURL, artist:currentData.artist, art:currentData.artwork};
  var currentItem:MovieClip = content.attachMovie("displayItem", "item"+i, content.getNextHighestDepth());
  currentItem._y = itemHeight*i;
  currentItem.track = dataArray[i].name;
  currentItem.artist = dataArray[i].artist;
  currentItem.id = i;
  }
  } else {
  status = "Sorry, the playlist could not be loaded!";
  }
}
In our next step we need to create a sound object for us to be able to play, pause, stop, load, etc. This is done rather simply with the following line of code;
var trackMP:Sound = new Sound();That however, only creates the sound object. We need to also load the song and play it. In this tutorial I am going to use a variable to keep track of which song is playing. So because arrays start from 0 and count onward, for consistency, I am going to set the trackCount to 0 also.
var trackCount:Number = 0;The next phase in getting flash to play songs in our MP3 player is to make a function which will load a sound into our newly created trackMP sound object and then stream that sound. Because we are streaming, we will also need to set a buffer time for the sounds. For this tutorial, I will do 10 seconds.
To do this I will do the following:
var trackMP:Sound = new Sound();
var trackCount:Number = 0;
_soundbuftime = 10;
function loadAndPlay(trackNum:Number):Void {
  trackMP = new Sound();
  trackMP.loadSound(dataArray[trackNum].url, true);
  trackMP.start(0);
}
In the above code, the true in our loadSound method tells Flash to create a blank sound object and then stream the song, If you set it the argument to false instead Flash will wait until the song is completely loaded before playing.
Some other interesting things to notice are are that my trackMP variable declaration is made outside the loadAndPlay function. This allows me to access our trackMP from other functions if I need to.
In order to actually call this function, all I have to do is pass in a tracknumber argument:
loadAndPlay(2);The above code would load, and then start song number 3. Remember that arrays start from 0 and count up, so something at position 2 is actually the third element (0, 1, 2). Now, what we want to do is get Flash to play our first song when it finishes placing the data into an array. To that, let's revisit our onLoad function for the XML, and place:
var dataArray:Array = [];
trackXML.onLoad = function(success:Boolean):Void {
  if (success){
  itemHeight = 20;
  for (var i:Number = 0; i < this.firstChild.childNodes.length; i++){
  currentData = this.firstChild.childNodes[i].attributes;
  dataArray[i] = {name:currentData.trackName, url:currentData.songURL, artist:currentData.artist, art:currentData.artwork};
  var currentItem:MovieClip = content.attachMovie("displayItem", "item"+i, content.getNextHighestDepth());
  currentItem._y = itemHeight*i;
  currentItem.track = dataArray[i].name;
  currentItem.artist = dataArray[i].artist;
  currentItem.id = i;
  }
  loadAndPlay(trackCount);
  } else {
  status = "Sorry, the playlist could not be loaded!";
  }
}
While we are working on the song loading, we will add in our artwork loader. The first step you should do is create a new movie clip with the default artwork, and then give it the instance name artLoader. Within this movie clip, insert a blank movie clip (the one you made earlier from the library) to load the artwork into, and give that too an instance name, I will use loadMC. Scroll back to where you have made your loadAndPlay function and insert the following, to clear our loader MC, and then tell it to load in the appropriate artwork:
var trackCount:Number = 0;
_soundbuftime = 10;
function loadAndPlay(trackNum:Number):Void {
  trackMP = new Sound();
  trackMP.loadSound(dataArray[trackNum].url, true);
  trackMP.start(0);
  artLoader.loadMC.unloadMovie();
  artLoader.loadMC.loadMovie(dataArray[trackNum].art);
}
Now we have all of this going well, I think it is about
time we add in a play button. First up, draw your play
button, and make that a movie clip. The next step is to,
within the same play button, place another frame with the
pause button on it. After you have done this give the whole
button an instance name of playPause.
At the moment if you were to play it, your play button will
play through all of it’s frames, to stop this quite simply
insert stop(); onto the first frame of the movie clip.
The easiest method to do the next step, playing and pausing, is to make a new function, and another variable to handle the two different states. So to start off with, we will insert the following piece of code;
var playState:Boolean = true;playState will be the variable I’ll use to play or pause,
true is playing and false is paused.
Before we make our new function we have one final thing to
add into our loadAndPlay function. This is to only play song
IF the are not paused and to make but the play button
displays the correct image, so a simple if statement could
achieve this. Your code should now become;
var trackCount:Number = 0;
_soundbuftime = 10;
function loadAndPlay(trackNum:Number):Void {
  currentPoint = 0;
  trackMP = new Sound();
  trackMP.loadSound(dataArray[trackNum].url, true);
  if (playState){
  trackMP.start(0);
  playPause.gotoAndStop(2);
  } else {
  trackMP.stop();
  playPause.gotoAndStop(1);
  }
  artLoader.loadMC.unloadMovie();
  artLoader.loadMC.loadMovie(dataArray[trackNum].art);
}
OK, so now back to the pause function. We need to first create our function, for the purpose of this tutorial I will name it alternateState. This function will just set playState to the opposite of it’s state, and if it is playing, it will store the sound’s position to play it back at the correct point when it starts again. This bit of our code should look like this:
function alternateState():Void {
  playState = !playState;
  if (!playState) {
  currentPoint = trackMP.position;
  trackMP.stop();
  playPause.gotoAndStop(1);
  }else{
  trackMP.start(currentPoint/1000);
  playPause.gotoAndStop(2);
  }
}
The final step for this play button is to make it actually
play or pause the song when it is pressed. You do this quite
simply with:
playPause.onPress = alternateState;
At this point, the entire code should look like this:
_soundbuftime = 10;
var trackXML:XML = new XML();
var trackCount:Number = 0;
var playState:Boolean = true;
var dataArray:Array = [];
trackXML.ignoreWhite = true;
trackXML.load("./trackXMLFile.xml");
trackXML.onLoad = function(success:Boolean):Void {
  if (success){
  itemHeight = 20;
  for (var i:Number = 0; i < this.firstChild.childNodes.length; i++){
  currentData = this.firstChild.childNodes[i].attributes;
  dataArray[i] = {name:currentData.trackName, url:currentData.songURL, artist:currentData.artist, art:currentData.artwork};
  var currentItem:MovieClip = content.attachMovie("displayItem", "item"+i, content.getNextHighestDepth());
  currentItem._y = itemHeight*i;
  currentItem.track = dataArray[i].name;
  currentItem.artist = dataArray[i].artist;
  currentItem.id = i;
  }
  loadAndPlay(trackCount);
  } else {
  status = "Sorry, the playlist could not be loaded!";
  }
}
function loadAndPlay(trackNum:Number):Void {
  currentPoint = 0;
  trackMP = new Sound();
  trackMP.loadSound(dataArray[trackNum].url, true);
  if (playState){
  trackMP.start(0);
  playPause.gotoAndStop(2);
  } else {
  trackMP.stop();
  playPause.gotoAndStop(1);
  }
  artLoader.loadMC.unloadMovie();
  artLoader.loadMC.loadMovie(dataArray[trackNum].art);
}
function alternateState():Void {
  playState = !playState;
  if (!playState) {
  currentPoint = trackMP.position;
  trackMP.stop();
  playPause.gotoAndStop(1);
  }else{
  trackMP.start(currentPoint/1000);
  playPause.gotoAndStop(2);
  }
}
playPause.onPress = alternateState;
Right now there would be one main issue, that is that the artwork shows too big when it loads, and it does not change size. This can be rather easily fixed. To start off with, we need to get the size of our artLoader movie clip, and store the width and height as variables. This can be achieved with:
_soundbuftime = 10;
var trackXML:XML = new XML();
var trackCount:Number = 0;
var artHeight:Number = artLoader._height;
var artWidth:Number = artLoader._width;
var playState:Boolean = true;
var dataArray:Array = [];
And to make it resize, we need to make a function that makes our main timeline wait for the song to load, and then get it to resize it. So to make our loadAndPlay function have this we need to change it to:
function loadAndPlay(trackNum:Number):Void {
  currentPoint = 0;
  trackMP = new Sound();
  trackMP.loadSound(dataArray[trackNum].url, true);
  if (playState){
  trackMP.start(0);
  playPause.gotoAndStop(2);
  } else {
  trackMP.stop();
  playPause.gotoAndStop(1);
  }
  artLoader.loadMC.unloadMovie();
  artLoader.loadMC.loadMovie(dataArray[trackNum].art);
  onEnterFrame = function():Void {
  if (this.loadMC.getBytesLoaded() == this.loadMC.getBytesTotal()){
  while (this.loadMC._width > artWidth) {
  this.loadMC._width--;
  }
  while (this.loadMC._height > artHeight) {
  this.loadMC._height--;
  }
  }
  }
}
Your player should be working beautifully now, and you
should be ready to move on. The next steps are to now make a
previous and next button to allow your users to skip through
your songs as they wish. This can also be done rather easily
with a function for each. The first function that I will do
will be the next/forward button.
When doing the forward button you need to check whether the
trackCount variable is not the same as the length of the
array before increasing up by one, because if it is you need
to go back to 0, the first song. In code terms this is:
function nextSong():Void {
  trackCount = trackCount<dataArray.length-1 ? trackCount+1 : 0;
  loadAndPlay(trackCount);
}
The previous button is done similarly, except you have to check that the trackCount variable does not go below 0, if it is going to go smaller than 0, you need to set it to the length of the dataArray array minus 1. Below is how you can achieve this:
function previousSong():Void {
  trackCount = trackCount >0 ? trackCount-1 : dataArray.length-1;
  loadAndPlay(trackCount);
}
Next up, draw both your previous and next buttons. Give them the instance names, previousTrack and nextTrack respectively. After you have made the two, add the following into your code, to make them call the appropriate functions.
previousTrack.onPress = previousSong;
nextTrack.onPress = nextSong;
Although we do need these two function for the user to be about to skip through the songs, we also need it to skip the songs when a track completes playing. We could easily do this by utilising the Sound.onSoundComplete() function. We can implement this into our player really easily by adding after where our code says trackMP = new Sound();
trackMP.onSoundComplete = nextSong;The final step of our track navigation is to make a song load after the user releases the cursor over the item. This part is very simple. As you recall we stored a variable on each item named ‘id’. Now that we have set up our player so it can skip songs simply by putting a number in between some brackets we can simply set trackCount to the buttons id, and call the loadAndPlay function. Below is how this is done:
var dataArray:Array = [];
trackXML.onLoad = function(success:Boolean):Void {
  if (success){
  itemHeight = 20;
  for (var i:Number = 0; i < this.firstChild.childNodes.length; i++){
  currentData = this.firstChild.childNodes[i].attributes;
  dataArray[i] = {name:currentData.trackName, url:currentData.songURL, artist:currentData.artist, art:currentData.artwork};
  var currentItem:MovieClip = content.attachMovie("displayItem", "item"+i, content.getNextHighestDepth());
  currentItem._y = itemHeight*i;
  currentItem.track = dataArray[i].name;
  currentItem.artist = dataArray[i].artist;
  currentItem.id = i;
  currentItem.onRelease = function():Void {
  trackCount = this.id;
  loadAndPlay(trackCount);
  }
  }
  } else {
  status = "Sorry, the playlist could not be loaded!";
  }
}
After we have all the song navigations working, it is usually pretty standard to have your player cycle through the artist and song name. To do this I am going to create an interval, and have it change the text that is displayed in the status text field every 2 seconds, or 2000 milliseconds. It is also a good idea to have it update at the same time as setting the interval so that there is no time without displaying anything.
alternateDisplay = setInterval(function():Void {
  status = status == dataArray[trackCount].artist ? dataArray[trackCount].name: dataArray[trackCount].artist;
}, 2000);
status = status == dataArray[trackCount].artist ? dataArray[trackCount].name : dataArray[trackCount].artist;
These should only be set after the XML has loaded, thus your XML onLoad event should look like so:
var dataArray:Array = [];
trackXML.onLoad = function(success:Boolean):Void {
  if (success){
  itemHeight = 20;
  for (var i:Number = 0; i < this.firstChild.childNodes.length; i++){
  currentData = this.firstChild.childNodes[i].attributes;
  dataArray[i] = {name:currentData.trackName, url:currentData.songURL, artist:currentData.artist, art:currentData.artwork};
  var currentItem:MovieClip = content.attachMovie("displayItem", "item"+i, content.getNextHighestDepth());
  currentItem._y = itemHeight*i;
  currentItem.track = dataArray[i].name;
  currentItem.artist = dataArray[i].artist;
  currentItem.id = i;
  currentItem.onRelease = function():Void {
  trackCount = this.id;
  loadAndPlay(trackCount);
  }
  }
  alternateDisplay = setInterval(function():Void {
  status = status == dataArray[trackCount].artist ? dataArray[trackCount].name: dataArray[trackCount].artist;
  }, 2000);
  status = status == dataArray[trackCount].artist ? dataArray[trackCount].name : dataArray[trackCount].artist;
  loadAndPlay(trackCount);
  } else {
  status = "Sorry, the playlist could not be loaded!";
  }
}
The next segment of this player we will create is the playback and loading bars. You will have to change this around to suit what you are after but I am going to create them separate, so you can see how this is done. You can also, alternatively, add another attribute to your XML nodes to store the lengths, which, in my opinion, would work a lot better than how I am going to make it as mine only counts the duration of the amount that is loaded and not the actual duration.
So, to start off with create both of your bars with the instance names loading and playing respectively. For the purpose of saving CPU I am trying to avoid use of too many enterFrame events throughout this player, there are a few exceptions but these bars are no exception. So to start off with I will work on the playback bar and we will build up.
To do this, I will set an interval to update twice every second. When setting the bars x scale you need to convert it to a percentage formula because the _xscale function works by percentages, thus:
updatePlayback = setInterval(function():Void {
  playing._xscale = trackMP.position/trackMP.duration*100;
}, 500);
Pretty simple huh? Now it’s time for the loading bar to come into play. This is the same sort of thing, we need to work out the percentage of bytes loaded out of the total bytes. The formula is exactly the same as the one above, so your code for the updatePlayback interval would now look like this:
updatePlayback = setInterval(function():Void {
  loading._xscale= trackMP.getBytesLoaded()/trackMP.getBytesTotal()*100;
  playing._xscale = trackMP.position/trackMP.duration*100;
}, 500);
But what is a player where you can’t click on a bar and go to that position on the song? Exactly, an average one. Let’s create another bar… we’ll call this one selector. In order to this we need to make a new function and use stop the song, then start it again ad use some more maths, as seen below:
function moveToMouse():Void {
  trackMP.stop();
  trackMP.start((((_xmouse-selector._x)*trackMP.duration)/ selector._width)/1000);
}
And the final step for this feature is to make it take effect when the selector bar is pressed.
selector.onPress = moveToMouse;To this point the player should be coming along quite well but it still doesn’t show how far into the song we are and how long the song is in time! Because flash does everything in milliseconds you need to divide the duration and song name by 1000 to get it into proper seconds. From there we need to floor (round down) both the time marker dived by 60 (for seconds) and the timer marker modulated to 60 (out of 60). We will add this piece into the updatePlayback interval.
updatePlayback = setInterval(function():Void {
  loading._xscale= trackMP.getBytesLoaded()/trackMP.getBytesTotal()*100;
  playing._xscale = trackMP.position/trackMP.duration*100;
  currentSeconds = Math.floor(trackMP.position/1000%60);
  currentMinutes = Math.floor(trackMP.position/1000/60);
  totalSeconds = Math.floor(trackMP.duration/1000%60);
  totalMinutes = Math.floor(trackMP.duration/1000/60);
  if (currentSeconds<10) {
  currentSeconds = "0"+currentSeconds;
  }
  if (totalSeconds<10) {
  totalSeconds = "0"+totalSeconds;
  }
  time = currentMinutes+":"+currentSeconds+" of "+totalMinutes+":"+totalSeconds;
}, 500);
We have almost finished our MP3 now! At the moment we are
up to making our volume slider. To do this we will need 2
movie clips, a slider bar and a dragger bar. I have named
mine volumeSlider and volumeBar respectively.
The next step of this is to allow our dragger to be dragged
when you press it. This bit is pretty simple, except there
are other options within the startDrag() function that we
have to use for this. These are lockcenter, left, top,
right, and bottom. For these values we want, to lock the
center, to be restricted to the bar’s x, it’s starting y,
the bar’s furthest point to the right, and it’s starting y
again. We can achieve this with:
volumeSlider.onPress = function():Void {
  this.startDrag(true, volumeBar._x, this._y, volumeBar._x+volumeBar._width, this._y);
};
Next up, we want our volume dragger to be moved when the user clicks on the volume slider, rather simple:
volumeBar.onPress = function():Void {
  volumeSlider._x =_xmouse;
};
And finally, we want our volume to be constantly set to the percentage of the dragger’s x to the sliders x plus it’s width, thus setting the volume out of 100:
onEnterFrame = function():Void {
  trackMP.setVolume(Math.round((volumeSlider._x-volumeBar._x)/volumeBar._width*100));
};
The final step for this tutorial is to create a scroll
bar. I will explain how to make a very simple scroll bar
with a dragger. There a few steps you need to take to
complete this dragger. The first step for making this
scrollbar is to make another new layer. On this layer you
need to create a new movie clip which will be a mask for
your playlist, I will call mine contentMask. Once you have
done this make this new layer a mask over the layer with
your content MC on it. After you have done this go back to
you layer without the mask and content movie clip and draw
your scrollbar and name that bar, and draw your drag bar and
name that dragger.
**Ensure you embed your fonts
Once you have made these, you will want to move the dragger
to the same position. You can code this with:
dragger._y = y = bar._y;
dragger._x = bar._x;
Because we want our code to only take effect after the XML has loaded, I will make a function that will set up all of the appropriate variables and simply call on that function after the XML has loaded. Below is the function:
function drawScroll():Void {
  friction = 0.9;
  speed = 4;
  top = content._y;
  bottom = content._y+contentMask._height-content._height;
  dragger.onPress = function():Void {
  this.startDrag(false, this._x, y, this._x, y+bar._height-this._height);
  this._x = bar._x;
  this.onEnterFrame = scroll;
  };
  bar.onRelease = function():Void {
  dragger._y = _ymouse;
  dragger.onEnterFrame = scroll;
  };
}
To draw the scrollbar only after the XML has loaded and the playlist has been drawn we will need change the onLoad function to:
var dataArray:Array = [];
trackXML.onLoad = function(success:Boolean):Void {
  if (success){
  itemHeight = 20;
  for (var i:Number = 0; i < this.firstChild.childNodes.length; i++){
  currentData = this.firstChild.childNodes[i].attributes;
  dataArray[i] = {name:currentData.trackName, url:currentData.songURL, artist:currentData.artist, art:currentData.artwork};
  var currentItem:MovieClip = content.attachMovie("displayItem", "item"+i, content.getNextHighestDepth());
  currentItem._y = itemHeight*i;
  currentItem.track = dataArray[i].name;
  currentItem.artist = dataArray[i].artist;
  currentItem.id = i;
  currentItem.onRelease = function():Void {
  trackCount = this.id;
  loadAndPlay(trackCount);
  }
  drawScroll();
  }
  alternateDisplay = setInterval(function():Void {
  status = status == dataArray[trackCount].artist ? dataArray[trackCount].name: dataArray[trackCount].artist;
  }, 2000);
  status = status == dataArray[trackCount].artist ? dataArray[trackCount].name : dataArray[trackCount].artist;
  loadAndPlay(trackCount);
  } else {
  status = "Sorry, the playlist could not be loaded!";
  }
}
You will notice that when you click on the dragger movie clip it begins to drag. However, when you release the mouse you would expect it to stop dragging, but it doesn’t. In order to fix this you need to use the stopDrag() function within an onMouseUp event. This can be done as follows:
onMouseUp = stopDrag;The very last step of this whole tutorial is the creation of a function to make your content actually scroll. Our functions we have set up do try to move the content except we have not yet added in our scroll function. To get this all going add into your code;
function scroll():Void {
  r = (this._y-y)/(bar._height-this._height);
  dy = Math.round((((top-(top-bottom)*r)-content._y)/speed)*friction);
  content._y += dy;
}
After this you are done! Now go away and play with your new MP3 player and let the world hear your sounds!
-Nathan
Just a final word before we wrap up. What you've seen here is freshly baked content without added preservatives, artificial intelligence, ads, and algorithm-driven doodads. A huge thank you to all of you who buy kirupa's books, became a paid subscriber, watch the videos, and/or interact on the forums.
Your support keeps this site going! 😇

:: Copyright KIRUPA 2026 //--