 Tutorials
Books
Videos
Forums
Tutorials
Books
Videos
Forums


This is an archived tutorial from the kirupa.com legacy collection. It covers software that may no longer be available, but it is kept online because the ideas still hold up.
I got this effect from a very good French Flasher. I found
the code on his site,
flasheur.com , broke it down, and improved it a little
bit, all this just for you.
You'll find that in this tutorial, I also took the code from
the
Random motion tutorial, that I use the
swapDepths and duplication functions, and a lot of
actionscript-based motion.
So that's not an easy tutorial, and you'd better check the
other tutorials before attempting this one.
Take a
look at the effect:
[ see the bacteria melt? ]
You can grab an incomplete source to get you started by
clicking here.
The Main Idea
If you went through the random motion tutorial, that part
shouldn't be a problem any more. The tricky part is that
thing when the bacteria seem to melt one into each other.
What we need to do is separate the outline of the bacteria
from the fill. We'll put the fill on a high level, and the
outline on a low level, so that the outlines can never get
on top of the fills. You didn't get that ? That's normal.
The Tutorial:
Now, what we want is that the bacteria move randomly. We
need to put Supra's random motion code to the circle, and
make so that the outline follows somehow the fill.
We also need to duplicate our bacterium, so that there are
more than one on the scene
Create a new layer that you'll name code and add this
code:
                      //Random Movement: kirupa.com
//Thanks to Suprabeener for the original code!

function getdistance (x, y, x1, y1) {
 var run, rise;
 run = x1-x;
 rise = y1-y;
 return (hyp(run, rise));
}
function hyp (a, b) {
 return (Math.sqrt(a*a+b*b));
}

MovieClip.prototype.reset = function () {
var dist, norm, movie_height, movie_width;

//   movie_height: refers to the height of your movie
//   movie_width: refers to the width of your movie

//---------------------------------

movie_height = 200;
movie_width = 400;

//---------------------------------

speed = Math.random()*4+2;
targx = Math.random()*(movie_width-_width);
targy = Math.random()*(movie_height-_height);
dist = _root.getdistance(_x, _y, targx, targy);
};

MovieClip.prototype.move = function () {
var cycle;

// cycle: specifies speed of the movement. The smaller
//         number, the faster the objects move.

//--------------------------------------------

cycle = 200;

//--------------------------------------------

diffx = (targx-_x);
diffy = (targy-_y);
if (_root.getdistance(_x, _y, targx, targy)>speed) {
 x += diffx/7;
 y += diffy/7;
} else {
 if (!this.t) {
  t = getTimer();
 }if (getTimer()-t>cycle) {
  reset();
  t = 0;
  }
 }
_x = x;
_y = y;
}
If you look very closely, you'll see that I removed two
or three lines from the move() and
reset function.
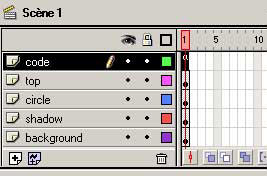
Save your work.
If you test your movie now, you'll see a blue down move
around the scene. Fine. Now we want the outline to follow
the fill. In order to do so, we'll use a controller clip.
Create a new clip (Ctrl + F8), and name it controller.
You won't need to give it an instance name. Leave it blank,
and get back to the main scene (press the little Scene 1
vignette above the timeline).
Open your library (Ctrl + L) and drag and drop the clip
inside the code layer. Open the Actions panel of the
clip and add the code:
| Note |
_root. in front of shadow is
necessary, because we are now in
_root.controller,
so writing shadow._x would be
equivalent to _root.controller.shadow,
which doesn't exist (arrow with the X on it). To get to
shadow, you have to go through _root. See the difference
?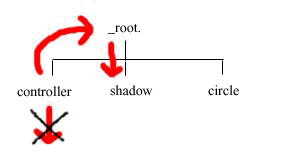 |
We get to the real actionscript part of the effect. We want
to duplicate our little bacteria, and make them all move,
and also make it so that it looks like they melt one into
each other.
In the code layer, under the random motion code, we are
going to put the duplication code.
Everybody OK? I admit this isn't
really simple.
duplicateMovieClip (_root.circle, "circle"+i,
  50+i);
This means you duplicate the movie
_root.circle
under the name "circle"+i in level
50+i.
At the beginning, i=1, so the name
of the duplicate will be circle1 and it will lay on
level 51. Logical. And so on and so forth 11 times
because of the do... while loop.
| Note |
| What we just wrote is certainly the most important thing in the tutorial. I don't know if you noticed, but the circles are loaded between level 51 and 61, whereas outlines are loaded between level 1 and level 11. This means that the fills will always be on top of the outlines. That's the way we can get that melting effect. If we hadn't done that, the outline of the 11th bacteria would cover all the other fills. |
_root["circle"+i].num = i ;

  _root["shadow"+i].num = i ;
Those lines just set a number so that a circle and its
outline have a common number. We'll see about the notation
in the next note.
num is used in the controller because the
circle number i has to tell the outline number i
to follow it.
_root.circle._visible = 0 ;
This makes the first circle invisible because it's on level
0.
_root.dessus.swapDepths(1000) ;
This makes so that the top movie clip gets always to
be on top. Otherwise the outlines would be over it.
That's it ! Finished ! Save your
work, and test the movie.
That last bit of code looks a lot like the one we first put
in the controller. The difference is that we loop so
that all the shadows follow their circle, and
that we have to give a general formula of the path to get to
the shadows and the circles. I like those NOTE things...
| Note |
Whenever you have duplicates generated by a loop, you're
going to need this notation. Let's see how it works._root["shadow"+i]._xFlash reads that and thinks : hmm...
_root[] is equivalent to
_root. except that here you ask Flash to evaluate
what's between the []. Here we have a string,
"shadow", and a number,
i, that are
concatenated with the + operator (this means put
one after another).So flash reads _root., then
shadow1 if i=1
for instance, and finally ._x =
_root.shadow1._xThis technique has a wonderful advantage : you don't have to know the name of your movie clips !! |
You can find
here all the source code of
the bacteria effect.
This
tutorial is written by Ilyas Usal. Ilyas is also known as
ilyaslamasse
on the
kirupa.com forums!
pom
![0]](http://www.ezboard.com/intl/aenglish/images/emoticons/alien.gif)
Just a final word before we wrap up. What you've seen here is freshly baked content without added preservatives, artificial intelligence, ads, and algorithm-driven doodads. A huge thank you to all of you who buy kirupa's books, became a paid subscriber, watch the videos, and/or interact on the forums.
Your support keeps this site going! 😇

:: Copyright KIRUPA 2026 //--