 Tutorials
Books
Videos
Forums
Tutorials
Books
Videos
Forums


This is an archived tutorial from the kirupa.com legacy collection. It covers software that may no longer be available, but it is kept online because the ideas still hold up.
After several years of procrastinating, which I have perfected to an art form, I have decided to write tutorials for creating a full Flash game. Since creating a full game from the beginning is quite an undertaking, I have divided the various aspects of game programming into small tutorials. This tutorial will help you to create a firing mechanism.
The following animation is an early prototype of my game. Move the mouse around the animation and click the left-mouse button. You will learn, in this tutorial, how to create something similar to the following animation.
[ why is a crab firing small movie clips? - click your mouse to see for yourself ]
In an effort to save you some time in re-creating the above animation, I have provided a partial source file that includes everything except the code required to make the crab fire. Download the source file by clicking the link below:
Fire away:
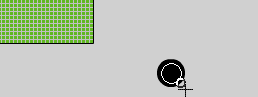
[ draw a small circle outside of your drawing area ]
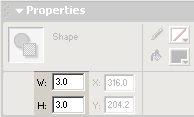
[ enter a value of 3 for the width and height of the circle (bullet) ]
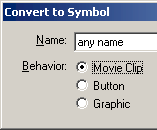
[ convert your circle into a movie clip ]
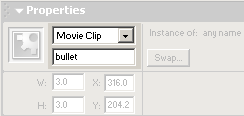
[ give your movie clip the instance name bullet ]
[ copy and paste the above
code into the actions dialog box ]
[ copy and paste the above
code into the actions dialog box ]
While you are finished with this tutorial, I highly recommend that you go to the next section and find out how/why the code works the way it does. Not only will you find out what each line of code does, you may get a better feel of ActionScript programming so you can create your own game with a cooler firing mechanism than the one I presented.
In this section, you will learn what each line of code found in the previous section accomplishes.
Let's take a look at the code a section at a time:
This chunk of code is responsible for
telling the movie clip that a bullet should be fired. It
does that by setting a conditional statement for bullet fire
to true by using the value 1.
_root.fire = 1 enables a if statement that, while not
used in this section of code, is used in the movie clip in the next few section.
You will see why once you get there.
_root.i += 1 initializes a counter and increments its
current value by 1. This is used in the next line where the
duplicateMovieClip
action is. The variable i (_root.i)
is incremented because each new movie clip name that is
duplicated has the variable i included in it. For example,
"bullet" + i.
This topic has been covered extensively on the site, and
doing a simple search for duplicateMovieClip should yield
plenty of good results.
All of the above code is executed ONLY when the mouse button is released.
Let's tackle the first section of code for our bullet movie clip:
In the onLoad event, the goal was to set the
initial properties of the bullet. Since we do not want the
bullet to be visible before firing, it is kept invisible
with this._visible
= 0.
In the next line, there
is a conditional if statement that sets the x and y position
of the bullet to the x and y position of the crab. The
statement is conditional because it is executed ONLY when
_root.fire ==1.
If you recall in the previous section, we set the value of
fire to 1 when the mouse is released.
If we don't use an
if
statement, the bullet would simply follow the crab until the
mouse is released. Since in the next section we
discuss the enterFrame actions, you will notice that the
bullet, once fire
is set to 1, will fly toward the top of the screen. Failing
to synchronize the default position of the bullet to the
position of the crab will cause the bullet to fire from a
random location that is different from the crab's position.
What's up with the next section of code?
                    onClipEvent (enterFrame) {

 if (this != _level0.bullet) {

  if (_root.fire == 1) {

  this._y -= 5;

  this._visible = 1;

  }

  if (this._y<0) {

  this.removeMovieClip();

  }

 }

}
This section of code is where the bullet is
actually displayed, moved, and removed. Ignore the first if
statement that contains
this !=

  _level0.bullet
. I will cover why that
if statement
is displayed in greater detail in the colored table a few
paragraphs down.
The variable
fire makes
another guest appearance! If the value of
fire is
equal to 1, the bullet is set to be visible by
this._visible = 1. Located in this section of code is
the material needed to make the bullet move up.
this._y -= 5
reduces the value of y by 5
pixels. Reducing the y value actually makes the bullet go
up. Flash's Cartesian co-ordinate system is a little
different than the one you may have learned in school.
We do not want the bullet to be moving
indefinitely. We need an exit strategy for the bullet movie
clip. The third if statement,
  if (this._y

  <0)
, becomes active when the bullet's y
position becomes less than zero. When the bullet (the
current movie clip) goes below a y position of 0, the bullet
gets removed via the
this.removeMovieClip() code.
                         Why

  if (this != _level0.bullet) is Used
 |
|
|
When you look at the
code in the previous section, you will notice that a
movie clip that reaches the top boundary (y < 0) is
removed by
this.removeMovieClip. While this code looks
handy to remove a movie clip from the stage, there
is one caveat. The movie clip that is going to be
removed must be a movie clip that has been
duplicated. A movie clip that is not duplicated
cannot be removed with the removeMovieClip function.Now, the bullet movie clip you created in the previous section - that is not a duplicated movie clip. That is the source movie clip from which the rest of the movie clips are duplicated from. So, trying to remove the source bullet movie clip using removeMovieClip will not work. Why not let the bullet go beyond the screen? Nobody will see it go beyond the stage. While nobody will see it go beyond
the stage and up into the stratosphere, Flash and
your system still recognize it. As the movie clip
keeps going up, the actions in the
Therefore, I set an if statement
that checks if the name of the movie clip. If the
name of the movie clip matches the name of the
original source movie, the actions simply don't
execute. How did I find the name of original movie?
It's not the instance name. I simply ran a
|
|
Now, let's have a quick review of what
happens. First, the crab button is pressed. The variable for
fire is initialized to 1. The movie clip is duplicated and
has a number equivalent to the value of
i attached to its instance
name. The movie clip's onLoad handler tells it, after being
duplicated, to position itself on the same x and y
co-ordinates as that of the crab.
When you reach
onEnterFrame, Flash checks to make sure you are a
duplicated movie clip by ensuring your name is not the same
name as that of the source bullet movie clip you created.
Once that test is passed, you check to ensure that the
variable fire is still 1.
With that done, the movie clip's visibility is set to 1 so
you can see the bullet as it streaks upward. The streaking
upward action is controlled by the
this._y -=5 action. Remember, in Flash, subtracting
from a y value makes the object go up on the stage.
Once the bullet movie clip reaches the top of
the animation, it is removed because a duplicated movie can
be easily removed with the
removeMovieClip() function. Repeat everything
mentioned under Replay each time for each time the mouse
button is depressed. Quite amazing isn't it?
You are finished with this tutorial! I hope you found the explanations helpful. I tried to make sure you understand why each and every line of code works the way it does. Some of the sections, such as checking to see if the movie clip is the original movie clip you created, are nitpicky. It is not designed to make this more complicated. All of these little details, in the end, help make you a better programmer and, hopefully, a good game designer.
Here is the source code for the final animation:
|
|
|
Just a final word before we wrap up. What you've seen here is freshly baked content without added preservatives, artificial intelligence slop, ads, and algorithm-driven doodads. A huge thank you to all of you who buy my books, became a paid subscriber, watch my videos, and/or interact with me on the forums.
Your support keeps this site going! 😇


:: Copyright KIRUPA 2026 //--


