 Tutorials
Books
Videos
Forums
Tutorials
Books
Videos
Forums


This is an archived tutorial from the kirupa.com legacy collection. It covers software that may no longer be available, but it is kept online because the ideas still hold up.
As you probably know already, there are many ways to detect a collision with Flash. Flash has a built-in method, called hitTest, that has 2 different syntaxes, which are both described in the AS dictionary:
myMovieClip.hitTest(target) // clip - clip collision
myMovieClip.hitTest(x, y, shapeFlag) // point - clip collision
If you've ever tried to use this method, you certainly realized its limitations: the first one can only detect a collision between the bounding boxes of 2 clips (the blue square around a clip), which proves totally inefficient if the clips are not rectangles (for instance, 2 circles, or 2 lines) as demonstrated on this little drawing of mine:
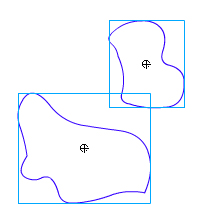
You can see that in this
situation, Flash will detect a non-existent collision.
The second syntax gives more accurate results, but it can only
be used to detect the collision between a clip and a point in
space, which is usually not what we're trying to detect.
There is an additional problem with the hitTest method. I call
it the Where-did-my-hitTest-go? problem. Let's say we're trying
to know whether a circle has touched a wall, symbolized by a
vertical line:

You can see in this highly artistic picture that there is no physical collision between the circle and the line within a frame, even though the circle did go through the wall. That's because hitTest is frame-dependent. Fortunately, there are ways to solve this, or at least to make so that it doesn't bother us too much in the making of our game. Enough talk, here comes the fun part.
The first thing we are going to make is a simplified version of Pong, without an opponent. Here is an example of the pone game that you can test out:
If you open the first source provided, called pong_00.fla, you'll notice there are 2 layers:
code, that contains a single include instruction
objects, that contains a bar symbol called bar and a ball symbol called ball.
Some of you may not be familiar with the
#include
instruction. It allows you to edit your code with your favorite
text editor, like Scite|Flash, or SE|PY, rather than the Flash
action panel. It's a matter of taste, but I strongly encourage
you to try them, you won't be disappointed. Of course, if you
choose not to use them, you'll have to remove the
#include
statement and paste the code directly in Flash.
In order to keep the code as clean and easy to update as
possible, we are going to write very simple classes for our
game. Nothing to worry about, you don't have to have mad OOP
skillz to understand the Actionscript of this game.
In the next section, I'll introduce the game class and related code!
In the previous section you were introduced to what we are trying to do. In this page, I'll introduce more of the code that will set the foundation for our game!
The Game class is just a container for all the important information we need in our game. Its methods will handle the setup of the Game, as well as the basic rules. Here is the first draft of our code:
trace ("Welcome to Pong!") ;
Game = function () {
  trace ("New Game created") ;
  this.timeline = _root ;
  this.left = 100 ;
  this.right = 400 ;
  this.up = 50 ;
  this.down = 350 ;
  this.barLevel = 330 ;
  this.lives = 3 ;
} ;
Game.prototype.init = function () {
  trace ("Init method called") ;
  this.drawArena () ;
  this.initBar () ;
} ;
Game.prototype.drawArena = function () {
  trace ("DrawArea method called") ;
  var Arena = this.timeline.createEmptyMovieClip ("Arena", 0) ;
  Arena.lineStyle (0, 0, 100) ;
  Arena.moveTo (this.left, this.up) ;
  Arena.lineTo (this.right, this.up) ;
  Arena.lineTo (this.right, this.down) ;
  Arena.lineTo (this.left, this.down) ;
  Arena.lineTo (this.left, this.up) ;
} ;
Game.prototype.initBar = function () {
  trace ("InitBar method called") ;
  bar.StartDrag (true, this.left + bar._width/2, this.barLevel, this.right - bar._width/2, this.barLevel);
  ball.followBar () ;
} ;
MovieClip.prototype.followBar = function () {
  this.onEnterFrame = function () {
  this._x = bar._x ;
  this._y = bar._y - this._height / 2 ;
  }
} ;
Pong = new Game () ;
Pong.init () ;
I agree it's a bit long, but there is absolutely nothing complicated in this piece of code. Let's take a look at that code and make sure everything is clear:
Game = function () {
  trace ("New Game created") ;
  this.timeline = _root ;
  this.left = 100 ;
  this.right = 400 ;
  this.up = 50 ;
  this.down = 350 ;
  this.barLevel = 330 ;
  this.lives = 3 ;
} ;
We declare our Game class. In
fact, we're just setting a few global variables relative to the
current timeline we're using, the boundaries of our game arena,
the position of the bar in that arena and the number of lives of
the player. Simple

Game.prototype.init = function () {
  trace ("Init method called");
  this.drawArena () ;
  this.initBar ();
};
Here, we declare the first
method of our Game class: init. What do we want to do when we
initialize the Game? We want to draw the walls of our game and
initialize the bar (for now). So we call 2 other method of the
Game class, drawArena and
initBar. Note that in this prototype,
this refers to the current Game instance.
Game.prototype.drawArena = function () {
  trace ("DrawArea method called") ;
  var Arena = this.timeline.createEmptyMovieClip ("Arena", 0) ;
  Arena.lineStyle (0, 0, 100) ;
  Arena.moveTo (this.left, this.up) ;
  Arena.lineTo (this.right, this.up) ;
  Arena.lineTo (this.right, this.down) ;
  Arena.lineTo (this.left, this.down) ;
  Arena.lineTo (this.left, this.up) ;
} ;
The drawArena method is just a matter of line drawing. Note that we refer to the timeline property of the current Game instance to create the clip in which we're going to draw.
Game.prototype.initBar = function () {
  trace ("InitBar method called") ;
  bar.StartDrag (true, this.left + bar._width/2, this.barLevel, this.right - bar._width/2, this.barLevel);
  ball.followBar () ;
} ;
The
initBar method calls the
StartDrag method on the bar with a complicated set of
parameters. Let's see how that works:
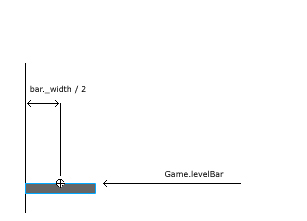
The bar cannot be moved vertically, it has to remain at the same _y value. We've called that value barLevel in our Game class, so the up and down parameters for the drag have to be Game.barLevel. The left parameter, according to the picture, has to be the position of the left wall plus half the width of the bar, hence the:
this.left + bar._width/2
followBar is a simple MovieClip method that make a clip
follow the clip called bar.
Pong = new Game () ;
Pong.init();
We create a new instance of the Game class that we name Pong, and then we call its init method. You can see the actual code at this point in file pong_00.as.
You have just finished Part 1 of this tutorial. In the next section, I'll explain how to move the ball around!
All right, so we have a nice, clean start for
our game, but so far it's not really fun to play. We are now
going to enable the player to throw the ball around! I have
decided that the ball will leave the bar with an angle of 45°
when the player clicks on his mouse. It could be anything,
really, but it's my game so I do whatever I want
As always, this will be handled by our Game class, so we need to create an object that will listen to the Mouse. We also need a variable that will tell us if we're already playing so that the player can't throw the ball when he's already playing.
Game = function () {
  trace ("New Game created") ;
  this.timeline = _root ;
  this.left = 100 ;
  this.right = 400 ;
  this.up = 50 ;
  this.down = 350 ;
  this.barLevel = 330 ;
  this.lives = 3 ;
  this.speed = 10 ;
  this.isPlaying = false ;
  this.MouseListener = {} ;
  this.MouseListener.Game = this ;
  Mouse.addListener (this.MouseListener) ;
} ;
Game.prototype.init = function () {
  trace ("Init method called") ;
  this.drawArena () ;
  this.initBar () ;
  this.MouseListener.onMouseDown = function () {
  trace ("The Mouse has been pressed") ;
  if (! this.Game.isPlaying) {
  ball.move () ;
  this.Game.isPlaying = true ;
  }
  }
} ;
In bold are the changes I made to the already
existing class and methods. We now have the parameter speed,
isPlaying, and the object
MouseListener that gets added to
the list of the Mouse listeners. Note also this particular line:
this.MouseListener.Game = this;
This creates a reference to the current Game in the
MouseListener object (we'll need it in the init method).
In the init method, we make the object listen to the event "The
player has pressed the Mouse button", and in that case, if
isPlaying is false, we call the
move method on the ball and tell
the Game that we are playing.
You have probably noticed that we haven't defined the move
method, that's what we are going to do next.
We are now going to take care of this move method. Let's take a look at what we have to do:
Here is the first draft of the move method:
MovieClip.prototype.move = function () {
  this.vx = pGame.speed * Math.cos (-45 * Math.PI / 180) ;
  this.vy = pGame.speed * Math.sin (-45 * Math.PI / 180) ;
  this.x = this._x ;
  this.y = this._y ;
  this.onEnterFrame = function () {
  this.x += this.vx ;
  this.y += this.vy ;
  this._x = this.x ;
  this._y = this.y ;
  }
} ;
First we define 4 variables: the vertical and
horizontal velocity (vx and vy), and the temporary position of
the ball (x and y). The value of vx and vy is simple
trigonometry, so please check the corresponding tutorial if you
don't understand this line. 45 is the angle in degrees, and it's
negative because I want it to go up and not down.
Then in the onEnterFrame part, we set the temporary position,
and we update the position of the clip to the temporary
position. That temporary position seems useless right now but it
will prove very useful when checking collision with the walls
and the bricks.
In the next section, we'll look at walls and what to do when your ball encounters them.
All right, this is the first time we are going to use hitTesting. We are in the circle - line collision situation I described at the beginning of this tutorial, the where-did-my-hitTest-go situation. So we're NOT going to use the hitTest method to do that. A very good way to know if the ball has touched a wall, let's say the left wall, is too check the position of the ball, as demonstrated here:

We can clearly see that if ball._width / 2 is superior to ball._x - Game.left, there has been a collision. The last thing we need to know is what action to take when the collision happens. Let's take a look another one of my beautiful pictures:

Of course, the opposite happens when the ball hits the upper wall. So let's check out the checkWalls method now (note that we need the information from the Game in the move method, especially the speed of the ball, which we are adding right now, so we need to pass it as a parameter):
Game = function () {
  // ...
  this.speed = 10 ;
  // ...
} ;
Game.prototype.init = function () {
  trace ("Init method called") ;
  this.drawArena () ;
  this.initBar () ;
  this.MouseListener.onMouseDown = function () {
  trace ("The Mouse has been pressed") ;
  if (! this.Game.isPlaying) {
  ball.move (this.Game) ;
  this.Game.isPlaying = true ;
  }
  }
} ;
MovieClip.prototype.move = function (pGame) {
  this.vx = pGame.speed * Math.cos (-45 * Math.PI / 180) ;
  this.vy = pGame.speed * Math.sin (-45 * Math.PI / 180) ;
  this.x = this._x ;
  this.y = this._y ;
  this.onEnterFrame = function () {
  this.x += this.vx ;
  this.y += this.vy ;
  this.checkWalls (pGame) ;
  this._x = this.x ;
  this._y = this.y ;
  }
} ;
MovieClip.prototype.checkWalls = function (pGame) {
  if (this.x < pGame.left + this._width/2) {
  trace ("Collision with left wall") ;
  this.x = pGame.left + this._width/2;
  this.vx *= -1;
  }
  else if (this.x > pGame.right - this._width/2) {
  trace ("Collision with right wall") ;
  this.x = pGame.right - this._width/2;
  this.vx *= -1;
  }
  if (this.y < pGame.up + this._height/2) {
  trace ("Collision with upper wall") ;
  this.y = pGame.up + this._height/2;
  this.vy *= -1;
  }
  else if (this.y > pGame.barLevel - this._height/2) {
  var l = bar._x - bar._width/2;
  var r = bar._x + bar._width/2;
  if (this.x > l && this.x < r) {
  trace ("Collision with the bar") ;
  this.y = pGame.barLevel - this._height/2;
  this.vy *= -1;
  }
  else {
  pGame.loseLife () ;
  }
  }
} ;
The first 3 'if' statements should be clear by now: if a collision with one of the walls happens, we put the ball on the edge of the wall and change the speed. The only tricky point is the last 'if', the one that handles the collision detection between the ball and the bar.
The principle is exactly the same, except that we have to make sure that the bar is present when the ball gets there. We calculate the position of the left end (l) and right end of the bar (r). If the position of the ball at that time is between those values, it means that we hit the bar.
var l = bar._x - bar._width/2;
var r = bar._x + bar._width/2;
Since the bar has its registration point in
its middle, we have to subtract half the width of the bar to its
position to get the position of its left extremity, and the same
for its right extremity.
If the bar is there, we make it bounce just like any wall, and
if it's not, we call the loseLife
method, which we're going to define right now:
Game.prototype.loseLife = function () {
  this.lives -- ;
  this.isPlaying = false ;
  if (this.lives >= 0) ball.followBar () ;
  else this.endGame () ;
} ;
Game.prototype.endGame = function () {
  trace ("End of the Game") ;
  bar.stopDrag () ;
  delete ball.onEnterFrame ;
} ;
We decrease the number of lines and tell Flash
that the player is not currently playing. If the player still
has lives left, we put the ball back on the pad, otherwise we
end the Game with the endGame
method.
If you test your movie now, you should have a little game where
you can throw a ball at a wall and have all the collisions and
reactions work (see complete code in file pong_01.as).
 |
Download AS File (pong_01.as) |
In the next section, we'll look at bricks.
It's time to put some bricks in there, don't you think?
Adding the Bricks
In order to add bricks to the board, we will need the brick
movie clip from the library. Its linkage name is brick. In order
to easily edit new levels, I'm going to use the map method
(which I stole from Klas Kroon from Outside of Society, thanks
to him). That method is pretty simple: in a brand new file,
we're going to create a 2-dimensional array that has the shape
of your block of bricks. Not clear? Let's use an example:
map1 = [
[1,1,1,1],
[1,1,1,1],
[1,0,0,1],
[1,1,1,1],
[1,1,1,1],
[1,1,1,1]
];
This array will produce the following block of bricks:
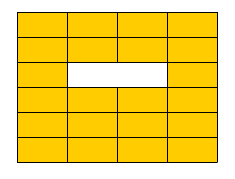
As you can see, a "1" in the array will put a
brick on the board. A "0" will put a hole. I'm sure you can
appreciate how practical this is to create new levels. Now all
we have to do is code it
Open a new .as file and copy/paste the map1 array. Name the
file "maps.as", and include it in "pong.as". We are going to
create a new method called initBricks, and we will call
it when we initialize the game, like so:
Game.prototype.init = function () {
  trace ("Init method called") ;
  this.drawArena () ;
  this.initBar () ;
  this.initBricks (eval ("map" + this.level) ) ;
  this.MouseListener.onMouseDown = function () {
  trace ("The Mouse has been pressed") ;
  if (! this.Game.isPlaying) {
  ball.move (this.Game) ;
  this.Game.isPlaying = true ;
  }
  }
} ;
The initBricks method takes one parameter (an array), in this case map1 which has been defined in "maps.as".
Game.prototype.initBricks = function (myMap) {
  brick_mc = this.timeline.createEmptyMovieClip ("brick_board",1);
  // size of the bricks
  var h = 25;
  var w = 50;
  var c = 0;
  for (var i in myMap) {
  for (var j in myMap[i]) {
  if (myMap[i][j] != 0) {
  var cl = brick_mc.attachMovie ("brick", "b"+c, c);
  cl._x = j * w + this.left + w ;
  cl._y = i * h + this.up + h ;
  cl.life = myMap[i][j];
  c++;
  }
  }
  }
} ;
First we create the brick_mc movie clip, that will hold all our bricks. Then we loop through all the elements of our array. If the value is not null, we attach a brick and position it accordingly. I suggest you take a look at the grid tutorial if you have trouble understanding how this works.
We eventually define a variable called life
that is equal to the value found in the array. We only put 1 or
0, so at best, the life will be 1, which means that the bricks
will disappear right away when the ball hits them.
If you test your movie now, you'll see that the bricks appear,
but the ball ignores them completely. It is now time to develop
the collision detection between the bricks and the ball. This is
definitely the hardest part of the code, so hang on!
In the next section, I'll explain the collision detection we will use!
We are going to write the checkBricks method for the ball, just like we create the checkWalls method.
MovieClip.prototype.move = function (pGame) {
  this.vx = pGame.speed * Math.cos (-45 * Math.PI / 180) ;
  this.vy = pGame.speed * Math.sin (-45 * Math.PI / 180) ;
  this.x = this._x ;
  this.y = this._y ;
  this.onEnterFrame = function () {
  this.x += this.vx ;
  this.y += this.vy ;
  this.checkWalls (pGame) ;
  this.checkBricks (pGame) ;
  this._x = this.x ;
  this._y = this.y ;
  }
} ;
MovieClip.prototype.checkBricks = function (pGame) {
  for (var cl in pGame.timeline.brick_board) {
  var clip = pGame.timeline.brick_board[cl];
  if (clip.hitTest(this.x, this.y, true)) {
  var u = clip._y;
  var d = clip._y + clip._height;
  var l = clip._x;
  var r = clip._x + clip._width;
  var bounce = 0;
  clip.life--;
  if ( clip.life == 0) clip.removeMovieClip();
  if (this._x <= l && this.x >= l) {
  this.x = l;
  this.vx *= -1;
  bounce = 1;
  }
  else if (this._x >= r && this.x <= r) {
  this.x = r;
  this.vx *= -1;
  bounce = 1;
  }
  if (this._y <= u && this.y >= u) {
  this.y = u;
  this.vy *= -1;
  bounce = 1;
  }
  else if (this._y >= d && this.y <= d) {
  this.y = d;
  this.vy *= -1;
  bounce = 1;
  }
  if (!bounce) {
  trace ("Houston, we have a problem!");
  this.vy *= -1 ;
  trace (this.x + ":" + this._x + ":" + l + ":" + r);
  trace (this.y + ":" + this._y + ":" + d + ":" + u);
  }
  pGame.checkEndLevel ();
  }
  }
} ;
Take a deep breath now. It's not as bad as it seems. In the following section, I will explain the code:
for (var cl in pGame.timeline.brick_board) {
  var clip = pGame.timeline.brick_board[cl];
Thanks to this for...in loop, we have access to
all the clips contained in the
pGame.timeline.brick_board movie clip, that is to say the
bricks, one after another. To make the code easier to read, I
created a reference to the current brick that I named clip. This
is a really important method, so make sure you understand what's
happening (there's also a tutorial about for... in loops).
if (clip.hitTest(this.x, this.y, true)) {This is the first time we use the hitTest method in this game. Notice that I used the point to clip form of the method, which means that I pretend that the ball is just a point, that it has no width. This is of course untrue, and this means that our game is not going to be 100% accurate.
Fortunately, it doesn't have to be 100% accurate, it just has to be accurate enough. If the ball were bigger, you'd better use the clip to clip version of hitTest.
OK, so now that we know that the ball has hit a brick, we need to find out which side of the brick was hit.
var u = clip._y;
var d = clip._y + clip._height;
var l = clip._x;
var r = clip._x + clip._width;
This retrieves the position of the upper, lower, left and right edges of the brick we've just hit (its registration point in on the top left corner).
var bounce = 0;
clip.life--;
if ( clip.life == 0) clip.removeMovieClip();
The bounce
variable will tell us if we've managed to find out which side of
the brick has been hit (it happens that we can't, but it's a
problem with Flash, not with the code ). And of course, when the
ball hits the bricks, its life decreases, and when it reaches 0,
the brick is removed.
You are almost finished, but not yet! In the next section, I'll finish explaining the code!
We are going to continue the code explanation from the previous section. Now this is the really important part, where we try to find out which side has been hit:
if (this._x <= l && this.x >= l) {
  this.x = l;
  this.vx *= -1;
  bounce = 1;
}
The idea is quite simple: we're sure that the ball has hit the left side of the brick if the former position of the ball (this._x) was on the left of the left side, and the new temporary position of the brick (this.x) is on the right of the left side.
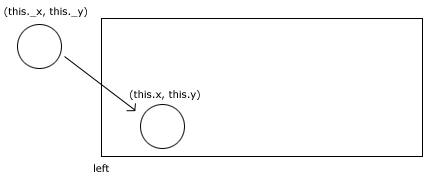
In that case, we put the ball against the wall, change its horizontal speed and set the bounce flag to 1.
We do exactly the same for the 4 sides.
if (!bounce) {
  trace ("Houston, we have a problem!");
  this.vy *= -1 ;
  trace (this.x + ":" + this._x + ":" + l + ":" + r);
  trace (this.y + ":" + this._y + ":" + d + ":" + u);
}
This is the back-up plan. I had to put this piece of code because sometimes, the ball simply went through some of the bricks, without bouncing. What it does: if bounce is still false, which means that we haven't been able to find out which side of the brick had been hit, we change the vertical speed. I did that because there's a much greater chance that the ball hit one of the big sides. But you can be original and assume that there's a greater chance for the ball to hit the smaller sides of the brick, and change the code to:
this.vx *= -1 ;pGame.checkEndLevel ();We need to make sure that all the bricks have not been removed from the board, and that's what this function does.
That function is pretty simple:
Game.prototype.checkEndLevel = function () {
  trace ("CheckEndLevel called") ;
  for (var c in this.timeline.brick_board) {
  var clip = this.timeline.brick_board[c] ;
  if (clip instanceof MovieClip) {
  return ;
  }
  } ;
  trace ("End of the level") ;
  this.nextLevel () ;
} ;
Game.prototype.nextLevel = function () {
  trace ("NextLevel called") ;
  this.level ++ ;
  this.isPlaying = false ;
  this.init () ;
} ;
Let's take a look at how the above code works:
for (var c in this.timeline.brick_board) {
  var clip = this.timeline.brick_board[c] ;
  if (clip instanceof MovieClip) {
  return ;
  }
} ;
This is again the good old for..in loop trick. We take a peek at what inside the clip that contains all our bricks (brick_board). If we find a clip, that means that the level isn't over yet. We get out of the function straight away with the return command.
trace ("End of the level") ;
this.nextLevel () ;
If this code is executed, it means that no clip has been found,
and that the level is over. We can call the
nextLevel function.
Game.prototype.nextLevel = function () {
  trace ("NextLevel called") ;
  this.level ++ ;
  this.isPlaying = false ;
  this.init () ;
} ;
We increase the level, we tell Flash that we're not playing anymore, and we reinitialize the board.
You're pretty much good to go as it is right now. The last thing we need to make sure of when we change level is that the level actually exists. That's why we have to make a little modification in our code:
Game.prototype.init = function () {
  trace ("Init method called") ;
  this.drawArena () ;
  this.initBar () ;
  var theMap = eval ("map" + this.level) ;
  if (theMap != undefined) this.initBricks ( theMap ) ;
  else this.endGame () ;
  this.MouseListener.onMouseDown = function () {
  trace ("The Mouse has been pressed") ;
  if (! this.Game.isPlaying) {
  ball.move (this.Game) ;
  this.Game.isPlaying = true ;
  }
  }
} ;
We end the game if no map has been found.
|
|
Download AS File (pong_02.as) |
There, you should now have a nice little breakout game, with
editable levels. Don't hesitate to post on the forums if you
have any question concerning this tutorial
![0]](http://www.ezboard.com/intl/aenglish/images/emoticons/alien.gif) pom
pom
 |
Just a final word before we wrap up. What you've seen here is freshly baked content without added preservatives, artificial intelligence, ads, and algorithm-driven doodads. A huge thank you to all of you who buy kirupa's books, became a paid subscriber, watch the videos, and/or interact on the forums.
Your support keeps this site going! 😇

:: Copyright KIRUPA 2026 //--