 Tutorials
Books
Videos
Forums
Tutorials
Books
Videos
Forums


This is an archived tutorial from the kirupa.com legacy collection. It covers software that may no longer be available, but it is kept online because the ideas still hold up.
Sites
made with Flash usually exist out of several
separate movies, which load into the main movie
when given the command
to. They are called external loaded swf's because
they are not part of the main movie. In this
tutorial, we are going to see how to make
transitions between those movies in Flash MX, and
add a preloader to each external movie. Ready ?
Below is an example on transitions
between external loaded movies. Of course, the
transitions are fully customizable.
{ Please note this is an example without the additional external preloader }
Setting up the external movie:
Open your
external movie in Flash. Set up the animation
you want to happen when the movie is loaded in
the main movie. This animation should start
from frame 1 on, in case you are unsure where
to start it. Also, set up the animation to play when another movie will load.
See my example image in step iv. The red line
(playhead) is on
the first frame of the outro, and the frame
right before that is the content frame. So
basically, the structure is Intro-animation -
Content - Outro-animation.
Create a new
layer by pressing the Insert Layer icon on the
bottom left of the timeline, and rename it actions, without the quotes.
Click
the the frame number in the actions layer at
which your content is at. Hit F6 to
convert it to a keyframe. Now right-click the
keyframe you just created, choose Actions from the
menu and copy and paste stop();
into the Actions dialog box.
Create a new layer, call it checkvar and select the frame right after the one at which your content is at. Convert it to a keyframe by pressing F6 or by right clicking it and choosing Insert Keyframe from the menu.
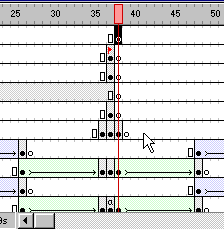
[
convert the frame to a keyframe ]
Once you have created the keyframe, press CTRL+F8 (Insert | New Symbol). The Create New Symbol dialog should appear. Give it any name, select Movie Clip and press OK. Return to the stage by pressing the button next to the name you just gave the movieclip, on the bar right above the stage.
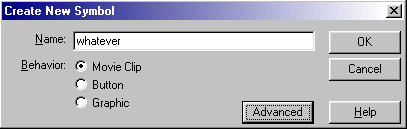
[
create a new, empty movieclip ]
On the checkvar layer timeline, click anywhere between the beginning of the timeline on the and the keyframe you created in step iv. Open the Library by pressing F11 (Window | Library). Search for the name you gave the movieclip. Once you've found it, drag it to the stage. It doesn't matter where.
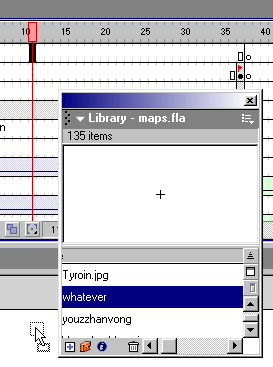
[
drag the movieclip from the library to the stage ]
Now, let's add some code to
the movieclip just placed on stage. Right click
the the circle with the little cross in it ( )
and select Actions.
)
and select Actions.
Copy and paste
the following code into your Actions dialog box:
onClipEvent (load) {

 _root.curmovie = "maps";

}

onClipEvent (enterFrame) {

 if (_root.curmovie != "maps") {

  _parent.gotoAndPlay(38);

 }

}
Some changes have to be made to the code above depending on your movie setup.
maps
is the name given to this movie. This variable
will be used later on in the main movie setup
part. It could be anything like: profile, news,
home, work, portfolio ...
38 is the frame number of the first frame of the outro. In my example image in step iv, 38 is the first frame of the outro. This should of course be replaced by the frame number of the first frame of the outro of your movie.
Click the last frame of the external movie (thus the last frame of the outro) in the actions layer, hit F6 to convert it to a keyframe, right-click it, and choose Actions from the menu that pops up. Now insert the following code into the Actions dialog box:
[ copy and paste the
above code ]
 |
important |
| The filenames of your movie clips have to be maps.swf, where maps is the name given to the movie clip in the actionscripting in step vii. For the examples given in step viii, the names would be profile.swf, news.swf, home.swf and portfolio.swf. |
Again, some change have to be made to the code above. _root.content is the instance name of the movieclip that you are loading the external movie into in the main movie.
You are finished with setting up the external movie. We are not yet finished though ! The next section explains how to set up the main movie, and also explains why and how the code works the way it does.
This is a continuation of the tutorial found in the previous section. If you stumbled here via a search result, please finish the beginning of this tutorial first by clicking here.
Setting up the main movie:
Open your main movie in Flash.
Right-click a button which will load the
external movie into the main movie. Select
Actions from the menu that pops up. The
Actions dialog should appear.
Copy
and paste the following code into the Actions
dialog box:
Some
modifications have to be made to the
actionscripting (yes, yet again
 ) skins
is the name of the movie you want to load when
this button is clicked. Remember those
movienames we used in the previous section ? Well,
here's where we're using them. Of course, this
value is different for each button. We don't
want every button to load the same page do we
?
) skins
is the name of the movie you want to load when
this button is clicked. Remember those
movienames we used in the previous section ? Well,
here's where we're using them. Of course, this
value is different for each button. We don't
want every button to load the same page do we
?
Repeat
step i, ii and iii for each button.
It
is essential that an external movie autoloads
when entering the main movie. The reason for
that can be read in the How and Why
explanation below. To achieve this, add the following
actionscripting to the frame that, when
reached, you want the external movie to
autoload. (which has
to be a keyframe ! If it isn't a keyframe yet,
select it and hit F6) of the main movie:
And
of course, the part home
of home.swf has
to be one of the names of the external movies,
which we used at the previous section. If you
don't understand, see the example names given
at the previous section in step viii. For those
examples, home.swf
could be replaced by profile.swf, news.swf,
home.swf, work.swf and portfolio.swf.
Adding a preloader with a bar:
To preload an external movie with a bar before playing the external movie, use this tutorial by Shane Waldeck (Lostinbeta). Apply it to the external movie you want to preload before displaying.
Congratulations ! You've finished creating transitions between external loaded movies ! Now for what might be the most important part: how and why ? I'll explain how this works to you:
How and why it works:
When an external movie is loaded inside a main movie, the external movie will also use the main movie's _root. So what I did is make the main movie write a var to the _root, which is then read by the external movie. This way the two movies can communicate.
The code on the new movieclip in the external movie is used to check if the variable written by the main movie has changed. Since every button of the main movie changes that variable, it will basically check if another movie has to load into the main movie. If it has changed (which means that another movie has to be loaded now), the external movieclip will start playing the first frame of the outro.
The reason why the other movie can't be on the stage anymore when it plays the the outro, is because of the onClipEvent(enterFrame). This practically equals all the time. So what will happen if it wasn't of the stage ? It would keep giving the command to gotoAndPlay, which would make the movie freeze at the frame you told it to play.
Because the movie is of stage from the outro on, it won't keep giving the command to gotoAndPlay. And so, the movie will continue. When the outro reaches it's last frame, it gives the command to load another movieclip into the main movie. And then the intro animation of the other external movie is played, which makes a nice transition.
When the command is given to load another movie, the movie that is loaded now will automatically make place for the new one. So don't worry that the other movie will still be there when a new one has loaded.
For the autoload option of part v, the reason that you can't use _root.curmovie+".swf" like we did for the external movies, is simply because the var doesn't exist yet when first entering the page. It is created by the buttons when clicked, or by an external movie when played. Because of that reason, it is essential that an external movie autoloads when entering the main movie. But that won't be a problem, as nobody wants to see an empty space when entering a site.
Remember that, if you put this online, it is prefered to put all the swfs in the same folder. If not, the external movies won't be found. It is possible to change it, but if you don't really need them to be in different folders, just keep them in the same.
That's it. If you have any further questions, please don't hesitate to post them on the forum. You can also contact me by e-mail, my e-mail address is given below.
Hope
this helps
Voetsjoeba.
Just a final word before we wrap up. What you've seen here is freshly baked content without added preservatives, artificial intelligence, ads, and algorithm-driven doodads. A huge thank you to all of you who buy kirupa's books, became a paid subscriber, watch the videos, and/or interact on the forums.
Your support keeps this site going! 😇

:: Copyright KIRUPA 2026 //--
