 Tutorials
Books
Videos
Forums
Tutorials
Books
Videos
Forums


This is an archived tutorial from the kirupa.com legacy collection. It covers software that may no longer be available, but it is kept online because the ideas still hold up.
The various filter classes that come bundled with Flash 8 are a fast way to create effective visual effects. This tutorial will teach you how to apply a filter to a movie clip instance and then animate it, all with ActionScript.
Our finished animation will look similar to the following animation:
[ hover over the text to see a filter effect in action ]
In this tutorial, I focus mainly on the Glow Filter, but all effects can be implemented similarly.
So, let's get started:
Download Partial Source for Flash 8
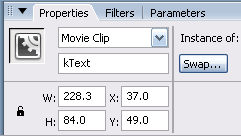
[ give your movie clip the caption kText ]
import flash.filters.GlowFilter;
var gf:GlowFilter = new GlowFilter(0x356D83, 100, 3, 3, 5, 3, false, false);
kText.filters = [gf];
kText.onRollOver = function() {
  this.onEnterFrame = function() {
  if (gf.blurX < 20) {
  gf.blurX++;
  gf.blurY++;
  } else {
  delete this.onEnterFrame;
  }
  this.filters = [gf];
  };
};
kText.onRollOut = function() {
  this.onEnterFrame = function() {
  this.filters = [gf];
  if (gf.blurX > 3) {
  gf.blurX--;
  gf.blurY--;
  } else {
  delete this.onEnterFrame;
  }
  };
};
In the next section, I will explain the code so that you can have a better understanding of how to implement and modify this and other effects in your animations.
In the previous section, you saw how your animation worked. In this page, you will learn what caused it to work the way it did.
import flash.filters.GlowFilter;This line imports the GlowFilter class file into your Flash document. You can find the class files at C:\Program Files\Macromedia\Flash 8\<language>\First Run\Classes\FP8\flash\filters\ assuming a default installation (on PC).
By importing these class files, we can use all of the properties and methods contained within. You’ll notice that in this tutorial, we only import the GlowFilter class since that is the only class which we will be using in this example.
var gf:GlowFilter = new GlowFilter(0x356D83, 100, 3, 3, 5, 3, false, false);Here we create a new GlowFilter instance and store it as the variable gf. The GlowFilter class constructor requires eight parameters which are properties of the GlowFilter class. These properties, in order, are:
kText.filters = [gf];This is where we actually apply the filter effect to an object on the stage (in this case our kText movie clip). The filter property of a movie clip expects an array of filters. Here we only have one filter so we need only to enter one value.
kText.onRollOver = function() {This is simply the event handler for the kText movie clip. Here we define a function to execute when the event occurs, in this case when the mouse rolls over the movie clip.
this.onEnterFrame = function() {Another event handler for the kText movie clip.
if (gf.blurX < 20) {This if statement checks to see if the blurX property of the GlowFilter instance gf is less than 20. If it returns true, the statements enclosed within the braces executes.
gf.blurX++;
gf.blurY = gf.blurX;
If the above if statement returns true, this code adds 1 to the blurX property of the GlowFilter instance gf. It then sets the blurY property to equal the blurX property.
} else {
  delete this.onEnterFrame;
}
If the above if statement returns false, the code within the else statement executes. So if the the blurX property is not less than 20, the onEnterFrame handler for kText is deleted.
this.filters = [gf];So far, the code has adjusted the blur properties of our GlowFilter instance. Now we need to re-apply them to the kText movie clip by giving its filter property an array of filter effects. And that is exactly what this code does.
kText.onRollOut = function() {
  this.onEnterFrame = function() {
  this.filters = [gf];
  if (gf.blurX > 3) {
  gf.blurX--;
  gf.blurY--;
  } else {
  delete this.onEnterFrame;
  }
  };
};
This code does the exact same as the above event handler, except in reverse. So when you roll out of the kText movie clip the blur of the gf GlowFilter will get smaller until the blurX property is not less than three, at which point the onEnterFrame handler will get deleted.
That’s it. I hope this has taught you the basics of the filter effects in
Flash 8 and how to manipulate them using ActionScript. If you have any
questions, feel free to post them on the
kirupaForums.
Good Luck!
 |
Jesse Marangoni TheCanadian |
Just a final word before we wrap up. What you've seen here is freshly baked content without added preservatives, artificial intelligence, ads, and algorithm-driven doodads. A huge thank you to all of you who buy kirupa's books, became a paid subscriber, watch the videos, and/or interact on the forums.
Your support keeps this site going! 😇

:: Copyright KIRUPA 2026 //--