 Tutorials
Books
Videos
Forums
Tutorials
Books
Videos
Forums


This is an archived tutorial from the kirupa.com legacy collection. It covers software that may no longer be available, but it is kept online because the ideas still hold up.
For many types of projects, you will be instantiating movie clips from your library and displaying them on your stage. Instantiating is a fancy word word for creating a copy of or duplicating. An earlier tutorial covers just how you would do that. One thing that the earlier tutorial does not cover is how to actually manage those instantiated movie clips. Once a movie clip has found its way into your stage, how can you work with it later? That is where this tutorial comes in.
Click on the following blob of circles to see an example where, each time you click, the circles that make up the blob disappear and are replaced with new circles:
This is done by me storing a reference to each movie clip and deleting them later. In this tutorial, let's learn how to do that.
What you are going to do is create a circle movie clip whose class name is BlueCircle. If you need further instructions on how to do that, the following instructions will help you out. Otherwise, skip over to the next section where we introduce the code and explain what is going on:
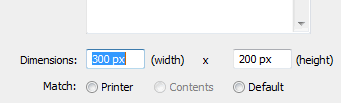
[ set your animation's width/height to 300 by 200 ]

[ draw a blue, solid, filled circle ]
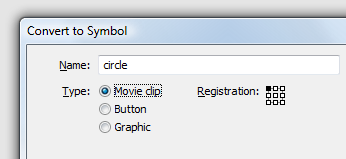
[ give your symbol the name circle and make sure it is also set to be a movie clip ]
Do not hit OK just yet. Let's make some more modifications.
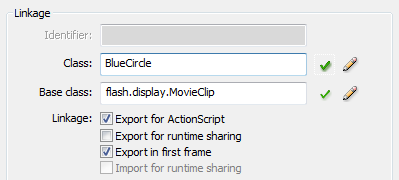
[ check 'Export for ActionScript and enter BlueCircle for your class ]
The Base class field will automatically be populated for you, but if it hasn't, make sure to enter flash.display.MovieClip as shown in the above image.
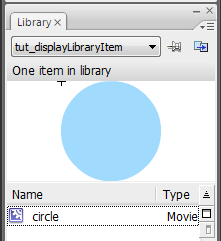
[ your circle in your Library ]
If you do not see your Library, press Ctrl + L to display it.
Ok, now we are in a good spot, for you have your library setup. In the next section, let's add the code and explain what was done to keep track of the newly added movie clips.
In the previous section, you created a circle and added it to your movie clip. In this page, let's add some code and look at how to manage your instantiated movie clips.
Right click on a blank keyframe on your timeline and select Actions. The Actions window will appear. Inside this window, copy and paste the following code:
function Start():void {
  DuplicateItems();
  stage.addEventListener(MouseEvent.CLICK, StageClick);
}
var listOfMovieClips:Array = new Array();
function StageClick(event:MouseEvent):void {
  RemoveItems();
  DuplicateItems();
}
function RemoveItems() {
  for (var i:int = 0; i < listOfMovieClips.length; i++) {
  var itemToRemove:DisplayObject = listOfMovieClips[i];
  this.removeChild(itemToRemove);
  }
  listOfMovieClips = new Array();
}
function DuplicateItems() {
  for (var i:int = 0; i < 50; i++) {
  var newCircle:BlueCircle = new BlueCircle();
  listOfMovieClips.push(newCircle);
  this.addChild(newCircle);
  newCircle.x = Math.random()*300;
  newCircle.y = Math.random()*200;
  newCircle.alpha = .1 + Math.random()*.3;
  newCircle.scaleX = newCircle.scaleY = .1 + Math.random()*2;
  }
}
Start();
Once you have copied and pasted the above code, press Ctrl + Enter to test your application. You should see something similar to the following in your preview window:
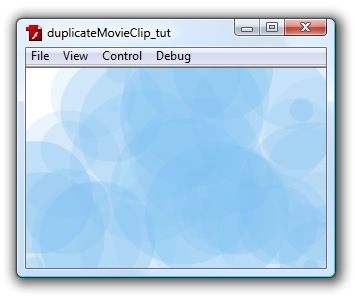
If you click anywhere in your stage, the circles will re-generate. Much of the code you pasted should not be new to you. In fact, all of the code I have grayed out in the following copy of the above code is covered fairly extensively in the Displaying Library Content tutorial:
function Start():void {
  DuplicateItems();
  stage.addEventListener(MouseEvent.CLICK, StageClick);
}
var listOfMovieClips:Array = new Array();
function StageClick(event:MouseEvent):void {
  RemoveItems();
  DuplicateItems();
}
function RemoveItems() {
  for (var i:int = 0; i < listOfMovieClips.length; i++) {
  var itemToRemove:DisplayObject = listOfMovieClips[i];
  this.removeChild(itemToRemove);
  }
  listOfMovieClips = new Array();
}
function DuplicateItems() {
  for (var i:int = 0; i < 50; i++) {
  var newCircle:BlueCircle = new BlueCircle();
  listOfMovieClips.push(newCircle);
  this.addChild(newCircle);
  newCircle.x = Math.random()*300;
  newCircle.y = Math.random()*200;
  newCircle.alpha = .1 + Math.random()*.3;
  newCircle.scaleX = newCircle.scaleY = .1 + Math.random()*2;
  }
}
Start();
Before looking at the remaining, new code in greater detail, let me explain the basic idea behind what I am doing.
The solution I am employing is fairly straightforward. Whenever you add a new instance of a movie clip, I add that movie clip instance to an array. An array is a basic data structure that allows you to store items inside it like a box or container. My goal is to, in the end, have a single array that contains a reference to every movie clip instance that I wish to keep track of. The snippets of code I highlight above put what I just wrote into practicee.
Let's look at each line in greater detail:
var listOfMovieClips:Array = new Array();First, I am creating a new array called listOfMovieClips. This array will be responsible for storing a reference to each of the movie clip instances you decide to add to your stage.
Let's jump down a few blocks of code and look at the code where we add our movie clip instance to our array:
function DuplicateItems() {
  for (var i:int = 0; i < 50; i++) {
  var newCircle:BlueCircle = new BlueCircle();
  listOfMovieClips.push(newCircle);
  this.addChild(newCircle);
  newCircle.x = Math.random()*300;
  newCircle.y = Math.random()*200;
  newCircle.alpha = .1 + Math.random()*.3;
  newCircle.scaleX = newCircle.scaleY = .1 + Math.random()*2;
  }
}
In the first line, I declare an object called newCircle whose type is BlueCircle. I also initialize it to the value of a new BlueCircle movie clip instance. Once I have done that, I go ahead and add it to the listOfMovieClips array.
The last thing to look at is the code for actually clearing your stage and array of these movie clip instances:
function RemoveItems() {
  for (var i:int = 0; i < listOfMovieClips.length; i++) {
  var itemToRemove:DisplayObject = listOfMovieClips[i];
  this.removeChild(itemToRemove);
  }
  listOfMovieClips = new Array();
}
The code is very straightforward. I loop through each item inside our listOfMovieClips array and remove that item from our stage:
function RemoveItems() {
  for (var i:int = 0; i < listOfMovieClips.length; i++) {
  var itemToRemove:DisplayObject = listOfMovieClips[i];
  this.removeChild(itemToRemove);
  }
  listOfMovieClips = new Array();
}Yay - you are now done! As you can see, the solution to our problem was not difficult. Like many things with programming, the solution requires thinking about the problem in a different light.
To see how my example was created, feel free to download the final source from the following location:
Just a final word before we wrap up. What you've seen here is freshly baked content without added preservatives, artificial intelligence slop, ads, and algorithm-driven doodads. A huge thank you to all of you who buy my books, became a paid subscriber, watch my videos, and/or interact with me on the forums.
Your support keeps this site going! 😇


:: Copyright KIRUPA 2026 //--
