 Tutorials
Books
Videos
Forums
Tutorials
Books
Videos
Forums


This is an archived tutorial from the kirupa.com legacy collection. It covers software that may no longer be available, but it is kept online because the ideas still hold up.
Introduction
First I'd like to thank Keith Peters from bit-101 for introducing me to perspective in Flash. Be sure to check his site, it's one of the best experimental sites out there.
We are going to see in this tutorial how you can give a realistic perspective effect to an object. I'm not going to lie to you: this is not very easy. But it is less hard than you could imagine. Even though it is not math-free, this tutorial will not get into very complex mathematic manipulations, but rather explain as simply as possible how it works. Then, when we feel comfortable about it, I will show you a few experiments I made with this, explaining step by step how I got there.
Let's take a look at what we know already about perspective. Basically, the farther the object, the smaller it looks. Good. The second thing is: ultimately, when you look far far away, all the objects seem to head towards one point on the horizon (imagine a very long tree lane). Let's call this point the horizon point (because I have no clue how it is called in English). Very well: we're ready to start.
A little bit of theory
Ever heard of Thales Theorem? No? Well it's very simple. And very useful. But first let's have a look at that picture. On the left, your eye, on the right, an object, and in the middle an imaginary plan that holds an image of the object, smaller than the actual object. This is the focal plan.
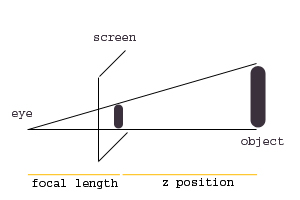
[ this is a triangle (everybody follows?) ]
Let's introduce a very important quantity: the focal length (fl). This expression is borrowed
from optics, and you could see it like this: imagine that you look out your window. Imagine also
that nothing moves out there. You know that the closer from the window the objects will be, the
bigger they will appear. That's the 'general' perspective. But there's more. Because
the size of the objects depends also on where YOU stand relatively to the window. So basically,
the focal length is the distance between you and that window. Therefore, a short focal length
means you have your nose on the window. On the opposite, a long focal length
means that you look at it from a long distance. This is about as clearly as I can explain it.
z is then how deep you go behind the window (z=0 is the window), the 'general' depth.
But I told you about Thales theorem. It is very useful for us to find the scaling formula: if
we call
H the real height of the object, and
h the height that we see
on the screen, then we have this relation:
H/h=(fl+z)/flActually, we're looking for
h/H, so the scaling factor is
fl/(fl+z).
Let's look at this for one second. Imagine that you have a long focal length (fl=1000). If
you're on the screen, z=0 and the scaling factor equals to 1000/(1000+0)=1. The object's scale
remains the same.
Now if z=500, the scaling factor equals to 1000/(1000+500)=0.66. The objects gets smaller.
Last thing to notice: the bigger the focal lenght, the less influence z has on the scale. For
instance, let's find when the object's scale is 0.5. If fl=1000, then you must have z=2000.
That's a lot. Now if fl=100, you need z=200. It comes much quicker.
Enough theory! Let's code!
First experiment
[ now this is a circle ]
We will create a ball that goes deeper and deeper.
onClipEvent (load)

  {

  z=0;

  zspeed=5;

  fl=300;

  }

  onClipEvent(enterFrame)

  {

  scale=fl/(fl+z);

  _xscale=_yscale=100*scale;

  z+=zspeed;

  }
You're encouraged to change these values to see what they actually mean (you can try a negative
speed for instance).
Then we calculate the scale (it changes because z changes), and set the object to the right
scale. Finally, we "move" the object by
zspeed (in fact we don't really move it,
we just increase its depth).
offx here) as an object which size decreases just as any other object.[ i marked the horizon point with a white spot ]
onClipEvent (load)

  {

  z=0;

  zspeed=5;

  fl=300;

  xcenter=175;

  ycenter=175;

  offx=(_x-xcenter);

  offy=(_y-ycenter);

  }

  onClipEvent(enterFrame)

  {

  scale=fl/(fl+z);

  _x=xcenter+offx*scale;

  _y=ycenter+offy*scale;

  _xscale=_yscale=100*scale;

  z+=zspeed;

  }
_alpha--;
There! This is the end of our introduction to perspective. I hope it made sense. Be sure to check the sequel of this tutorial for more cool perspective effects (and more coding, yeah!!!).
Just a final word before we wrap up. What you've seen here is freshly baked content without added preservatives, artificial intelligence, ads, and algorithm-driven doodads. A huge thank you to all of you who buy kirupa's books, became a paid subscriber, watch the videos, and/or interact on the forums.
Your support keeps this site going! 😇

:: Copyright KIRUPA 2026 //--