 Tutorials
Books
Videos
Forums
Tutorials
Books
Videos
Forums


This is an archived tutorial from the kirupa.com legacy collection. It covers software that may no longer be available, but it is kept online because the ideas still hold up.
So a good year and a half later I've finally found the time to put together part 2 of the principles of animation tutorial. I've actually spent a considerable amount of time thinking about the best way to teach the following principles to you. As you may or may not recall, there are 12 principles of animation, which are:
In my last tutorial, we only covered timing and squash and stretch. I took you step by step through my process of creating a bouncing ball. As I began putting together this tutorial I realized that there are many applications for these principles and many ways I could demonstrate them to you. In the following examples, I've decided not to get into how I actually "drew" the objects, or where I placed my pivot points. More importantly, I'm going to talk about the more powerful ideas behind the animation that you see. I'll be answering the questions "Why does it work?" and "Why does it work so well?"
When you put these principles to use, I don't want you
all to try and replicate my drawings perfectly. It would be
better to try and take these principles and apply it to
whatever current project you may be working on. This will
cause you to fully understand the many ways in which the
principle applies. With that being said, lets get on with it
shall we?
In this tutorial you will learn three more principles! They
are:
I know, it seems like a lot of material to cover, but I
promise it will make your animation a quadrillion
times more powerful. So what are these principles exactly?
Well lets look first at what they're not:
Lord that's awful. You may not realize it yet, but it is. When you watch this example you can probably pick up on the following drawbacks:
I'm going to attribute some of those failures to a lack of
anticipation. Beyond that, the animation also lacks arcs of
motion, nor does the animation slow-in or slow-out. I
shall now talk about each of these principles in more
detail. Let's start with arcs of motion.
Now that you have a good idea of what we are about to do from the previous section, let's begin by discussing arcs of motion.
This concept relates to how things move. More appropriately, how living, organic, non-mechanic things usually move. Now while the subject of our animation is a mallet and a button (man made objects), we can imagine that a human being would be swinging this mallet to smash in the button. So arcs of motion refers to how the source of the action moves. Lots of really old animators would study how people move. What they found is that most natural motions move along a curved path, or an arc, not a straight line. Lets onionskin our mallet and see what kind of arc its moving on:
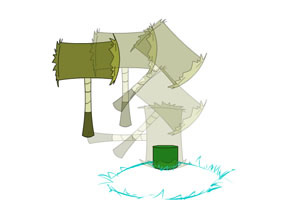
WOW. That's pretty hideous. The animation lacks any arc
or smooth pattern! I can not stress enough the importance of
using your onionskin to check your arcs of motion when
working in Flash. It is the equivalent of traditional animators page-flipping!
Lets look at the same drawings when they are positioned
correctly to make a nice arc:
If we do an onionskin, notice that now have this nice looking specimen:
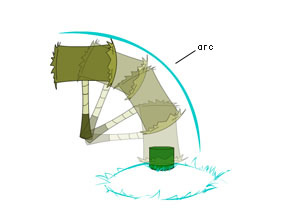
So you can now see that the mallet has a certain pattern to it. The arc is literal here. It now moves the way it would if a really old robot was using it, nut that's not good enough for us. We want LIFE in our animation right? We want it to look like its being used by a human, (or for you Battlestar Galactica fans out there) a cylon at the very least. So lets learn about the next principle, slow-in and slow-out.
The basic jist of this principle is that we add more drawings to the beginning and to the end of our sequence. In essence, the animation slowly moves into the arc, and then slowly leaves. If you observe how people move, how actions are made, you'll begin to witness slow in slow out in life. It all has to do with inertia and gravity where it takes more effort to begin or end a sequence of movements. Now do ALL things slow in and slow out? Absolutely not! It's up to you as an animator to experiment and find out what types of actions slow in, but don't slow out. Here are a few examples:
Slow in, but don't slow out
A car driving fast from a distance, but as it passes you, it
whizzes by.
Slow out without slowing in
Someone getting ready to sneeze
Slow in and slow out
Our example here today.
So without further ado, let me show you what I mean:
The following image shows the onionskin for the above animation:
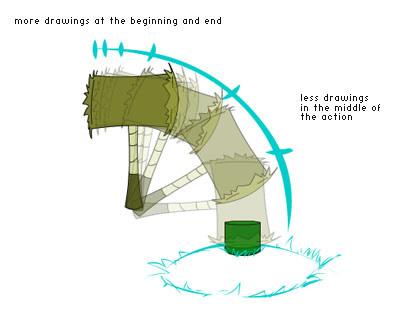
By adding more drawings at the beginning and ending of the
action, we achieve a more lifelike feel to our animation.
You must experiment with how many drawings any particular
action needs for slow in, slow out. Sometimes, you may only
need one, other times, you might want 5 or 6. Eventually,
you'll develop a feel for how many drawings you'll need.
So now our animation is moving correctly, and it even has a
nice, subtle slow in and slow out. But I don't know, it
still seems to be lacking a certain something. There's still
some room to add more life to our animation! But how? Let's
find the answer in our next (and my favorite) principle,
anticipation.
In the previous section you learned about slow-in/slow-out and arcs. In this page, though, I'll explain my favorite principle - anticipation.
I freaking love this principle. If you spend the time to really grasp this, and truly learn how to use it, you will be amazed at how much life it can give your animation. Anticipation is about psychology really. What is the person thinking that's carrying out the action? How would someone ACTUALLY use a mallet to whack some strange button in the ground? How would they lift it? Which part would move first?
I like studying Japanese, and one of the rules, when writing the intricate kanji characters, is that: "to go up, you must first go down, to do down, you must first go up." This is really what anticipation is about. It's the precursor to the main action. It's like a visual hint that you give the viewer to let them know whets about to happen. I could speak for volumes on this topic, but I think it will be better for you to look at how we use it with our example, and then experiment for yourselves. One last note on anticipation, whenever you do it, EXAGGERATE it! If you don't, it usually looks like a mistake.
Ok, so here is what our animation looks like, with arcs, slow in slow out, and anticipation:
Nice right? Ok, now what exactly, is going on here? Well, basically, we're "winding up" for our main action. I spent a few drawings raising our mallet back, slowing in of course, in ANTICIPATION of our main action. See how the motion works to get you ready for the big WHACK of the mallet? Once you reach your final drawing of anticipation, I usually like to hold it for about 3 drawings before moving into the main action. This is a personal preference however, and I encourage you to find out which works best for you in your unique animation situation.
In closing, let's look briefly at the onionskin of our final project:

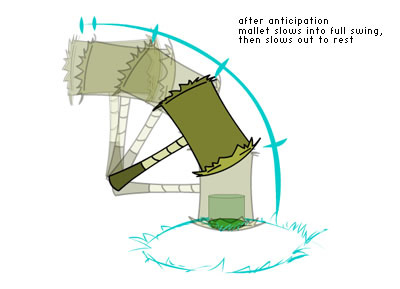
Once again, I want to explain the ideas "behind" the animation. Please don't read this article as something trying to get all your drawings to look like mine. Use your own drawings and ideas, and apply the principles that I went over today. Have fun!
Hope you enjoyed the tutorial. If you have any questions, feel free to email me at [email protected] or post on the forums. If there's demand, I'd be happy to continue the series with a new principle each lesson.
Thank you.
 |
Daniel Bodinof aka Danielthelion creativeJUGGERNAUTS |
Just a final word before we wrap up. What you've seen here is freshly baked content without added preservatives, artificial intelligence, ads, and algorithm-driven doodads. A huge thank you to all of you who buy kirupa's books, became a paid subscriber, watch the videos, and/or interact on the forums.
Your support keeps this site going! 😇

:: Copyright KIRUPA 2026 //--