Flash is
really great for quickly displaying content from an external
data source. One area where that would be useful is with news
tickers. Instead of having to recompile your FLA and upload a
new version of your SWF each time something new happens, you
could just update the external data source using a simple text
editor instead!
News tickers seemed to be all the rave back in the day
along with those loveable scrolling marquees. It's time that we
did our part and help bring them back. This tutorial will help
explain how to create a news ticker similar to what you see
below:
[ what you will create by the end of this tutorial
]
Play around with the ticker and notice that there is a
brief transition between each news item, each news item is underlined
when you hover over it with your mouse, and when clicked, each
item loads the appropriate URL. The data for the ticker is taken
from this file:
http://www.kirupa.com/developer/.../swf/news.xml.
Let's get started with creating the ticker:
Create a new animation and set the width and
height of your movie to 380 and 45 respectively. Set the
frame rate to 25, and change your movie's background to
something besides white:
[ adjust your movie's properties ]
Now that you have your movie setup,
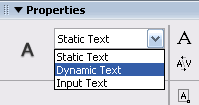
let's add a text field that will contain our news
items. Click the Text Tool icon. Now, look in the Properties
Panel and select Dynamic Text from the text type drop-down
menu:
[ select dynamic text ]
Let's draw the text field. Click to
specify the left boundary of your text field drag to
draw your text field. Make sure the text field stretches
horizontally towards most of your stage area:
[ draw your text field ]
We aren't done with our text field
just yet! Select the text field and give it the instance
name newsText from the Properties panel. While you
are still at the Properties panel, you should adjust the font,
text size, color, and other properties to determine how your
news items should look:
[ the text properties I used for
the above example animation ]
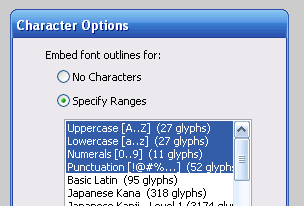
The last thing we will do to our text
field is embed our fonts. Press the Character button in our
Properties panel. The Character Options window should
appear. Select the first four lines in the Character Ranges
area similar to the following image and press OK:
[ embed the first four ranges from
the Character Options window ]
Finally, let's convert our text field
into a movie clip. Select your text field and press F8 or go
to Modify | Convert to Symbol. Select the option for Movie
Clip and press OK. With that done, our text field is now a movie
clip.
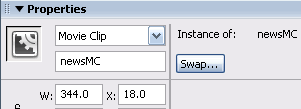
Select your newly created movie clip, and from
our always-busy Properties panel, give it the instance name:
newsMC
[ give our movie clip the instance
name 'newsMC' ]
Let's add some code now. Select the
first frame in your timeline and press F9 or go to Window |
Development Panels | Actions. Copy and paste the following
code into your Actions window:
You can now preview the file, and you will find
that your animation resembles my animation from earlier.
Pretty cool, ehh?
In the next page, I will explain the structure of the XML
file and start explaining the code that is used.