 Scrolling
Dynamically Loaded Text
Scrolling
Dynamically Loaded Text
by
kirupa chinnathambi
One question that often appeared in my
mailbox or on the forums regarded creating a text scroller
that worked when text was loaded from an external text file.
I had told users that it was not possible to create that
effect until a user (Ged)
e-mailed me with a link to Macromedia's tech note (no:
16142). In his
link, I found out how to create the text scroller and make
it work easily. So, here is the tutorial to help you out!
The following is an example of the animation
you will have created by the end of this tutorial:
[ the text in the scroll box
was loaded from a location on the server ]
Creating the Text Scroller:
-
Create a new movie by going
to File | New. Set the width and height of your movie to
anything you choose.
-
Click the Text Tool icon from the left. The Properties
panel should appear. Select Dynamic Text from the
drop-down menu on the bottom-left:
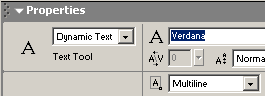
[ select
Dynamic Text ]
-
After you have selected "Dynamic Text", draw your text
box. Make the text box large enough to contain several
lines of text:
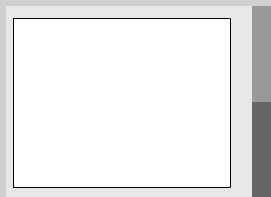
[ the white
rectangle above is the text box ]
-
Now that your text box is drawn, select the text box with
your mouse pointer. In the Properties Panel, replace
<instance name> on the left with the word scroller:

[ set the
instance name of the dynamic text to scroller ]
From the Properties
panel, make sure you select Multiline for the
line type. That ensures your text wraps as opposed to
displaying in one huge horizontal line.
-
Now, make sure your Components panel is visible. To
display the Components panel, go to Window | Components or
press Ctrl + F7. The Components panel will be visible on
the right.
-
From the Components panel, drag and drop the Scrollbar
Component on top of the text box you just created. The
scrollbar will automatically resize and snap to your text
box:
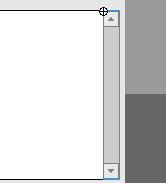
[ the
scrollbar automatically snaps to the text box ]
-
The final step to our Flash movie involves adding the
action. Right click on a keyframe on your timeline and
select Actions. The Actions dialog box will appear. Copy
and paste the following code into the Actions dialog box:
[ copy and paste the above
code into the Actions dialog box ]
-
You are done with the Flash animation, but you have yet to
create the text file from which all the text will be loaded
from. The next section will help you to do just that: create
the text file.
Creating the Text File:
-
Open up an ASCII text editor.
I will be using Notepad because I am on a Windows-based
PC.
-
Copy and paste the following
text into Notepad:
[ copy and
paste the above text into Notepad ]
-
Now, the text should be
visible in Notepad. Place your mouse cursor before the
word "Hello" on the first line and press Enter or Return.
Now, type the words kirupatext=:
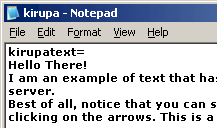
[ enter the
words "kirupatext=" above the words "Hello There!" ]
-
Now, save this text file as
kirupa.txt and place it in the SAME folder as that
of your Flash animation.
-
Preview the Flash animation in your browser. You will now
see the text that you pasted into Notepad display in your
text box. Best of all, the
scrollers work!
ActionScript Explained
Not to leave you in the dark, I will
briefly summarize what the major
lines of ActionScript stand for. For
reference purposes, here is the copy of the code you pasted
in Flash:
In the first line, I am creating a loadVars
function to loadText, and in the next line I initialize
loadText to load kirupa.txt when the variable first gets
loaded (.load). With that, I tell Flash to load the
variables, the content, from the file kirupa.txt.
In the next segment of code, I create a new
function and apply the variables stored in loadText (from
the kirupa.txt file) to the text scroller. Remember, that
the text property of a text box specified what is displayed
in the text box. Therefore, the the content in scroller.text
equals what the variable kirupatext equals.
Remember that kirupa.txt is the name of the
Text file you saved. The variable kirupatext is the text you
added to the file in your ASCII Editor (notepad).
You have just completed the tutorial! As
always, I have provided the source code for you to take a
closer look at. Click the download source link below to download
the Flash MX Flash File (FLA) for this effect.
Just a final word before we wrap up. If you have a question and/or want to be part of a friendly, collaborative community of over 220k other developers like yourself, post on the forums for a quick response!

|


