 Timeline
Effects
Timeline
Effects
by
kirupa
| 17 February 2004
A much hyped about feature of Flash MX 2004
is the timeline effects. Timeline effects are a collection
of special effects that you can customize and apply to an
object on your stage such as a movie clip, graphic, etc. If
you have ever used programs such as
Wildform's Wild fx
or
Red Giant Software's Text FX, you
have seen how you can easily add custom text effects with a
few simple clicks. Flash MX 2004's timeline effects work
similarly, but the effects are not limited only to text. You
can apply the timeline effect to any object.
The following animation provides an
example of four types of timeline effects that come with
Flash MX 2004. Click each of the text options such as
"Blur", "Drop Shadow", etc. in the following animation to
see the various special effects:
[ click on
the above text buttons to see the special effects ]
This tutorial will briefly
explain how to apply all of the timeline effects. Grab a box of pop-corn and
get ready. This tutorial is about to start!
-
Create a new document in Flash MX 2004. Set your movie's
width and height to 300 by 200.
-
Once you have done that, draw a nice circle in your stage
using the Oval tool from your toolbox:

[ the circle
you drew ]
-
Now, select your circle and press F8. The Convert to
Symbol dialog box will appear. Select Graphic and press
OK:
[ select
Graphic and press OK]
-
With that done, save this file by going to File | Save.
Save this file as timeline effects.
You will use this circle graphic for each of the timeline
effects. Don't overwrite this file =)
 |
Note |
|
You may remember that in step iii, I
told you to convert your circle into a graphic
object. The timeline effect will work for any object
- even ones freshly drawn with no symbolic
association. The only issue is that the Expand
effect does not work unless what you have on stage
is converted into an object.
You can also apply the effects to
movie clips that contain their own series of motion
tweens, etc. For the sake of simplicity, I am using
a plain, filled circle. |
|
Blur Effect
The first effect I will explain is the Blur effect.
Select your circle graphic and go to Insert |
Timeline Effects | Effects | Blur. The Blur editor
window should appear. You should see a small animation of
your circle blurring in and out on the right with options on
how to customize the effect:
[ the blur
effect editor ]
I am sure you would like to
know what each of the options actually explain:
-
Effect Duration
Specifies the number of frames for which the blur effect
will continue. For a quick blur, enter a smaller number. For
a longer blur, enter a larger number.
-
Resolution
Specifies the number of individual copies of your object
that will be used to create the blur effect. The blur effect
basically copies your object and scales it while fading out
at the same time. The higher your number, the more objects
will be scaled and faded out within the duration you
specified.
-
Scale
Specifies the scale of each copy of your object that is made
to simulate the blur effect.
-
Allow Horizontal Blur &
Allow Vertical Blur
Specifies whether you want the blur to occur in only one
direction. Notice that by checking or unchecking these
boxes, you can adjust the direction with which the blur
effect goes in.
-
Direction of Movement
The 9 arrows (not displayed in the above image) further help
define your blur effect's direction of movement:
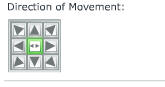
When you check both the boxes
for Allow Horizontal Blur and Allow Vertical Blur, the
effect is oriented toward the center as shown by the green
border surrounding the center square. If you press any of
the buttons such as the one for Top Right, you will find
your animation seems to shift the blur to the top right
direction.
You should note that if you
only check the Allow Vertical Blur, you will only be able to
adjust the direction movement in the vertical likewise. The
opposite is true if you only check the Allow Horizontal Blur
check box. You will only be able to, in that case, to adjust
the blur horizontally.
You can press Update Preview
to see how your effect looks now. To finalize your effect,
press OK and preview your animation by pressing Ctrl + Enter
or previewing the animation in your browser.
Save this file as something
else because it would be best not to overwrite the original
timeline effects fla you created earlier. We will use that
file for the three other timeline effects.
Let's proceed to the next page to learn
about a few more interesting effects.
|


