| |
|
|
|
|
 |
 Menu
with Slider
Menu
with Slider
by Bryan
Arciniega : August 10, 2004You've all seen those menus
where you roll over one of the buttons
and an object slides into place right underneath it, right?
Well, in this tutorial you will learn how to create one of
those. We will be creating a very basic example, but like
everything else, once you learn how to do it you can create
something better!
We will be using:
-
ActionScript
-
Instance
Names
-
Button & Movie Clip Symbols
Here's how
our finished product will look and act:
[roll over each
button]
Let's begin:
- Start a New Document in Flash, size and background color
do not matter.
- Name the current layer: Buttons, then
create a new layer and name that one: Slider.
Create one more layer and name it: Actions.
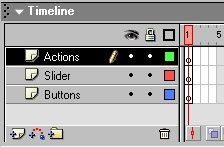
[this is what
your timeline should look like so far]
-
In the Buttons layer draw
four (4) boxes and turn each one into a Button
Symbol. What you name them is up to you. Give each
button an Instance Name, like this (Instance Name in Bold):
1st Button - button_1
2nd Button - button_2
3rd Button - button_3
4th Button - button_4
-
Next, in the Slider layer
draw your "sliding" object. I used a rectangle with an arrow
on it. Turn your object into a Movie Clip Symbol,
what you name it will be used in the Action Script.
So for this tutorial, name it: slider_mc
and give it an Instance Name of: slider.
Place your slider underneath one of the buttons in your
menu. It'll slide horizontally from this position. Here's
what your Properties Panel should look like with the
slider_mc selected:
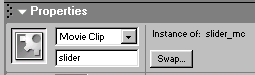
[properties
for slider_mc]
ActionScript:
-
With your slider_mc selected, open the
Actions Panel (F9) and copy and paste this:
- onClipEvent
(load)
{
- xMove
=
_x;
- easeSpeed
=
5;
- }
- onClipEvent
(enterFrame)
{
- _x
+=
(xMove-_x)/easeSpeed;
- }
-
Next, in the Actions layer
select the blank frame and open the Actions Panel (F9). Copy
and paste this (notice your button's Instance Names in the
script):
- easeSpeed
= 5;
- //slider_mc is your Movie
Clip's name, not the Instance Name.
- slider_mc.onEnterFrame
=
function()
{
- this._x
+=
(xMove1-this._x)/easeSpeed;
- };
- button_1.onPress
=
function()
{
- xMove
=
button_1._x;
- };
- button_2.onPress
=
function()
{
- xMove
=
button_2._x;
- };
- button_3.onPress
=
function()
{
- xMove
=
button_3._x;
- };
- button_4.onPress
=
function()
{
- xMove
=
button_4._x;
- };
-
-
Select your first button (button_1) and
again open the Actions Panel (F9). Copy and paste this:
- on
(rollOver)
{
- // slider - Movie Clip's
Instance Name. button_1 - Button's Instance Name.
- slider.xMove
=
button_1._x;
- }
-
-
Repeat the previous step for every button,
but remeber to change the code where it says "button_1._x;"
to match the Instance Name of every button
(button_2, button_3, button_4).
-
In my example I added a line underneath the
"slider" to make it seem like the object was actually
sliding on that line. This of course is optional.
-
You're done!!! Test your movie out to see if
it functions properly.
Well, you have successfully completed the "Menu with Slider"
tutorial. Congratulations! In the next page I will explain the
ActionScript code that makes our menu work.
| |
page 1 of
2 |
 |
|
|
|
|
|
|


