"What in the world is a hover caption? Must
be another name Kirupa made up." Now that you mention it, I
think I did make the name up. A hover caption is the text
that appears when you hover your mouse over a command icon or button. When you hover over the Lock icon in
the timeline (in Flash MX), you will see the caption "Lock/Unlock Layers"
display next to your mouse cursor. The text that displays
when you hover over certain sections is the hover caption.
If Flash MX, Windows, Word, and other
applications can have hover captions display when the mouse
rests over an icon or command, why can't our animations have
hover captions in them. After all, if Microsoft can create
that effect, we should be able to create that effect as
well...right? YES!
Note
This tutorial is mainly kept for
archival purposes. The more recent version of this
tutorial can be found here:Hover Captions
v2
This tutorial will teach you how to create a
hover caption that displays when you hover over a button in
Flash MX:
[ hover over the flash icons
in the above animation to see the captions ]
Creating the Caption Box: The following steps will explain how to
create the caption box that houses the blue rectangle and
text:
Create a new document in Flash MX
by going to File | New. A new, blank Flash MX movie will be
displayed.
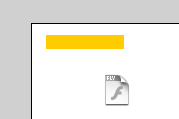
Open the caption_user.fla file by clicking here.
The FLA simply contains the buttons (the icons) that you
will use. Rest assured that none of the coding or complex
steps have been completed in the FLA.
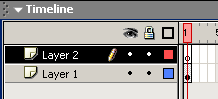
Now that you have the
caption_user.fla file opened, it's time to start
'captioning' (another word I made up). Insert another layer
in your timeline.
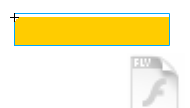
Once the layer has been inserted, draw a small rectangular
box. Make sure the box is large enough to hold text inside
it:
[ notice the yellow
rectangular box ]
Once the box has been drawn, select it and press F8 or go to
Insert | Convert to Symbol. The Convert to Symbol dialog box
will appear. Give the movie clip an unique name and make
sure you select 'Movie Clip'. After you have done that,
press OK.
Your rectangular box is now a symbol. Right click on the
rectangle and select Edit in Place. We will now add a text
field to display a text caption. Insert another layer in the
timeline:
[ insert
another layer ]
Click the Text tool icon. Once you have clicked the Text
tool icon, draw a small rectangular box directly above your
yellow rectangle. Make sure the box is large enough to
support a few words of text. Make sure to Zoom in if you
can't see clearly:
[ the text
box zoomed in at 200% ]
You may have to adjust the size of the rectangle to ensure
the text box is completely over the rectangle. As you can
tell in my screenshot, my rectangle needs to be heightened
to cover the text box.
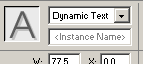
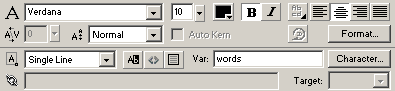
We now need to make some modifications to our text box.
Select the text box and make sure its Properties panel
displays. From the Properties panel, ensure Dynamic Text is
selected:
[ ensure
dynamic text is selected in the drop-down menu ]
There are modifications that need to be made! From the same
Text properties panel, make the following changes:
Font: Verdana
Ab:
Deselected
Size: 10
Style: Bold
Color: Black
Alignment: Centered
Var: words
[ how your
text properties panel should look like after completing step
x ]
Your text box is now complete and setup for the next steps.
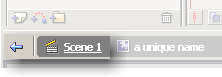
Press the Scene 1 tab (or the blue left arrow) below the
timeline and you will be back on your main timeline:
[ the scene
1 tab and blue left arrow ]
That concludes this major portion of our tutorial. I
am sure you are tired and worn-out from all this
Flashing. If you need to, don't hesitate to take a
break. Once you are refreshed and ready for some more
flashing, click the Next Page link below.