 Tutorials
Books
Videos
Forums
Tutorials
Books
Videos
Forums


This is an archived tutorial from the kirupa.com legacy collection. It covers software that may no longer be available, but it is kept online because the ideas still hold up.
Oh no! Not another random motion tutorial on kirupa.com. There are already several, so why would I be writing another tutorial on random movement? The reason is that many of the excellent random motion tutorials on the site cater to a more actionscript-savvy audience.
My implementation accomplishes random motion by using simpler AS concepts that are, I hope, easily understandable by beginner Flashers. The following is an example of what this tutorial will help you to create:
[ the flowers - they are alive! ]
This tutorial will help you to create the above effect. You will also learn the 'behind-the-scenes' action of the code that makes the objects move randomly.
The following steps are designed to work in Flash MX 2004, but they should work in Flash MX and maybe even Flash 5:

[ draw a circle ]
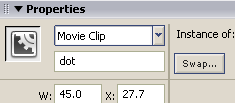
[ give your movie clip the instance name 'dot' ]
onClipEvent (load) {
  //data you may want to change
  width = 300;
  height = 200;
  speed = Math.round(Math.random()*2)+1;
  //initial positions
  x = this._x=Math.random()*width;
  y = this._y=Math.random()*height;
  x_new = Math.random()*width;
  y_new = Math.random()*height;
}
onClipEvent (enterFrame) {
  //x movement
  if (x_new>this._x) {
  sign_x = 1;
  } else {
  sign_x = -1;
  }
  dx = Math.abs(x_new-this._x);
  if ((dx>speed) || (dx<-speed)) {
  this._x += sign_x*speed;
  } else {
  x_new = Math.random()*width;
  }
  //y movement
  if (y_new>this._y) {
  sign_y = 1;
  } else {
  sign_y = -1;
  }
  dy = Math.abs(y_new-this._y);
  if ((dy>speed) || (dy<-speed)) {
  this._y += sign_y*speed;
  } else {
  y_new = Math.random()*height;
  }
}
i = 0;
while (i<25) {
  //duplicateMovieClip(dot, "dot"+i, i);
  dot.duplicateMovieClip("dot"+i, i);
  i++;
}
Well, you have the easy part of the tutorial finished. The next section will explain why the code works.
onClipEvent (load) {This ensures that code contained in this section is executed immediately when a movie loads. The code only executes once, and it will not loop continuously. This is a good place to define properties of your movie that will stay constant throughout the life of your movie.
    //data you may want to change
  width = 300;
  height = 200;
These two lines specify the boundaries of the random movement. For the most part, they will be representative of your movie's width and height. You should change the dimensions for width and height if your movie's dimensions are different.
speed = Math.round(Math.random()*2)+1;The variable speed controls, well, how fast the movie clip moves. I set the speed to be a random value between 1 and 3, and each movie clip could be moving at a different speed. Of course, you can change the value to a constant number if you want all of your movie clips to move at the same speed.
    //initial positions
  x = this._x=Math.random()*width;
  y = this._y=Math.random()*height;
These two values determine the initial position of your movie clip. Because I want each movie to start from a different location, you will see that the positions occur randomly within the bounds of your movie's width and height. You can notice that feature by seeing the variables width and height making their appearance along with the random function.
If you want, you can write the above two lines using four lines such as the following:
//initial positions
x = Math.random()*width;
y = Math.random()*height;
this._x = x;
this._y = y;
Since x and y are being used twice, I simply combined them each into one line such as what you see in the code in your Flash animation.
    x_new = Math.random()*width;
  y_new = Math.random()*height;
These lines specify where the end position of your movie clip will be. You have a starting position which I explained in the above section, and now you have an ending position. Notice that these positions also take into account the width and height of your movie by using our favorite width and height variables.
onClipEvent (enterFrame) {This tells Flash that any section of code contained after this line will execute continuously depending on your frame rate. If your frame rate is 25, the code will execute 25 times per second.
This is vastly different from the onLoad statement we had earlier. In our earlier onLoad action, the code would execute once when the movie clip was loaded. enterFrame is, as I explained above, loops continuously.
The following section covers in detail how the movie clip moves horizontally:
    //x movement
  if (x_new>this._x) {
  sign_x = 1;
  } else {
  sign_x = -1;
  }
This portion of the code is very important. This section specifies the direction the particle will be moving. Basically, in the if statement, I check to see where the particle is currently (this._x), and where it will be later (x_new).
If the particle's current position is to the LEFT of the final position, that would mean the particle needs to move RIGHT to get to the final position. Since right is positive with respect to the horizontal (x) axis, the variable sign_x is a positive number.
Conversely, if the particle needs to head LEFT because the final destination is to the left of where the particle currently is, the direction specified by sign_x takes on a negative number.
I am using -1 and 1 as the value because I am only interested in the sign value of the direction. As you will see in the next section, if I were to use a number with a magnitude other than 1, it will mess up the speed at which the particle moves in.
dx = Math.abs(x_new-this._x);I am determining in this line the magnitude of the change between where the particle was and where it will be. I place the entire statement within a absolute value function (Math.abs) because I am not particularly interested in the sign of the new answer. For example, if x_new was to the left of this._x, the number would end up becoming negative!
Basically, as your movie clip approaches its final destination, the value of dx will decrease towards zero.
    if ((dx>speed) || (dx<-speed)) {
  this._x += sign_x*speed;
  } else {
  x_new = Math.random()*width;
  }
While all sections of code are important, this section is probably the MOST important =)
The if statement checks to see if the movie clip falls within a small area between speed and -speed. As long as the movie clip is beyond that area, the movie clip will move at the speed specified in the onClipEvent(load) statement.
Notice that the speed is multiplied by the sign_x variable. If you remember, we earlier learned how the sign of the sign_x variable is determined. That way, if the variable sign_x is negative, this._x is increased by a negative number - therefore moving left. If the sign_x is positive, the position of the movie clip moves to the right.
    if ((dx>speed) || (dx<-speed)) {
  this._x += sign_x*speed;
  } else {
  x_new = Math.random()*width;
  }
If the movie clip does get very close to the final destination, the new position is determined. The movie clip never rests and is constantly on the move. This line of code ensures that.
The explanation for the y movement is almost exactly the same as the explanation for the x movement. I tried to keep the variable names similar with the exception of the _x and _y ends, so you should be able to adapt your knowledge of horizontal (x) movement to the vertical (y) movement.
An explanation for duplicating the movie clip can be found here: //www.kirupa.com/developer/actionscript/duplicate.htm
In the following section, I am going to do a quick recap of the above section in an abbreviated, codeless form.
The movie clip is loaded. I determine the current position of the movie clip, and then I determine the final position of the movie clip. After having done that, I determine where the new position is with respect to where I am currently. I need to know (Marc Anthony anyone?!), where the final position is because I need to figure out the direction I will need to be moving in.
Once I figure out the direction of where I need to be moving in, I start moving the movie clip in that direction. The movie clip continues to move until it reaches its final destination. The final destination is, though, not a definite point. It is a zone determined by the value of the negative speed to the positive speed.
If the movie clip reaches its final destination, a new location is immediately determined. This is the equivalent of luring a rabbit to your home using a giant carrot, and when the rabbit nears the carrot, you move the carrot away - hopefully luring the rabbit to your new location.
Fortunately for us, movie clips are not as intelligent as rabbits!
Just a final word before we wrap up. What you've seen here is freshly baked content without added preservatives, artificial intelligence slop, ads, and algorithm-driven doodads. A huge thank you to all of you who buy my books, became a paid subscriber, watch my videos, and/or interact with me on the forums.
Your support keeps this site going! 😇


:: Copyright KIRUPA 2026 //--
