 Tutorials
Books
Videos
Forums
Tutorials
Books
Videos
Forums


This is an archived tutorial from the kirupa.com legacy collection. It covers software that may no longer be available, but it is kept online because the ideas still hold up.
This tutorial started as the answer to a forum user's question about finding and selecting text in a text field. I noticed that there was nothing in Kirupa's tutorial section relating to this, so I decided it would make a neat tutorial! The find function described in this tutorial is actually found in most word processors and many other applications. The aim of this tutorial is to achieve a similar effect in Flash.
Below is an example of what we'll end up making by the end of this tutorial:
[ an example
of what you will create by the end of this tutorial ]
Here's How:
To start, create a new document in Flash. Set the width to 350 px and the height to 200 px.
Next you'll need to create a text box on the stage using the Text Tool. It can be any size; I used one that was 200 pixels by 170 pixels. Make sure your text box remains on its own layer throughout the tutorial.
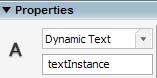
In the properties inspector for your newly created text box, make sure you have the following settings:

[ the Properties Inspector ]
Make sure your text is Dynamic Text, or else you will not be able to define its variable or Instance Name. Note that I have the "Selectable" option selected, though that will only change the user's ability to select the text, not the ActionScript's ability to select text, which we will be using later.
Now we need some text to put in our text box. I used Lorem Ipsum text, which is just dummy text that is useful for filling space. To do this, make sure you have your Text Tool out and click somewhere in the text field and then type/paste your text.
We'll need buttons to call the selecting action, so create 2 new layers by going to Insert>Timeline>Layer. I named mine Find and findNext.
Now we need to make our Find and Find Next images. Feel free to copy the ones below and paste them onto the stage.


[ example Find and Find Next buttons ]
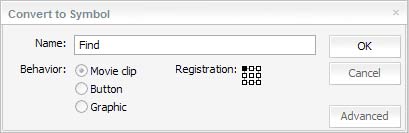
Click on one of the images and hit F8 (Insert>Convert to Symbol). Name the first one Find, and then repeat the process for converting your Find Next image into a symbol.
[ the Convert to Symbol dialogue box ]
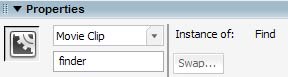
Once we have converted them to symbols, give your Find clip the instance name "finder" by selecting it and going to the properties inspector again. Give your Find Next clip the instance name "findNext".
[ the Properties Inspector ]
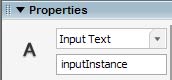
In order to have text we want to find and select, we'll need an input text box so that the user can choose the text to find! To do this, create a new layer named "input" and on this layer put a new text box. This time it should be input text with the instance name "inputInstance" and the variable "inputter".

[ the Properties Inspector ]
Now that we have everything set up, let's get to the ActionScript! First, create a new layer named "Actions". Go to the first frame in that new layer, and paste the following into the actions panel:
finder.onRelease = function() {
  Selection.setFocus("_root.textInstance");
  var inputterString:String = _root.inputter;
  var inputLength:Number = inputterString.length;
  textStart = textVar.indexOf(inputter, 0);
  if (inputLength>0) {
  textEnd = textStart+inputLength;
  } else {
  textEnd = 0;
  }
  if (textStart>=0) {
  Selection.setSelection(textStart, textEnd);
  } else {
  Selection.setSelection(0, 0);
  }
  _root.textEnd = textEnd;
};
findNext.onRelease = function() {
  Selection.setFocus("_root.textInstance");
  var inputterString:String = _root.inputter;
  var inputLength:Number = inputterString.length;
  textStart = textVar.indexOf(inputter, _root.textEnd);
  if (inputLength>0) {
  textEnd = textStart+inputLength;
  } else {
  textEnd = 0;
  }
  if (textStart>=0) {
  Selection.setSelection(textStart, textEnd);
  } else {
  Selection.setSelection(0, 0);
  }
  _root.textEnd = textEnd;
}
That's it! Now, hit Ctrl+Enter to test your movie. Type text into the input box and hit Find to find it. To find the next instance of your input, hit the Find Next button. Notice that the finder will loop once it finds the last instance of your text.
In the next section, I will explain the code that makes everything work.
Let's take a closer look into what makes this work. You might be surprised at the other uses you find for these concepts in the future, even outside of the world of finding and selecting.
finder.onRelease = function() {Here we're making a function that's called upon every time someone lets go of the left mouse button after they click on it.
Selection.setFocus("_root.textInstance");In this line we're setting the selection, which is what is currently being interacted with, to the text field we'll be selecting text in. We need the "_root" before "textInstance" because the ActionScript in this line is for the button, and we need to tell it to go back to the main timeline to look for our text field instance.
var inputterString:String = _root.inputter;
var inputLength:Number = inputterString.length;
In these two lines, we're creating two variables. The first variable is set to be the same thing as what is in the input field at the time the button is pressed. The second variable takes our newly created variable and counts the number of characters in it, which we'll use later on to do some calculations with.
textStart = textVar.indexOf(inputter, 0);Here we're setting the textStart variable to be a number that is equal to the position in the text field where the text we're searching for begins. The "0" represents where we start searching; in this case at the beginning of the text.
if (inputLength>0) {
  textEnd = textStart+inputLength;
} else {
  textEnd = 0;
}
With this if statement, we're checking to see if someone has typed characters into the input box. If so, it will set the textEnd variable to the amount of character typed in plus the start position of the charaters being searched for.
After this we have an else statement, which will set the textEnd variable to 0 if no text has been entered, so nothing will be selected.
if (textStart>=0) {
  Selection.setSelection(textStart, textEnd);
} else {
  Selection.setSelection(0, 0);
}
Here we have another if statement that controls what gets selected (highlighted) in the text box. The reason we have an if statement here is because the indexOf function we used to find the text start point will return "-1" if it doesn't find the text it was looking for.
If the textStart variable is "-1", that means the text wasn't found, so it will go to the else statement where no text will be highlighted. This is to prevent users from entering text that isn't found. Since the inputLength variable is the same whether or not the text is actually found, and the textEnd variable is based on inputLength, before this statement was added the user could fool the selector into highlighting characters in the beginning even if they weren't the ones being searched for.
_root.textEnd = textEnd;In this little tidbit we're setting up a variable for our Find Next button which will tell it where to start searching. We want it to start searching after where it left off the first time, so we don't find the same instance again.
findNext.onRelease = function() {
  Selection.setFocus("_root.textInstance");
  var inputterString:String = _root.inputter;
  var inputLength:Number = inputterString.length;
  textStart = textVar.indexOf(inputter, _root.textEnd);
  if (inputLength>0) {
  textEnd = textStart+inputLength;
  } else {
  textEnd = 0;
  }
  if (textStart>=0) {
  Selection.setSelection(textStart, textEnd);
  } else {
  Selection.setSelection(0, 0);
  }
  _root.textEnd = textEnd;
}
This is the ActionScript for the Find Next button. It is identical except for one line with a difference that I will explain below.
textStart = textVar.indexOf(inputter, _root.textEnd);As you can see the difference here is that it starts to search the input string at the end of where it was at the last cycle. Since this button also includes the line that defines textEnd, every time the button is pressed it will find the next instance until it runs out of places to find what it's looking for. When it can't find anymore, textStart is defined as "-1" so nothing will be selected on the next press.
That's about it for this tutorial. If you
want to learn about loading Dynamic Text from
external sources, check out
This Tutorial
by Kirupa.
If you have any questions,
make sure you post about it in the
Forums. If I don't answer, one of the
other great forum members will.
The files I used in this tutorial can be downloaded below:
Have fun scripting!
 |
Kyle Murray
(aka Krilnon)
Reclipse |
 |
Just a final word before we wrap up. What you've seen here is freshly baked content without added preservatives, artificial intelligence, ads, and algorithm-driven doodads. A huge thank you to all of you who buy kirupa's books, became a paid subscriber, watch the videos, and/or interact on the forums.
Your support keeps this site going! 😇

:: Copyright KIRUPA 2026 //--
