 Preloader
that Displays Load Progress
Preloader
that Displays Load Progress
by
kirupa chinnathambi
Welcome to the world of the preloader! Of all
the various things people can accomplish in Flash, a
preloader is a mystical concept which everyone uses yet no-one seems
to be able to explain quite well. A preloader is not
something that can really be explained because it is more of
an abstract concept that works behind the scenes.
A preloader is basically a small script that
keeps the user entertained or informed while a Flash movie
is loading. For example, in my preloader animation below, the
text "loading" appears with the number of bytes
downloaded and the total size of the animation (broadband
users probably may not notice the preloader):
[ preloader (movie is about
83k in size) ]
Creating the Preloader:
-
Click here to
open an FLA that
contains information that needs to be preloaded. Don't
worry, you will add the cool code yourself!
-
Once you have opened the preload_user.fla file you
downloaded from the above link, you should see a movie
clip contained on one frame on a single layer:
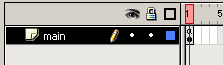
[ the main
timeline ]
-
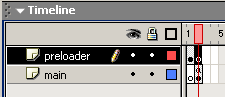
Before we add a preloader, let us arrange the timeline a
little bit. Move the solid keyframe on the "main" layer
over by one frame. After you have done that, add a new
layer to the timeline and name the layer "preloader".
Your timeline should look like the following image:
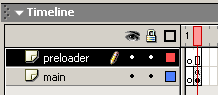
[ your new
and improved timeline ]
-
Select the empty keyframe on Frame 1 of the "preloader"
layer. Draw a dynamic text box near the center of
your movie (stage area):
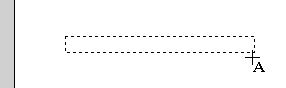
[ draw the
dynamic text box in the center of your movie ]
-
Once the dynamic text box has been drawn, select the text
box. You will see the Properties panel change to display
the individual properties of the text box you can edit.
Find the Var text field and enter the word
kirupatxt.
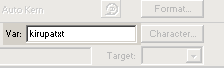
[ giving the
text field a variable name ]
-
After you have done that, press F8. The Convert to Symbol
dialog box will appear. Select Movie Clip and press Ok.
-
Right click on the movie clip and select Actions. Copy and
paste the following lines of code into the Actions dialog
box:
[ copy and paste the above
code into the Actions dialog box ]
-
After the rigorous process of Copying and Pasting, close the
Actions dialog box. Go back to your timeline and insert a
blank keyframe on Frame 2 of the "Preloader" layer:
[ the
timeline ]
-
Save the animation and press Ctrl + Enter. You will see the
3d animation. Press Ctrl + Enter again (while the animation
is playing) to simulate a real world situation using a
dial-up modem. You will see something similar to the
following on your screen while the movie is loaded:

[ the
loading sequence will play until the entire movie has been
loaded ]
|
 |
MY
PRELOADER DOES NOT SEEM TO WORK? |
| You may remember
me mentioned that the preloader is an abstract
concept. It is abstract because most of us do
not notice that it works when we create it. A
preloader works by displaying the progress of a
movie loading. When a movie has loaded,
the preloader disappears and the movie
plays. When you
preview the animation in your browser from the
Hard Drive, you WILL NOT see a preloader. The
movie loads instantaneously because your
animation does not need to be preloaded. Before
you can say "Chinnathambi" the movie would have
loaded and started to play. The only real way to
test the movie would be to press Ctrl + Enter in
Flash.....then press Ctrl + Enter a second time.
That helps Flash's bandwidth analyzer kick in,
and it loads the animation at the bandwidth you
specify. Also, when
preview the animation on your Web server, you
may see the preloader the first time you watch
the animation. You probably will not see the
preloader the second time because the animation
will be cached in your browser's Temporary
Internet Files folder. Remember, a preloader
works always only when you press Ctrl + Enter
two times after a short pause in between Ctrl +
Enter(ing)! |
|
|
ActionScript Explained
Not to leave you in the dark, I will
briefly summarize what the major section of ActionScript
stands for.
onClipEvent
(enterFrame)
{
var
bytes = _root.getBytesTotal();
var
bytes_loaded =
_root.getBytesLoaded();
if
(bytes_loaded == bytes) {
_root.gotoAndPlay(2);
this.kirupatxt =
"movie loaded";
} else
{
_root.gotoAndStop(1);
this.kirupatxt
= "loading ("
+ bytes_loaded + "/" + bytes +")";
}
}
In the above lines of code I am declaring
variables and assigning them values. For the variable
bytes, I am giving it the
value of the total byte size of the movie (getBytesTotal).
For the variable bytes_loaded,
I am assigning the value of the number of bytes currently
loaded (getBytesLoaded).
The remaining lines of code should be self
explanatory. I add a conditional (if/else) statement to
check if the number of bytes loaded equals the number of
bytes total. If it is equal, the animation plays as normal.
If the number of bytes is not the same as the total number
of bytes, Flash is being told to continue preloading the
movie.
Notice that I display the data to the text
field, which we named kirupatxt (in the Var field). You should also take note
of the concatenation (combining strings and data) taking
place. I am combining regular characters with numerical
values such as the number of bytes currently loaded and the
total number of bytes the movie occupies.
You have just completed the tutorial! As
always, I have provided the source code for you to take a
peek at. Click the download source link below to download
the Flash MX Flash File (FLA) for this effect (for file size
reasons, the 3D movie clip is intentionally left blank):
Just a final word before we wrap up. What you've seen here is freshly baked content without added preservatives, artificial intelligence, ads, and algorithm-driven doodads. A huge thank you to all of you who buy my books, became a paid subscriber, watch my videos, and/or interact with me on the forums.
Your support keeps this site going! 😇

|


