| |
|
|
|
|
 |
 Reusable
Preloader Using MovieClipLoader
by
Macneilslt : 9 March: 2005
This tutorial is a step by step guide on creating a reusable
preloader for external .swf and .jpg files, using the new
MovieClipLoader(); class introduced in Macromedia Flash MX 04.
Since this tutorial uses the MovieClipLoader(); class, preloader
will only work in flash player 7.
The movie below is an example of what we will be making. High
broadband users may not get a chance to see the preloader in
action, but dial up users will be able to see the full effect.
[ an example of
what you will create ]
Here is How:
-
Open Flash MX 04, create a new document, I
used 300x200, but any size will work.
-
Name the first layer "Actions" (no quotes).
Insert a new layer, name the new layer "bar" (no quotes).
Use the rectangle tool to draw a borderless rectangle 100px
wide and 7px tall. After you have the rectangle on the stage
select it, then press F8, or Select ... Modify...Convert to
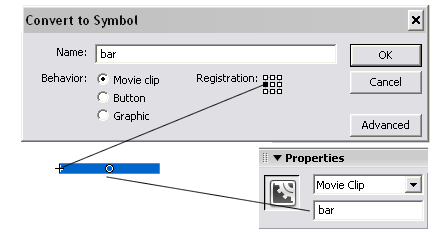
symbol, and choose Movie clip. Before you press okay, be
sure to set the registration point of the movie to left.
After you have the bar symbol created, Open the properties
selector and give it an instance name of "bar" (no quotes).
- After the "bar" symbol is on the stage, open it's
properties and give it an instance name of "bar" (no
quotes). See the image below for comparison.

[ Take note of
registration, Symbol name, and "bar" Instance Name]
- After you have the "bar" layer completed, insert a new
layer. Give the new layer a name of "border" (no quotes). On
this layer, using the line tool, draw a border for the "bar"
symbol you have just created. Hint: Turn on the Snap Objects
Option (located at bottom of tool bar, shaped like a magnet)
to make make the lines snap to the "bar" symbol. You can use
any color or line thickness. I used a red line, 4px thick.
-
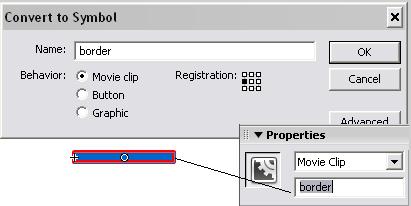
After you have you have the border created, select all 4
sides and press F8 to convert it to a symbol, or
Select... Modify... Convert to symbol. Choose Movie
clip, and give it a name of "border" (no quotes"). After
you have the "border" (no quotes) symbol created, open
the properties selector, and give it an instance name of
"border" no quotes. See the image below for comparison.
 [ Take note of Symbol
name, and "border" Instance Name ]
-
So far we have 3 layers, actions, bar, and border. Next
we need to insert a new layer, name this new layer
"text" (no quotes). Insert a Dynamic
text box below your bar. Open up the text properties,
set the instance name to "pText" (no quotes). see the
image below for comparison.
[ Take note of Dynamic
Text Option, and "pText" Instance Name]
- If your text looks like mine, then we are ready to move
on. Insert a new layer called "buttons" (no quotes"). I made
mine 75px wide and 19px tall, but any width / height will
work. After you have your rectangle drawn out, select it and
press F8, or Select... Modify... Convert to symbol, to
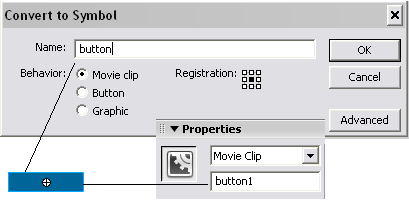
convert it into a Movie clip. After you have the button clip
created, give it an instance name of "button1" (no quotes).
Copy and paste the button on the stage two more times, give
each new button an instance name of "button2" and "button3"
respectively.

[ Take note of the "button1"
instance name ]
-
Now that we have finished setting up the stage, we are
ready to move on to the
Next page and set up the script that makes
this preloader work.
| |
page 1 of 2 |
 |
|
|
|
|
|
|