 Tutorials
Books
Videos
Forums
Tutorials
Books
Videos
Forums


This is an archived tutorial from the kirupa.com legacy collection. It covers software that may no longer be available, but it is kept online because the ideas still hold up.
So many of the animations you create directly or indirectly are inspired by motion in the physical world. Yet, the language of motion you use in Flash is completely different from that of the mathematical equations that describe physics. In this tutorial, let's look at how to reconcile those two worlds.
The last sentence probably sounds scary. This sounds like
a flashback to physics classes which often involved
contrived examples of blocks on inclines, cars sliding down
the road, and things dropping from tall places. This
tutorial will describe things dropping from tall places! (hey, I
never said that I was original
 )
)
The following is an example of the effect I will be describing. Click on the ball to see it fall again.
[ click on the ball once it hits the ground to cause it to fall again ]
The effect you see can be created easily using a few simple eases, but instead, I am defining the motion manually using good old fashioned physics equations. As you will see, the concepts behind it may be a bit complicated. The actual code is pretty straightforward.
In order to understand the code that powers the above animation, it will be helpful to learn the physics behind falling objects. Let's take a look at the following diagram:
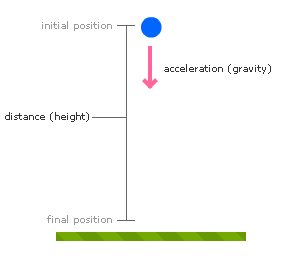
The diagram is pretty representative of the the ball falling in the animation. The key things to note about this diagram are the various labels I've given to the points of interest. The distance your ball falls is the difference between the initial position and the final position. The force that causes your ball to fall is gravity, and it is always downward. Seems simple enough.
At the end of the fall, you know where the ball is going to be. It is going to be at the bottom where the final position mark is:
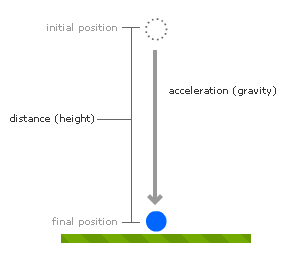
The tricky part is knowing exactly where the ball is between the initial position and the final position. It's not a linear fall, so you can't evenly divide the position your ball is based on the total height. There is acceleration, so the ball moves faster through certain regions and slower through others.
Figuring this all out from scratch would be tough, but thankfully, this is something that has been well defined for a few hundred years. The following equation describes the position of your ball as it gets dropped:
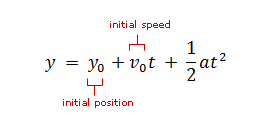
The a stands for acceleration, the t stands for time, and v represents velocity or speed. The position of my ball is determined by three things:
Our initial position is the starting point of the ball drop. What about initial velocity? Well, we actually don't have an initial velocity. The value of v is 0. The reason is, at the beginning of the drop, the ball is motionless. It isn't being thrown down, so the equation can be simplified a bit as follows:
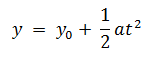
This equation looks a bit nicer! Anyway, keep the last equation in mind, for that defines the structure of the code that is used to make our object fall. In the next section, we will look at the second half of the animation that concerns the physics behind objects that bounce after hitting the ground.
In the previous section, you saw the animation that I will be deconstructing, and you also received an overview of the math behind falling objects. In this page, let's pick up from where we left off and look at the math behind objects that bounce up after hitting the ground.
Our ball's movement is actually made up of two separate sequences. The first is the falling sequence which I described above. The second is the rising sequence, the bounce, and let's look at that now.
When your ball hits the ground and bounces, the following diagram describes what is at play on the way up:
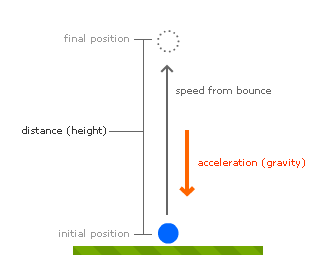
Before, gravity was your friend. It helped move your ball in the correct direction. Now, though, gravity is actually fighting against you. You have the upward initial speed from your bounce competing with the downward pressure of gravity. Fortunately, the equation I showed you above is flexible enough to work in this situation as well:
This time, we don't get rid of the initial speed portion of the equation. Instead, we actually have an initial speed. This initial speed is the final speed of the ball as it fell earlier. How do we calculate the final speed of the ball as it hits the ground? This requires another equation, and this comes from the series of equations linking Kinetic Energy and Potential Energy:

The speed of an object under constant acceleration is the square root of two times gravity (aka acceleration) and height. This result makes up the initial speed, and you can plug this value into the equation that is shown just a few paragraphs ago.
Putting these two equations together, you have everything you need for defining the bounce. There is a slight catch though, so let's look at that next.
One thing you need to keep in mind is conservation of energy. In an ideal world, a ball you drop from a certain height will keep bouncing back to that exact height every time. In other words, your ball will be bouncing forever. This is clearly not the case in the real world. The reason is that, each time the ball hits the ground, some of the energy from the impact is converted into other things such as heat and sound. Not everything goes back into making the ball bounce.
With each subsequent bounce, your ball has a bit less energy than it did in the bounce that preceded it. That is the real world. Flash simulates an ideal world. What you will need to do is force some energy decay to cause your ball to not bounce indefinitely. There are numerous areas where you can do that, but the one that I will interfere with is the initial speed as you are about to bounce up:
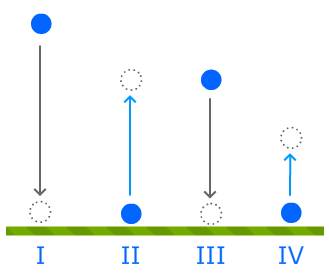
Each time the ball is about to bounce up (stages II and IV), I decay the value of the initial speed by a certain amount. This gives you the effect of your ball bouncing with each subsequent bounce being weaker than the one that preceded it. In the physical world, the amount of energy your ball has with each bounce is decreased when it hits the ground. This decay indirectly gives us the same effect in an ideal world. That is all there is to the physics behind all of this.
Ok, now that you have a primer on how a ball's bounce theoretically works, let's look at the code and see how the world of physics maps with how we do things in Flash.
In the previous section, we wrapped up our theoretical discussion on the math behind falling and bouncing objects. In this and the next section, we will look at the the code that actually implements all of this.
Downloading the Application
The following source file contains a working copy of the
bouncing ball animation:
Once you have downloaded, extracted, and opened the source file in Flash CS4 (or Flash CS3), open the BlueBall.as file to see the code that makes this all work. The next section will cover the code in greater detail.
You now have a high-level overview of the physics involved with a falling object, and you have a copy of the project open. All that is left is to look at the code and how it maps with the theory you saw before. While the mapping is not exact, I hope it strikes a good balance between realism and simplicity.
The code is broken up into two parts. The first part is the falling action. The second part is the rising action. By breaking up our bounce into these two parts, it allows me to have much simpler code. The connection between these two parts is the initial velocity of the ball as I am bouncing. As long as I know (and can manipulate) that initial velocity, I am set!
Let's look at the code in the order in which things get executed. Coincidentally, this code also sets off the ball's falling motion.
function BlueBall() {
  startFallingBall();
  setupResetFunctionality();
}
The above code represents my constructor, and it gets called only when my BlueBall object gets created. This constructor is responsible for calling my startFallingBall and setupResetFunctionality methods. Let's look at startFallingBall next, for the setupResetFunctionality method is just for resetting the ball's position when you click on it. That's not really that important for this tutorial.
function startFallingBall() {
  timer=0;
  initialPos=this.y;
  this.addEventListener(Event.ENTER_FRAME, moveBallDown);
}
As this method's name implies, the code here is responsible for starting the ball's fall. I initialize two variables first. I set the timer to 0, and I set my initialPos to the current position. The final thing I do is set up my ENTER_FRAME event and have it call my moveBallDown event handler...which we will look at next!
// Responsible for moving the ball down
function moveBallDown(e:Event) {
  timer+=1;
  this.y = initialPos + .5*gravity*(timer * timer);
  checkBottomBoundary();
}
The moveBallDown event handler is what is responsible for actually moving your ball down. I first increment the value of my timer value, the one I set to zero in the startFallingBall method, to indicate a clock tick has occurred. Once I do that, I set the position of our ball using the equation you saw earlier:
That equation translated into our code can be seen as:
this.y = initialPos + .5*gravity*(timer * timer);Finally, each time this method gets called, I call the checkBottomBoundary method to figure out what to do next. So, let's look at that method in greater detail.
function checkBottomBoundary() {
  if (this.y+this.height>stage.stageHeight) {
  finalPos=this.y;
  stopFallingBall();
  }
}
This method checks to see if your ball's current position is below that of your ground which is represented by your stage's height. I can't simply compare the Y position and call it a day. Because the ball has some height as well, I want to stop the falling when the bottom of the ball hits the ground. That is why I am including the height of the ball in my calculation for height.
When the ball hits the ground, I call stopFallingBall, so let's look at what it does next.
function stopFallingBall() {
  this.removeEventListener(Event.ENTER_FRAME, moveBallDown);
  // If the bounce is a 10% of the ball's height, just stop
  // the bounce
  if (finalPos-initialPos<.1*this.height) {
  stopRisingBall();
  } else {
  startRisingBall();
  }
}
The stopFallingBall method does two things. First, it kills the event listener for moveBallDown as shown by the call to removeEventListener. This means that your ball will no longer keep falling.
The second, equally important, task this method does is check whether we are done with the bouncing permanently. The way I measure that is by comparing where my final position will be compared to where my initial position is. If they are very close to each other, that means the bounce is coming to an end.
The "very close" in the code is 10% of the ball's height. If your ball's bounce is going to be less than 10% of its height, then it's time to call it a day:
function stopFallingBall() {
  this.removeEventListener(Event.ENTER_FRAME, moveBallDown);
  // If the bounce is a 10% of the ball's height, just stop
  // the bounce
  if (finalPos-initialPos<.1*this.height) {
  stopRisingBall();
  } else {
  startRisingBall();
  }
}
The call to stopRisingBall ends your sequence of bounces, but if your final bounce position is greater than 10% of your ball's height, then your code lives another day. The startRisingBall method gets called. Since we just wrapped up what happens when your ball is falling, let's go ahead and look at what happens when your ball starts to rise....in the next section!
In the previous section, you saw what it takes to make your ball fall. That is only half the story. In this page, let's look at what it takes to cause the fallen ball to rise back up.
Let's continue looking at the code from where we left off...starting with the startRisingBall method:
// Sets up what is needed to start bouncing the ball up
function startRisingBall() {
  initialSpeed=decay*Math.sqrt(2*Math.abs(finalPos-initialPos));
  timer=0;
  currentPos=this.y;
  this.addEventListener(Event.ENTER_FRAME, moveBallUp);
}
The startRisingBall method is responsible for taking your ball from the bottom and moving it to the top. Like I explained a few pages ago, the speed your ball has as your bouncing up is exactly the same speed it had when it fell to the ground. The equation for that is what you saw earlier:
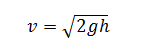
Because of conservation of energy, if the same speed was used, that would mean your ball would be bouncing indefinitely, so I introduce a decay value that I briefly talked about to dampen the speed a bit. Putting it all together, you get the following line of code:
initialSpeed=decay*Math.sqrt(2*Math.abs(finalPos-initialPos));The final deed the startRisingBall method does is just resetting some of our variables to start the ball moving up. Because I am treating the up movement as a separate, independent action, I reset my timer and currentPos to 0 and my ball's current position respectively.
The final thing this method does is set up the animation by registering the ENTER_FRAME event with the moveBallUp event handler...which we'll look at next.
// Responsible for moving the ball up
function moveBallUp(e:Event) {
  timer+=1;
  //Storing the position of the ball before and after it moves
  var positionA:Number=this.y;
  this.y = currentPos - initialSpeed*timer + .5*gravity*(timer * timer);
  var positionB=this.y;
  checkTopBoundary(positionA, positionB);
}
The moveBallUp event is the arch-nemesis of your moveBallDown method. This method gets called at each ENTER_FRAME event, and it is responsible for moving the ball up. It does this by first incrementing the timer and then setting the current position to our favorite equation for position:
The line of code mapping to the above diagram is:
this.y = currentPos - initialSpeed*timer + .5*gravity*(timer * timer);The only difference now is that the initialSpeed actually matters. That is why it is visible in the code whereas it was omitted in its counterpart for making the ball fall earlier.
The last thing is to make a call to the checkTopBoundary method that takes positionA and positionB as arguments. Notice that the positionA and positionB variables measure the position of the ball before and after it gets moved. While this sounds odd, I am doing this to figure out whether the ball is still moving up or whether the ball's direction has changed.
// Checks when the ball has hit the top of the bounce
function checkTopBoundary(firstPos:Number, secondPos:Number) {
  if (secondPos>firstPos) {
  stopRisingBall();
  startFallingBall();
  }
}
While I gave some of details away in the preceding section, I check the direction of the ball movement in the checkTopBoundary method. The reason is that, if I didn't check the direction, the ball would automatically reverse direction and start moving down. I already have code dedicated to making the ball fall! You spent an entire page looking it. Instead, by comparing whether the secondPos is greater than the firstPos, I can stop the current animation and switch to all of the code you saw before for making the ball fall.
If the second position is greater than the first position, I immediately call both the stopRisingBall and startFallingBall methods! As their names apply, one method stops the ball from rising, and the other method starts the ball falling. Phew. You are almost done. Let's just jump back up in our code to look at the variables you have declared.
var timer:Number=0;
var initialPos:Number=0;
var finalPos:Number=0;
var currentPos:Number=0;
var initialSpeed:Number=0;
var startPosition:Number=0;
var gravity:Number = 1;
//Adjust this to increase or decrease the
//number of bounces
var decay:Number = .9;
The variables at the vary top help keep track of the various things that help your ball either fall or bounce. The most important variable is the one for decay. This decay variable is used to dampen the bounce each time your ball hits the ground. A really small value for decay means that the bouncing will stop very quickly. A larger value (such as .95 or .99) indicates that the bounce will go on a bit longer. A value of 1 means the bouncing will continue indefinitely. This would be the ideal case where energy is perfectly conserved.
I hope you found this tutorial useful. While the end result was a look at the code that is responsible for making something bounce, I think the more important part is understanding the physics behind why the code is written the way it does. Best of all, I probably brought back fond memories of you having seen some of these concepts in your classes in the real world!
Just a final word before we wrap up. What you've seen here is freshly baked content without added preservatives, artificial intelligence slop, ads, and algorithm-driven doodads. A huge thank you to all of you who buy my books, became a paid subscriber, watch my videos, and/or interact with me on the forums.
Your support keeps this site going! 😇


:: Copyright KIRUPA 2026 //--
