 Slider Bars
by
ilyas usal aka pom
Introduction
Sliders can be used in many ways in a site: to
control sound, to scroll a text, or more generally
to adjust the value of a variable at run-time. We
are going to see in this tutorial how to build a
very simple slider with Flash MX. Then one that is a
tiny bit more complex. And then in the extension
pack (next tutorial) how to build the corresponding
component. Nice and easy.
[
The slider we are going to build ]
What You Need to
Get Going
All you need is a line and a dragger.
If you open the source provided and look inside the
library, you'll see that the dragger is a
very thin rectangle, with its registration point in
its center, and that the line is 100 pixels
wide, with its registration point at the left end of
it. I didn't pick this width at random : I chose it
because most of the usual quantities have a value
comprised between 0 and 100, and it's very
appropriate for percentages too.
Steps to Create
Animation
To make it really reusable, we are going to make
it a little component on its own, that you can just
drag and drop on your scene and have a functional
slider. It won't be a proper component at first
because we want the code to remain simple, but it
won't be so far.
-
The first thing you need to do is create a
container clip on the scene (Ctrl+F8). Give it the
name slider. Then drag and drop from the
library the line and the dragger, so that the left
end of the line matches the center of the slider
clip. You can use the Align Panel (Ctrl+K) to do
that, it's quite practical. Here's an example with
the line but the dragger works
exactly the same.
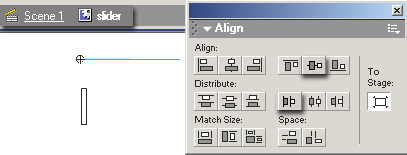
[
position of the left end of the line ]
-
Now give instance names to the line and the
dragger : line and dragger. And
that's it for the non-code part. All you have to
do now is write the code in the first and only
frame of the slider movie clip.
The code:
-
Let's look at the functionalities: we want the
dragger to be draggable left and right but always
on the line and then we want to return the
position of the dragger relatively to the width of
the line.
-
Let's translate this into ActionScript :
This is the code that lies in the first frame of
the slider movie clip:
[
the code ]
- Let's explain this briefly:
startDrag(lockCenter,left,up,right,bottom)
We want to drag from the left end of the line
(position 0) to the right end of the line
(position line._width, and we want to stay on that
line, that is to say remain at _y=0.
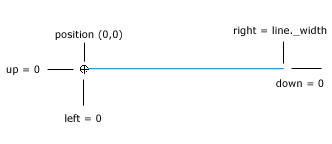
[
the parameters of the startDrag ]
You can see that when the dragger is completely
at the left of the line, this._x equals 0, and so
does the ratio, and when it's at the right of the
line, this._x equals 100, and so does the ratio.
Notice that the last line is that simple because the
line movie clip is 100 pixels wide.
Anyway, the first version of the slider is done.
All you have to do now to use it is drag and drop it
on the scene, give it an instance name, for instance
mySlider, and then get the value of the
slider using mySlider.ratio. In the
example I did, I assign the value of the slider to a
text box called ratio by putting this in the
first frame of the movie:
this.onEnterFrame=function(){

   ratio.text=mySlider.ratio;

}
Part 2: Make your slider any size you want
We just need to change a few things in the code
of the slider to make this work. It's a basic " Rule
of 3 " as we call it in French.
You can see that when the line is 100 pixels
wide, length equals 100, and then
this._x*100/line._width equals this._x*100/100 =
this._x, which is exactly what we had in the first
place (I'm just trying to show that the formula
works
 ). ).
[
Enter a length and press ENTER ]
Here! I hope you found this tutorial interesting.
Check back soon and we'll see how to build a nice
slider component from the A to the Z.
-pom
|


