 Tutorials
Books
Videos
Forums
Tutorials
Books
Videos
Forums


This is an archived tutorial from the kirupa.com legacy collection. It covers software that may no longer be available, but it is kept online because the ideas still hold up.
This title may sound scary to you, and it probably isn't because of the word Animations. The word trigonometric to many of you brings up memories of school with random repeating graphics, cosine, sine, and Pi. Don't worry if you forgot everything about trigonometry or never had a chance to learn it. That is OK for today, for my goal with this article is to emphasize just the portions of trigonometry that make sense when used in animations.
For example, the following animation may just look like a bunch of circles just flying around after you mouse over the button:
Looking deeper, there is a bit more to it. This effect, dubbed the Colorful Explosion by me, uses some trigonometric magic. De-mystifying this magic is where this tutorial comes in. By the end of this article, you will have gained the ability to learn how the above and a range of other animations can be created using just trigonometric functions.
There is really only one thing that characterizes trigonometric motion. That one thing is periodicity or, to put more simply, predictability. All trigonometric animations fall into a predictable pattern - almost too predictable actually.
For example, two common trigonometric functions you will be using are Cosine and Sine. These functions take a number as the input and return another number as the output. Regardless of how large or small the input is, the number that gets returned is always, by default, between -1 and 1:
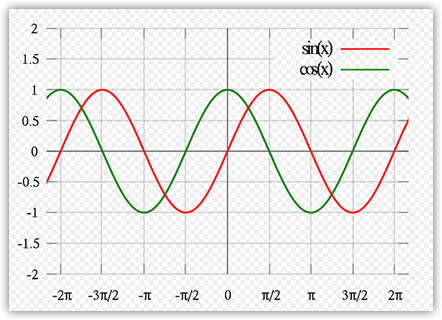
[ image plotting Cosine and Sine taken from wikipedia ]
Let's look at the above chart in greater detail. The input to the function is an angle similar to what you see on the x-axis. The angle is in terms of radians, so that is why you see the Pi symbols. When the Cosine and Sine functions that the angle as the input, they return a value known as the amplitude. This amplitude is what is plotted on the y axis.
One characteristic of trigonometric animations I mentioned is periodicity. In the above graph, let's focus in on the Sine function. Notice that the range of angles shown in the graph goes from -2 Pi (-6.28) and 2 Pi (6.28). Despite the range of the angles, notice that the amplitude never deviates beyond -1 or 1. Even an angle of 1000 Pi would result in a value between -1 and 1.
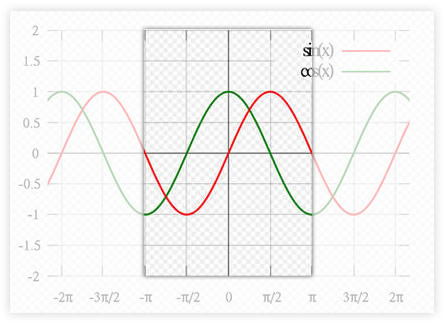
The periodicity also means that you do not need to look over every possible angle to figure out what the value of your Cosine or Sine function will be. What you need to find is a single tile of your Cosine or Sine function that you can repeat forever without ever having lost any fidelity in your pattern.
For example, this is would be considered an example of such a tile:
This would be another example of a tile:
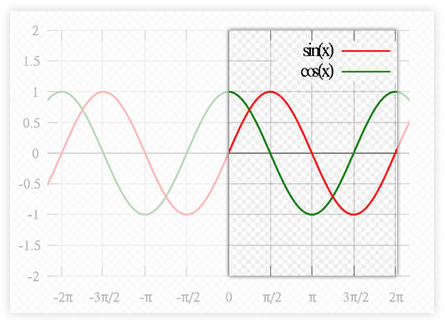
For a simple cosine function, the tile's range of angles will be 2 PI. Something from negative PI to positive PI or something from 0 to 2 PI would all work because the range of angles between those endpoints contains 2 PI worth of them!
Ok, this page was a little dry. I will make up for this on the the next section where we jump right into some code.
In the previous section, you learned a bit about trigonometric animations at a very high level. In this page, let's go a little deeper and look at how these functions can be represented in code.
There are three common trigonometric functions - Cosine, Sine, and Tangent. For animations, you will rarely use Tangent, so let's just focus on Cosine and Sine. In ActionScript, the syntax for accessing them both is:
Math.sin(number);
Math.cos(number);
If you take a graphing calculator, if you graph the above two functions, you would basically get the exact chart you saw in the previous section. The value you pass in as an argument to Math.sin() or Math.cos() is the angle, and that is what you see on the x-axis.
Compare the values from the chart to what I input into Flash below:
// 0
Math.sin(-2 * Math.PI);
// 1
Math.sin(-1.5 * Math.PI);
// 0
Math.sin(-1 * Math.PI);
// -1
Math.sin(-.5 * Math.PI);
// 0
Math.sin(0 * Math.PI);
// 1
Math.sin(.5 * Math.PI);
// 0
Math.sin(1 * Math.PI);
// -1
Math.sin(1.5 * Math.PI);
// 0
Math.sin(2 * Math.PI);
I basically took the key angles from our chart and placed them into Flash just to show you how to map between the chart and code. If you pass in any other intermediate angle, you will find that your output is exactly the same as what it would be if you relied on the chart, but the chart makes it a bit difficult to read values that are not -1, 0, or 1.
NoteNotice I am entering the angle by using the built-in constant for PI (Math.PI) instead of just approximating to 3.14. I am doing this to ensure the result is exactly the same as that of the chart, but you do not have to do this.
You can definitely use decimals as well, for PI is nothing more than 3.14159.... The only thing to note is that, by going all decimals, you do lose a certain amount of precision. Keep that in mind if such precision is important to you! For example, Math.sin(PI) is 0. Math.sin(3.14159) is 0.000002653589793352726. The answer is close to 0, but close may not be quite right.
Now that you have seen the code for usng the Sine and Cosine functions, let's look at placing them in a simple application. I have created a simple application for you to get started on, so please download it from the following location:
Don't worry. The application I have provided just saves you some time without giving away anything that might be important. All I have done is created a ColorfulCircle movie clip class, drew instances of that class on the artboard, and added an ENTER_FRAME event handler. In case you are curious, you can learn in detail how this was all done in the Classes and MovieClips tutorial.
Anyway, once you have downloaded and extracted the files, go ahead and open both trig_animation_flash.fla as well as ColorfulCircle.as. The Flash file only contains a few circles:
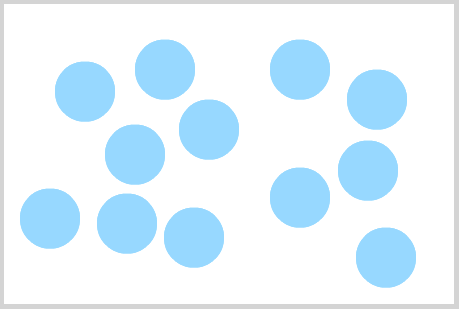
[ what your artboard looks like ]
These circles are instances of the the ColorfulCircle movie clip, and this movie clip has an associated class file that is stored in the ColorfulCircle ActionScript file. If you switch over to that file, you will find the following code:
package {
  import flash.display.*;
  import flash.events.*;
  import flash.geom.*;
  public class ColorfulCircle extends MovieClip {
  public function ColorfulCircle() {
  this.addEventListener(Event.ENTER_FRAME, flyCircleIn);
  }
  function flyCircleIn(e:Event) {
  }
  }
}
If you run your application right now, nothing will happen. The reason is that we haven't actually specified what our application will do. That's what the next section is for!
In the previous section, we got our hands wet by looking at how Cosine and Sine can be represented in ActionScript. We ended by having you look at a small sample project that contained some circles - circles that don't do anything. We'll fix that right up on this page.
Our ColorfulCircle class contains an event handler and event for EnterFrame already defined. That sets us up nicely for what we want to do, and what we want to do is this - we want the size of the circles to oscillate between small and large. Because we are dealing with an oscillation, we will use a trigonometric function to simulate it.
Make the following additions, highlighted in yellow, to your code:
package {
  import flash.display.*;
  import flash.events.*;
  import flash.geom.*;
  public class ColorfulCircle extends MovieClip {
  var angle:Number=0;
  var speed:Number=0;
  public function ColorfulCircle() {
  speed=.1+Math.random();
  this.alpha=speed;
  this.addEventListener(Event.ENTER_FRAME, flyCircleIn);
  }
  function flyCircleIn(e:Event) {
  this.scaleX=Math.sin(angle);
  this.scaleY=Math.sin(angle);
  if (angle<=2*Math.PI) {
  angle+=speed/5;
  } else {
  angle=0;
  }
  }
  }
}
Once you have added the new code, save the ColorfulCircle file and press Ctrl + Enter to test the movie. Notice that this time, the circles are not stationary. Instead, they are moving around. Let's look at the code in greater detail.
The first thing that we do is declare two variables that will end up storing the angle and speed:
var angle:Number=0;
var speed:Number=0;
Both of these variables are of type Number, and I am initializing them to a value of 0.
Next up is the code we added to our constructor:
speed=.1+Math.random();
this.alpha=speed;
The speed variable I declared earlier to 0 is being replaced with a random number that is between .1 and 1.1. The reason I keep the minimum to .1 is that if the speed were any less, the animation really looks boring.
In the next line, I set the transparency of our circle to be the same as the value for our speed. I am doing this deliberately, and not out of sheer laziness, because I want the faster circles to be more visible. The slower circles will be less visible because their alpha value would be equal the lower value for speed.
Speaking of the value for speed, while the minimum transparency will be .1, the maximum will be 1.1. The only hitch is that the value for alpha only goes between 0 and 1. The nice thing is that inputting a value that goes beyond that range has no effect. Your transparency will never be below 0 or greater than 1.
Let's now move into our flyCircle event handler that responds to each tick of the ENTER_FRAME event:
this.scaleX=Math.sin(angle);
this.scaleY=Math.sin(angle);
In the first two lines, I set the value of our horizontal as well as vertical scales to be equal to the Sine of our angle. Initially, the angle is 0, but in the next couple of lines you can see where it changes:
if (angle<=2*Math.PI) {
  angle+=speed/5;
} else {
  angle=0;
}
If our angle is less than 2 * PI, the angle's value is incremented by our speed divided by 5. This is a very small number, but since we are dealing with radians where 6.28 is considered a large number (in the grand scheme of things), small numbers are what we really need.
Because a typical cycle goes from 0 to 2 PI, once our angle becomes larger than 2 PI, it makes no sense to keep incrementing the value for angle. That is why once the value for angle gets larger than 6.28 something, it gets reset back to 0 as if nothing ever happened.
That is all there is to this code. The gradually increasing angle being passed into our Sine function is entirely responsible for scaling our circle. Everything else is just the support that allows it to just keep on rolling. In the next section, let's extend this example a little bit by looking at magnifying and slowing down the oscillation.
In the previous section, you saw how a simple animation using a trigonometric function can be created. In this page, we'll extend our example slightly and wrap things up.
Right now, the range of your oscillations goes between -1 and 1. This is because our Sine function is not being amplified:
this.scaleX=Math.sin(angle);
this.scaleY=Math.sin(angle);
To amplify the effects of the Sine function, simply add a multiplier to the front:
this.scaleX=5*Math.sin(angle);
this.scaleY=5*Math.sin(angle);
In the above example, I have a multiplier of 5 set. This means that the range of my oscillation now goes between 5 and -5. The effects of this are very noticeable because our circles are now being scaled five times their original size.
Here is a screenshot of what it looks like:
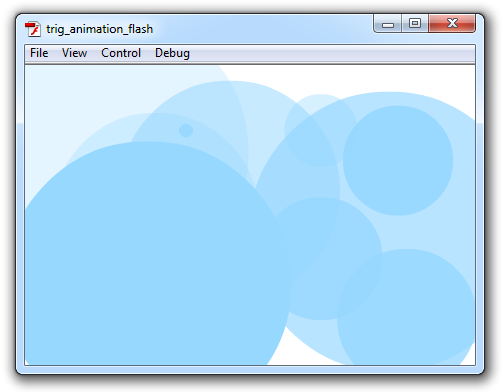
What is really nice about the amplitude is that you do not have to resort to using a constant value. You can choose to be more creative and have a multiplier that changes based on what the value of your angle and speed are.
Here is a change I made that causes my circles to have a bounce as they approach a small size:
this.scaleX=5/(angle+.1)*Math.sin(angle);
this.scaleY=5/(angle+.1)*Math.sin(angle);
this.alpha = angle/5;
Notice that the multiplier is a constant that gets divided by our angle. Just for kicks, the alpha property is being changed to be a fraction of the angle as well. This effect, which is close to what you saw on the first page, provides the illusion of something being dropped and bouncing before it rests.
The last topic on our menu has to do with adjusting the speed of the oscillation. The rate of the oscillation is determined entirely by your frame rate and how quickly the angle value is being incremented. The second part, how quickly the angle value is being incremented, is what we will dive a bit into.
The larger the value of the angle incrementer at any given frame, the faster your oscillation will complete a full cycle from 0 to 2PI. The smaller the value of your angle incrementer at any given frame, the longer your oscillation will take to complete. Kind of makes sense because you are now going from 0 to 2PI in less time.
Here is an example where I adjust the angle's increment size using a random number:
package {
  import flash.display.*;
  import flash.events.*;
  import flash.geom.*;
  public class ColorfulCircle extends MovieClip {
  var angle:Number=0;
  var speed:Number=0;
  var randomIncrement:Number = 0;
  public function ColorfulCircle() {
  speed=.1+Math.random();
  randomIncrement = .2 + Math.random();
  this.alpha= speed;
  this.addEventListener(Event.ENTER_FRAME, flyCircleIn);
  }
  function flyCircleIn(e:Event) {
  this.scaleX=5/(angle+.1)*Math.sin(angle);
  this.scaleY=5/(angle+.1)*Math.sin(angle);
  this.alpha = angle/5;
  if (angle<=2*Math.PI) {
  angle+= randomIncrement/5;
  } else {
  angle=0;
  }
  }
  }
}
Once you make the three changes to your code, save the ColorfulCircle file, and test your application by pressing Ctrl + Enter. Notice now that the variation in how long your circles take to finish their cycles is more varied than it was before.
When fiddling with the angle, there is one thing you should avoid doing. Do not directly manipulate the value of the angle inside the trigonometric function as follows:
this.scaleX=5/(angle+.1)*Math.sin(2*angle);
this.scaleY=5/(angle+.1)*Math.sin(2*angle);
The reason is that you may have other code that relies on this value being untouched. For example, we have some code that resets the value of angle when it hits 2PI. If you manipulate the angle inside the trigonometric function, you need to make sure to adjust that value accordingly everywhere else. Otherwise, you will fall out of sync where your trigonometric function's value is out of touch with all other areas the angle is being used.
My preference is to make any tweaks to the area where you are actually incrementing your angle...such as what you see in my example. This ensures that you minimize any additional tweaks and fix-ups you need to make to ensure consistency.
I hope this tutorial helped unlock the mysteries of trigonometric functions and how easy they are to use in animations. If you have been following this site for a while, you will probably realize that almost all of the animation based tutorials I have written have either a Cosine or Sine at the center, so this tutorial is in many ways, very VERY late to the party.
If you are curious to see my implementation of the example you were working on, please download it below:
Just a final word before we wrap up. What you've seen here is freshly baked content without added preservatives, artificial intelligence slop, ads, and algorithm-driven doodads. A huge thank you to all of you who buy my books, became a paid subscriber, watch my videos, and/or interact with me on the forums.
Your support keeps this site going! 😇


:: Copyright KIRUPA 2026 //--
