 Tutorials
Books
Videos
Forums
Tutorials
Books
Videos
Forums


This is an archived tutorial from the kirupa.com legacy collection. It covers software that may no longer be available, but it is kept online because the ideas still hold up.
When you write code in Flash, you launch the Actions panel and start writing your statements. You don't think about how the Actions panel retrieves the data, how Flash compiles your code into an SWF, or how memory is managed internally by the Flash application. Such information is not directly relevant to whatever program you are writing. But, wouldn't your task be more complicated if you did have to figure out how all of those pieces worked in order to code in Flash?
Hiding those unnecessary details is known by a scary term - abstraction. The idea is that you can simply box up certain features/code/etc. and hope nobody would need to open up the box and look at the messy insides. As long as you plug in the right data to the box, you would received a predicted output.
Abstract Data Types (ADT's) work similarly. They are sections of code that exist somewhere created by somebody else, but they help you save time and not worry about messy programming details. You probably have used ADT's without even knowing it, for example, the String data type.
The String data type comes built-in with Flash, and it allows for you to use and manipulate text-based data. When using a String object, you really do not think too much about how the String class is defined, how the various properties work, or how the data is stored internally. You only need a basic understanding of the String's methods in order to use it:
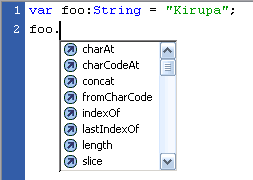
[ the foo object, because it is a String, allows you to access the String's methods ]
Whoever wrote the String class took care of the details so you do not have to worry about them. Because of the String data type, you can spend more time working with text as opposed to fiddling with the underlying String representation.
In this tutorial, you will learn about user defined data types - or commonly known as abstract data types by deconstructing a Graph ADT. You will learn how to create a good ADT and learn how the Graph ADT was approached and coded.
The following is an animation I created using the Graph ADT. Instructions on how to use it are below the animation:
[ an example created using the Graph ADT ]
Graph Example - Instructions
Click on any two squares to find a path between them. Since only two nodes can be selected at any given time, make sure to unselect a node by clicking on a selected node again.
Now that you have an idea of something cool that can be created with our ADT, let's learn about creating an ADT!
The following guidelines help you in creating a good, usable ADT:
Your ADT will be a very important part of your program. You will save time in the long-run if you brainstorm some operations, features, and potential troubles you may run into before beginning to code.
An ADT should make life easier for you as a programmer. When creating your ADT, keep the operations you can perform on an object simple, straightforward, and consistent.
Your operations should be relevant to the ADT's purpose. Remember, your ADT is not your main program. It is merely an accessory that you use to build your main program.
After step 2, it seems odd to mention this, but ensure that any relevant information can be easily retrieved via your ADT itself. For example, any set operation has a complementary get operation.
Your ADT may be very generic (such as a graph, list, etc.) or it may be very domain-specific (such as an address book). It is good practice to avoid mixing and matching generic and domain-specific types, for it will make it difficult to manage your code and find/fix type incompatibilities in the long-run.
In the next section, I will explain how I approached the Graph ADT.
In the previous section, I explained what ADT's are provided some guidelines on creating your own. In this and the next few pages, I will explain how I created my Graph ADT.
Our Graph is composed of Nodes with connected Edges. In my representation, an edge exists only if it is connecting two nodes. A pair of nodes may have multiple, different edges between them.
For consistency purposes, the node from which the edge originates from will be called the source node. The node that receives the edge will be called the target node.
The following series of images provide valid representations of our Graph:

[ just one node ]

[ two nodes connected by one edge]

[ two nodes connected by two edges ]

[ a complicated example containing many nodes and edges ]
Another minor detail is how neighbors are defined. A neighbor is a node that can be reached in one step by traveling an edge. In the second example containing one edge and two nodes, Node 1's neighbor would be the Node 2. Node 2 does not have any neighbors because Node 1 cannot be reached using Edge 1.
Now that we have an idea of how our Graph will behave, let me run through some of the basic requirements of the ADT:
I should be able to add Nodes by simply specifying a Node's name and it's X and Y position.
I should be able to add an edge by calling a source node's add method that would take in the name of the target node.
Everything else - such as specifying the neighbors and displaying the data should be done automatically.
In the next section, I will provide a brief overview of all public methods in both the Node and Edge classes.
Now that you have a brief idea (from the previous section) of how I approached the ADT, let's take a look at the public methods and the arguments those methods allow:
Edge Class - Public Methods
Having easy to understand method names will save you time and reduce confusion - especially if you are revisiting a project after a long break.
Random Comment
While writing this tutorial, I actually went back and revised some of the method names because I didn't do a good job following the naming convention I mentioned above
Let's actually use some of the above code in a quick program! First, download the source files for this tutorial from the following link:
Once you have extracted the files, open the file called adt_tutorial in Flash. right click on the first frame in your Actions layer and select Actions. The following sections will help you to use the Graph ADT.
Let's first create a node. Our Node constructor takes in three arguments. The arguments in order are the node's name, the node's X position, and the node's Y position.
Type in the following code and press Ctrl + Enter to see how it looks:
var blue:Node = new Node("blue", 200, 50);
Notice that our node's name is blue, and its x and y positions are 200 and 50 respectively. Also, notice that when you hover over your node, the node's name blue is displayed:
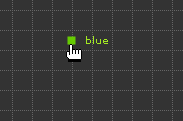
[ the node you just created ]
Let's add two more nodes. Add the following lines of code after your existing code:
var red:Node = new Node("red", 50, 150);
var green:Node = new Node("green", 250, 250);
When you preview your animation now, you should see three nodes:
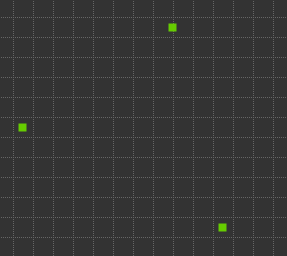
[ the three nodes ]
The three nodes are great, but now let's add some edges to connect them. To construct an edge, you should use the source (parent) node's addEdge method. The addEdge method takes two arguments. The first argument is your target node, and the second argument is your edge's name.
With that said, copy and paste the following code after your existing code from the previous section:
blue.addEdge(red, "blue->red");
blue.addEdge(green, "blue->green");
green.addEdge(red, "green->red");
When you preview your animation now, you will see three lines connecting the three nodes. Since your edges are not bi-directional, your connection goes from blue to red, blue to green, and green to red. Any complementary relations such as red to blue, green to blue, and red to green do not exist.
So, now you have a brief idea on how to create nodes and edges. As you could tell, it is a lot easier to create a few Nodes and a few Edges using the ADT as opposed to worrying about how to create the lines, figuring out which library items to attach, etc.
There are more methods in the ADT than the two you have used so far, but for our purposes of getting used to using the ADT, that is fine. In the following sections, I provide an explanation of all major code. If you are not familiar with object-oriented programming in Flash, you may find some of the explanations useful.
From the previous sections, you should have a better idea of what does or does not belong in a good ADT. Now, let's go through the code and analyze the internals of our Graph ADT.
Let's first start by examining our Node class. Here is the constructor:
public function Node(nodeName:String, xPos:Number, yPos:Number) {
  this.nodeName = nodeName;
  this.xPos = xPos;
  this.yPos = yPos;
  nodeList.push(this);
  currentNode = this;
  isSelected = false;
  neighborList = new Array();
  draw(nodeName);
}
The above code defines our constructor responsible for creating instances of our Node object. Like I mentioned in the previous section, the constructor takes in three arguments: the node's name (String), the x position (Number), the y position (Number).
this.nodeName = nodeName;
this.xPos = xPos;
this.yPos = yPos;
nodeList.push(this);
currentNode = this;
isSelected = false;
neighborList = new Array();
draw(nodeName);
The above lines store the initial properties of our node so that other methods can easily access them. The nodeName, xPos, yPos, nodeList, currentNode, isSelected, and neighborList variables are declared outside of the method (globally) so that the entire class has access to the data contained in them.
The assignments are pretty straightforward. Notice that I am using the this keyword to reference variables localized to this particular class. The this keyword, in the constructor, references the Node instance itself. Therefore, this references a Node object and, when I push this to our nodeList array, I am actually adding our current Node object.
public function getName():String {
  return nodeName;
}
public function getX():Number {
  return xPos;
}
public function getY():Number {
  return yPos;
}
The above three methods help return data to the client. All they do is return global variables that had been initialized with data in the constructor.
public function getEdgeList(input:Node):Array {
  var newEdge:Array = Edge.getEdgeList(currentNode, input);
  return newEdge;
}
The getEdgeList method returns a list of edges connecting the caller node with the target node. The method gets that data by making a call to our Edge class's static getEdgeList method. I will discuss the Edge's getEdgeList method in detail when covering the Edge class in the next section.
public static function getNodes():Array {
  return nodeList;
}
This static method returns a list of all the nodes contained in the nodeList array. Because the nodeList array is updated each time a new Node object is created in the constructor, the getNodes method always returns an up-to-date list of Nodes created by your program.
public function addEdge(neighbor:Node, edgeName:String) {
  var edgeOne:Edge = new Edge(currentNode, neighbor, edgeName);
  neighborList.push(neighbor);
}
This is the method that you use to create an edge between two nodes. Like you saw in the example, the addEdge method takes in a node and the edge's name as its arguments.
Because an edge is created, I have to create an Edge object. I will explain the Edge object constructor in the next section, but just note that an Edge object is created for each edge connecting a pair of nodes.
Since our newly connected node is also now our neighbor, I am adding the name of the inputted node to our neighborList array.
public function containsNode(neighbor:Node) {
  var arrayData:Array = currentNode.getNeighbors();
  for (var i = 0; i<arrayData.length; i++) {
  if (arrayData[i] == neighbor) {
  return i;
  }
  }
  return -1;
}
This method checks to see if a node in question is contained in my current Node's neighbors. I have written a tutorial on how a variation of this method works in the Finding Values in Array tutorial. One thing to notice is that the array I search through is my current node's neighbors:
var arrayData:Array = currentNode.getNeighbors();With that said, let's take a look at the getNeighbors() method.
public function getNeighbors():Array {
  return neighborList;
}
It's another one of those methods that simply return a value initialized in an earlier method. If you recall, each time an edge is created, the target node is added to our neighborList array.
public static function getSelectedNodes():Array {
  nodeSelected = new Array();
  var nodeAll:Array = Node.getNodes();
  for (var i = 0; i<nodeAll.length; i++) {
  var nodeSel:Node = nodeAll[i];
  if (nodeSel.isSelected == true) {
  nodeSelected.push(nodeSel);
  }
  }
  return nodeSelected;
}
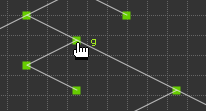
This method returns a list of selected nodes. A selected node (see following images) is a node that has been clicked on by the mouse:
[ unselected node ]
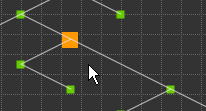
[ a node that has been selected ]
When a node is selected, its isSelected variable is set to true. I make call to our getNodes() method, and the getNodes method if you recall returns an array of all nodes. I cycle through each node in the returned array and check if that node's isSelected variable is set to true. If it is, I add that node to a new list.
Essentially, I take a large array of nodes and create a new array with only the selected nodes as its content. Another way of looking at it is that you are filtering away unnecessary data until all you are left with is the relevant data.
This covers all of the public methods in our Node class. In the next section, I will provide similar explanations for our Edge class.
Let's go over our Edge class. You will notice that our Edge class is noticeably smaller than the Node class you learned about in the previous section. Let's start with the constructor:
public function Edge(from:Node, to:Node, edgeName:String) {
  nodeOne = from;
  nodeTwo = to;
  var edgeKey:String = from.getName() + to.getName();
  var edgePair:Array = new Array();
  edgePair.push(edgeKey);
  edgePair.push(this);
  edgeList.push(edgePair);
  this.edgeName = edgeName;
  currentEdge = this;
  draw(nodeOne, nodeTwo);
}
The Edge constructor takes in, for its arguments, two nodes (from, to) and the name of your edge (edgeName). Because edges are linked to nodes, I need to be able to store both the edge and the names of the two nodes it is connecting. A simple way I was able to do that is by storing both the node names and the Edge in a single list.
var edgeKey:String = from.getName() + to.getName();
var edgePair:Array = new Array();
edgePair.push(edgeKey);
edgePair.push(this);
edgeList.push(edgePair);
For example, if you have have two nodes called "East" and "West", and you create an edge between them, your edgeList would look like the following:
((EastWest, [edge Object]))If you added another edges between the West node and a South node, your edgeList would now look like this:
((EastWest, [edge Object]), (WestSouth, [edge
Object]))
This format allows me to easily search for the correct Edge by simply inputting the two nodes. You will see how the searching works when I explain the getEdge method below.
Similar to the Node class, I store many of the values from our constructor as private variables outside our class:
private var edgeName:String;
private var nodeOne:Node;
private var nodeTwo:Node;
private var currentEdge:Edge;
private static var edgeList:Array = new Array();
Notice that our edgeList is defined as a static variable. It is static because I want to ensure that the edge and node connections are up-to-date among all of the edge objects.
Finally, I make a call to our private draw method that simply puts two lines between the nodes.
public function getName():String {
  return edgeName;
}
This method simply returns the name of our edge. Because the edgeName variable is declared globally and initialized in the constructor, we can simply return the edgeName variable without doing anything else.
public function getDistance():Number {
  var dx:Number = 0;
  var dy:Number = 0;
  dx = Math.abs(nodeOne.getX() - nodeTwo.getX());
  dy = Math.abs(nodeOne.getY() - nodeTwo.getY());
  return Math.round(Math.sqrt((dx*dx) + (dy*dy)));
}
This method returns the length of our edge or, in other words, the distance between the two nodes that make up our edge. In this implementation, I use the Pythagorean theorem to calculate distances because our edge is a straight line. If you use non-linear edges (such as a curve, for example), you will need to adjust this method accordingly.
public static function getEdgeList(node1:Node, node2:Node):Array {
  var keyName:String = node1.getName() + node2.getName();
  var gettingEdge:Array = new Array();
  for (var i = 0; i < edgeList.length; i++) {
  var itemList:Array = new Array();
  itemList = edgeList[i];
  if (itemList[0] == keyName) {
  gettingEdge.push(itemList[1]);
  }
  }
  return gettingEdge;
}
This method returns a list of edges that connect the two inputted nodes. In my description of the constructor, I provided an explanation as to how the nodes map to the edge object. This method essentially searches through our edgeList array structure and adds any instance of an edge it finds to our gettingEdge list.
Because the key is the combination of both node names, I search the first item in each nested array for a match. If a match is found, you automatically know that the second item in the nested array must be the Edge object you are searching for.
Designing and creating an ADT is time-consuming, but hopefully the time you will save using your ADT for repetitive tasks will be greater. Something that I chose not cover in this tutorial is Testing. Your ADT needs to work consistently, and testing is a good way to ensure that your ADT produces the right outputs for the inputs your provide. I felt it is too important of a topic to combine with an intro to ADT's, so I'll continue this discussion in a future tutorial.
Further Info
For more information on Abstract Data Types, the following link should be helpful: Lecture: Introduction to ADT's
The node/graph implementation is based partly on work that I did here.
Just a final word before we wrap up. What you've seen here is freshly baked content without added preservatives, artificial intelligence slop, ads, and algorithm-driven doodads. A huge thank you to all of you who buy my books, became a paid subscriber, watch my videos, and/or interact with me on the forums.
Your support keeps this site going! 😇


:: Copyright KIRUPA 2026 //--
