Hello Friends! Here's a tutorial about a new feature the
folks at Macromedia have included in Flash MX. Scriptable
Masks! Woo Hoo! What a beauty! To get started, I have
included an fla which has all the components you need to
make this effect possible.
If you're experienced with Flash, but are
new to the scriptable mask, you can skip right over to the
actionscript section. For the rest, I
will try to explain in detail. (quick thank you to
lostinbeta and to Pom for helping beta test).
[ drag mouse over the pictures
to see the masking effect ]
Understanding Masks Pretty cool, huh? First,
I'll take a moment to try to explain a mask in my very own twisted way, because
I have found that some people have difficulty understand it. Well, the basic
explanation comes from it's name: "Mask". So, you're at your favorite costume
party and you've decided to come to the party with your Britney Spears costume.
Your gut is hanging out and you're wearing your pants in a "plumber-like"
fashion...crack showing and all. Not quite the Britney look you were expecting.
However, you bought the
Britney Mask and you put it over your face, knowing that this will complete the
look! To your dismay, you discover that you cannot see through your mask!
Someone forgot to cut the holes for the eyes so you could actually see where you
were going. Now you look like a lunatic with their belly showing, your pants are
down to your thighs and you're bumping into the walls. Not at all what you had
hoped. That mask is just not useful unless you have an area through which you
can see the people laughing at you.
Well, let's forget that disturbing image and take this knowledge to Flash MX
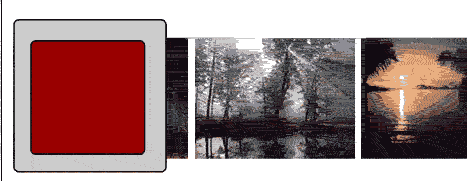
with an easy example. I want to make a movie clip of a television. I want the
television to display a short animation, just as if I was watching TV. I've
created an little graphic of a TV and I created an animation of some text that
I want to display "INSIDE" my TV. My TV graphic is hollow in the middle,
but unless I use a mask it will look like this:
That doesn't look right at all. Instead, I want to put a mask over that text
and instead of cutting the eyes out my mask, I am going to cut a shape exactly
like the shape of the hole in my TV graphic. That way people will only be able
to see my text through that hole, therefore giving you this effect:
Okay.. so that covers masks. On to the good stuff! Flash MX has given us an
awesome tool by introducing scriptable masks. In other words, you can now create
a mask with actionscript! Unreal! That is what we used to create this effect.
This is a scaled down version, slightly simplified. You can see the real world
example at
http://www.adobe.com/digitalimag/main.html.
Now, you too can create effects just like this one!
In order to set something like this up, we
need a few elements. Dont' worry, all objects are included
with your sample FLA, but I will describe the items, because
that is what good tutorials are all about.
Here's what we need to create this effect.
A movie clip of
three pictures sitting side-by-side. (instance name on the
stage: normalpic)
A movie clip of
the same three pictures that has been blurred using any
photo/graphics editing program (I used Fireworks MX for
this one). (instance name on the stage: blurredpic)
A movie clip of
our little slider gadget. It is simply a rectangle frame
with a hollow middle, so you can see items underneath it.
(instance name on the stage: camera)
A movie clip
INSIDE of the gadget that covers the hollow middle of
"camera" perfectly. (instance name on the stage: hole)
The Scenario I want all my pictures on the
scene blurred (blurredpic) until the user takes my gadget
(camera) and slides it across the blurred pictures. The user
will then be able to see the pictures in focus (normalpic)
by viewing through the opening ("hole") in my gadget
("camera"). Finally, I want the gadget ("camera") to "snap"
to my mouse when the mouse in inside the pictures. That way,
the gadget will follow the mouse by sliding along its x
axis. Not too bad. Is it?
First, let's set up our "camera with
hole" movie clip.
Open your library
if it is not already open (F11 on Windows). Double
click on the gadget movie clip in your library to
go to edit mode. You will be taken to a
new timeline for that movie clip. It currently has one
layer called "Layer1".
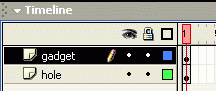
Add a new layer and name it "hole".
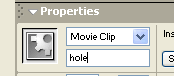
Drag an instance of the "hole" movie clip
onto the "hole" layer. VERY IMPORTANT! Give this instance
a name in the properties panel. Name it "hole":
[ give the
movie clip the instance name "hole" ]
Once that is done, change the
stacking order of your layers so the topmost
layer is gadget, and the next layer is "hole". It should
look like this:
[ re-arrange
the order of your layers ]
Good! Now, let's return to our main stage
by clicking on the words Scene1 located
just above your stage and just below the timeline (in the
default layout for Flash MX).
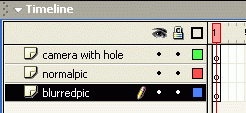
Let's Assemble the Layers on Main
Stage
I will have a layer for "normalpic", one for "blurredpic",
and one for "camera". I don't need one for "hole" because
"hole" is contained inside of "camera" . So, what is the
proper stacking order of these layers? Well, I want the
gadget to be over the whole thing, right? That means "camera
with hole" goes on top. That one is easy. What about the
normalpic and blurredpic? Well, I want to view "normalpic"
through the "hole" in "camera", so that means that normalpic
is next and blurredpic is last.
[ your layer
order should be similar to the graphic above ]
Let's put content inside the layers. (This
should be easy because we did such a good job naming our
layers!)
I want "blurredpic" to show all the time,
unless "camera" is over it, then I can show "normalpic"
through "hole". This, of course, is just an illusion. In
order to pull it off, "normalpic" and "blurredpic"
must be aligned perfectly with one another. That is
to say, their x and y values must be the same in the Info
Panel (click on Window, Info to access) or, you can use the
Align feature by pressing CTRL+K on your keyboard. With the
normalpic layer selected, drag the normalpic movie clip from
your library onto the stage. Name the instance of this movie
clip "normalpic" in the Instance section of your Property
panel.
Now, click on the blurredpic layer to
select it and drag the blurredpic movie clip from your
library onto the stage. Name the instance of this movie clip
"blurredpic" in the Instance section of your Property panel.
Finally, select the camera with hole layer
and drag the gadget movie clip onto the stage. Name this
instance "camera" (no quotes). Note: In my library, the
movie clip gadget has been given that name to follow the
metaphor of our initial description.
Your setup should look something like
this:
Now you're set! Actionscript will take you
the rest of the way in converting these meaningless objects
on the screen into an awesome effect! Steady... Steady....
Add ActionScript The actionscript that makes
this mask effect happen has the following syntax:
myMovieClip.setMask (maskMovieClip)
this is, slightly cryptic. Let's modify
this a bit...
WhatYouWantToSeeMC.setMask(theHoleInYourMaskMC)
Apply that to the effect we are trying to
achieve and it would look like this.
normalpic.setMask(hole)
That's it! hope you enjoyed it. Heheheh,
just kidding. Let's put this new bit of actionscript to use,
shall we?
Doubleclick on your camera movie clip on
the stage to go to edit mode. Right click on the "hole"
movie clip on your timeline and select Actions.
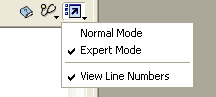
Make sure your actions panel is set to
Expert Mode.
[ to add the
code, your actions panel must be in Expert Mode ]
Type the following lines of code inside
the Actions panel:
[ copy and paste the above
lines of code ]
Quick explanation on _root
_root is how we are telling our script where it should find
certain elements. In our little tutorial here, we have
created three containers. our main stage (_root) is
container 1. Inside this container 1 we have placed a movie
clip called "camera". Camera is container 1A, because it
sits inside of container1. So, if I want to reference
"camera" I can do it like this: _root.camera and and Flash
will know that camera sits inside of _root. I have a third
container because the "hole" movie clip sits inside the
camera movie clip. The "hole" movie clip would be container
1Aa. If I want to reference "hole", I can do it like this:
_root.camera.hole.
Now, the actionscript above makes a bit
more sense! You can try out the code by using CTRL-ENTER on
your keyboard and you should be able to see the normalpic
through the hole you just created. Cryeeeekee!
Almost Done
Now, we just want to be able to drag the "camera" back and
forth with our mouse, but only if our mouse is inside of
normalpic. Easy enough...
First we are going to find out the x and y
values or our normalpic by using getBounds.
getBounds will return the coordinates of
your movie clip in the following fashion. xMin, xMax, yMin,
yMax. That way, you will know the "limits" of your movie
clip. Simple enough. We are going to attach the following
code to our camera movie clip. On your main stage, right
click on the camera movie clip and select Actions. Type (or
cut and paste) the following actions inside the Actions
panel:
[ add the above actions ]
In plain English this says: "Every time a
frame in the camera movie clip is played, I want you to
check the boundaries of the movie clip called normal pic,
and save the boundaries in a variable called getlimits.
Then, I want you to check if the mouse is inside the
normalpic limits(getlimits). If it is, I want you to make
the camera movie clips x position (it's center, in this
example) the same as my mouse's x position (which is called
_xmouse), therefore making camera follow the mouse along the
x axis only.
Drum Roll! Press Ctrl-Enter and test that
puppy. Yes! It is a thing of beauty, isn't it? I hope you
have enjoyed this tutorial and that you will soon write one
yourself. Take care!
Troubleshooting If you
have any problems with your movie, please check this first.
Make sure you
have named all the instances of your movie clips. This is
simply good practice in Flash.
If you have
changed the names of the movie clips to something else,
don't forget to change the code to reflect those changes.
Check your
syntax.
Finally, the
finished fla can be found here so you can play with it and compare.