 Tutorials
Books
Videos
Forums
Tutorials
Books
Videos
Forums


This is an archived tutorial from the kirupa.com legacy collection. It covers software that may no longer be available, but it is kept online because the ideas still hold up.
The DataGrid component is one of those things that falls under the "Mixed Blessing" bucket. On the positive, it is very useful for quickly displaying sets of data without having to worry about coding the various sort functions, the scrollbar, etc. Unfortunately, like most built-in Flash components, its file size is quite hefty - about 58kb for just having the DataGrid component displayed on stage.
Note
The DataGrid component is only available if you are using the Professional versions of either Flash 8 or Flash MX 2004.
There are numerous tutorials and documentation on the web on how to use the DataGrid component. In this tutorial, I will try to cover topics that have not been addressed by other sites such as how to dynamically populate your DataGrid. sort numerical data, and finally, how to make simple style adjustments.
The following is an example of what you will be creating:
[ notice that you can scroll the data and sort either by first or last name ]
In the above DataGrid, you will notice that you can scroll through the data and sort the data by either the first name or the last name. Another thing to notice when hovering over an item or clicking on an item is the colors. The colors have been modified from their default values, and in Page 3 of this tutorial, you will learn how to style your DataGrid.
I will be using Flash 8 Professional, but Flash MX 2004 Professional users should still be able to follow along:
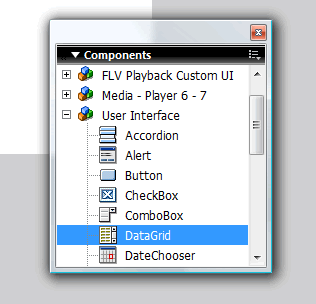
[ select the DataGrid component from the Components window ]
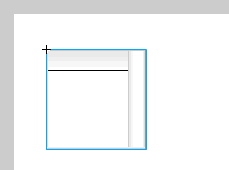
[ your DataGrid component on your stage ]
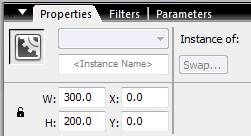
[ your DataGrid should be snugly located on your stage now ]
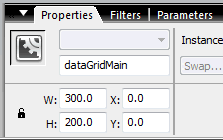
[ give your DataGrid the instance name dataGridMain ]
You now have your DataGrid setup, but there is still some more work left. For example, you haven't added any code to get our DataGrid to display something. That and more is covered in the next section.
In the previous section, you dragged and dropped your DataGrid component to the stage and made some Property changes. Let's add some code and look at how this all works in greater detail in this page.
function dataGridFunction() {
  var characters:Array = new Array(new Array("Jerry", "Seinfeld"),
  new Array("Elaine", "Benes"),
  new Array("Cosmo", "Kramer"),
  new Array("Jocopo", "Peterman"),
  new Array("Lloyd", "Braun"),
  new Array("Estelle", "Costanza"),
  new Array("George", "Costanza"),
  new Array("Frank", "Costanza"),
  new Array("David", "Puddy"),
  new Array("Mickey", "Abbott"),
  new Array("Morty", "Seinfeld"),
  new Array("Helen", "Seinfeld"));
  //
  for (var i:Number = 0; i < characters.length; i++) {
  var firstName:String = characters[i][0];
  var lastName:String = characters[i][1];
  dataGridMain.addItem({First:firstName, Last:lastName});
  }
  dataGridMain.setStyle("fontFamily", "Verdana");
  dataGridMain.setStyle("headerColor", "0xA6CBDD");
  dataGridMain.setStyle("alternatingRowColors", ["0xF0F0F0", "0xFFFFFF"]);
  dataGridMain.setStyle("rollOverColor", "0xDCEBF1");
  dataGridMain.setStyle("selectionColor", "0xFFF97D");
  dataGridMain.setStyle("selectionDuration", 300);
}
dataGridFunction();
In the previous section, you created a working DataGrid example. Let's look at the code in greater detail.
Basically, the form you would take for adding data to a DataGrid is as follows:
dataGridName.addItem(column1:Data1,
column2:Data2);
dataGridName.addItem(column1:Data3, column2:Data3);
dataGridName.addItem(column1:Data5, column2:Data4);
You would often have numerous of those above lines to populate a DataGrid with many values, and needless to say, that approach is not the most efficient way to add large collections of data. Instead, a more dynamic approach is the method highlighted in the code you used earlier. In my example, you basically have a nested array of popular characters from the TV sitcom Seinfeld being added to the DataGrid component using a for loop:
for (var i:Number = 0; i < characters.length; i++) {
  var firstName:String = characters[i][0];
  var lastName:String = characters[i][1];
  dataGridMain.addItem({First:firstName, Last:lastName});
}
Notice that the column names are First and Last, and the data being added is in the form of a string extracted from the two-dimensional characters array. The loop basically goes through each array, extracts the relevant information from the array, and puts it in the ({column:Data,...,etc.}) form needed to add data to the DataGrid component.
In the previous section, you learned how to dynamically add data to your DataGrid. On this page, you will learn how to sort numbers using the DataGrid component.
The DataGrid component sorts all data alphabetically. That is great for First and Last names, but it is not that useful for non-string data. Even if you enter numbers in a raw number form, the default sort method still sorts the columns alphabetically.
So, to sort numerical data, use the following section of code:
var sortListener:Object = new Object();
sortListener.headerRelease = function(event) {
  //specifying the column index number
  var columnIndex:Number = 1;
  if (event.columnIndex == columnIndex) {
  var arrayOrder:Number = Array.NUMERIC;
  if (dataGridMain.sortDirection == "DESC") {
  arrayOrder = arrayOrder | Array.DESCENDING;
  }
  dataGridMain.sortItemsBy(dataGridMain.getColumnAt(columnIndex).columnName, arrayOrder);
  }
};
dataGridMain.addEventListener("headerRelease", sortListener);
The code itself is pretty self-explanatory, so I won't divert this tutorial by going through it in great detail. You basically create a listener object to detect when you click on a header, and after specifying the column you wish to sort numerically, you detect whether you are sorting down or up. The sortItemsBy method takes two arguments - the column and the type of sort to be performed.
My code assumes that you will be sorting the second column, columnIndex = 1, and the instance name of the DataGrid to be sorted, dataGridMain. Be sure to change those values to suit your animation if necessary.
For a full working example using the above code, here is a variation of our earlier DataGrid example:
[ notice that you can scroll the data and sort either by first or last name ]
The full code for the above example is:
function dataGridFunction() {
  var characters:Array = new Array(new Array("Jerry", 24), new Array("Elaine", 10), new Array("Cosmo", 4), new Array("Jocopo", 12), new Array("Lloyd", 12), new Array("Estelle", 7), new Array("George", 25), new Array("Frank", 0), new Array("David", 1), new Array("Mickey", 19), new Array("Morty", 30), new Array("Helen", 32));
  //
  for (var i:Number = 0; i<characters.length; i++) {
  var firstName:String = characters[i][0];
  var lastName:String = characters[i][1];
  dataGridMain.addItem({Player:firstName, Points:lastName});
  }
  var sortListener:Object = new Object();
  sortListener.headerRelease = function(event) {
  //specifying the column index number
  var columnIndex:Number = 1;
  if (event.columnIndex == columnIndex) {
  var arrayOrder:Number = Array.NUMERIC;
  if (dataGridMain.sortDirection == "DESC") {
  arrayOrder = arrayOrder | Array.DESCENDING;
  }
  dataGridMain.sortItemsBy(dataGridMain.getColumnAt(columnIndex).columnName, arrayOrder);
  }
  };
  dataGridMain.addEventListener("headerRelease", sortListener);
  dataGridMain.addEventListener("sortByNumber", this);
  dataGridMain.setStyle("fontFamily", "Verdana");
  dataGridMain.setStyle("headerColor", "0xA6CBDD");
  dataGridMain.setStyle("alternatingRowColors", ["0xF0F0F0", "0xFFFFFF"]);
  dataGridMain.setStyle("rollOverColor", "0xDCEBF1");
  dataGridMain.setStyle("selectionColor", "0xFFF97D");
  dataGridMain.setStyle("selectionDuration", 300);
}
dataGridFunction();Another area in which you can customize your DataGrid is in the colors. The default DataGrid looks pretty nice, but because it is default, you will find many other sites using the same style for the DataGrid component. Therefore, to differentiate your DataGrid, you can style it.
For a good overview of the list of styles you can use, Adobe's LiveDocs are a good source. In my code, I just gleaned what I think are the most useful style changes you can make from the various DataGrid styles as well as styles inherited from the components that make up the DataGrid:
dataGridMain.setStyle("fontFamily", "Verdana");
dataGridMain.setStyle("headerColor", "0xA6CBDD");
dataGridMain.setStyle("alternatingRowColors", ["0xF0F0F0", "0xFFFFFF"]);
dataGridMain.setStyle("rollOverColor", "0xDCEBF1");
dataGridMain.setStyle("selectionColor", "0xFFF97D");
dataGridMain.setStyle("selectionDuration", 300);So, there you go - that is all there is to using DataGrids. You can find numerous other options you can tweak, and Macromedia's documentation or 3rd-party web sites are good sources of information on other DataGrid tricks. Because the internal workings of the DataGrid are hidden from us, I did not elaborate on the code in great detail like I normally would. Some might consider that a good thing!
For the most part, due to the large file size of the DataGrid, I do not encourage users to use this component. Unfortunately, the complexity of creating your own DataGrid component makes writing your own DataGrid-like feature time-consuming. Whether writing your own component and gaining an advantage in file-size over a disadvantage in time taken to develop is a reasonable plan, is up to you. After all, software development is often about making compromises and choosing the best path given the current situation.
I have provided the source files for both the simple and numeric DataGrid examples.
Just a final word before we wrap up. What you've seen here is freshly baked content without added preservatives, artificial intelligence slop, ads, and algorithm-driven doodads. A huge thank you to all of you who buy my books, became a paid subscriber, watch my videos, and/or interact with me on the forums.
Your support keeps this site going! 😇


:: Copyright KIRUPA 2026 //--