 Tutorials
Books
Videos
Forums
Tutorials
Books
Videos
Forums


This is an archived tutorial from the kirupa.com legacy collection. It covers software that may no longer be available, but it is kept online because the ideas still hold up.
During your course of Flashing, you may have added sounds the old-fashioned way. You would probably have added the sounds by adding them to a frame and looping them 999 times. You are no longer a beginner Flasher. You have to move away from relying on frames and, instead, rely on using ActionScript for your sound needs.
Why use ActionScript when frame based sounds work perfectly? While sounds controlled by frames work perfectly also, you do not get the level of control over the sound as you would when using ActionScript. By using ActionScript, you are able to change the sound's speaker directions, pans, volume, and more. Best of all, you can create virtual sound environments by using various random numbers and values that change how your sound feels throughout your animation.
The following example is a basic setting in which a sound plays when a button is clicked. The sound is entirely controlled by ActionScript!
[ hint: press the 'play sound' button to hear the sound :) ]
Because this tutorial requires the use of sounds, I will provide you with a sound file that you can download and use in your animations.
Here is how to add sound:
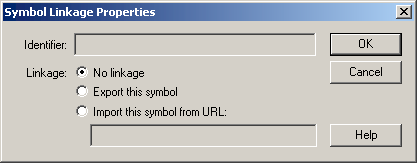
[ the symbol linkage properties dialog box ]
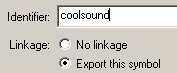
[ the sound file has been given a unique identifier name ]
on (release) {
  kirupaSound = new Sound(this);
  kirupaSound.attachSound("coolsound");
  kirupaSound.start(0, 99);
}How Does the
Code Work?
The following section will basically
deconstruct how the code you copied and pasted enables sound
to come out of your PC's speakers.
on (release) {
  kirupaSound = new Sound(this);
  kirupaSound.attachSound("coolsound");
  kirupaSound.start(0, 99);
}
The first line is the On handler for the button. The code following this statement will be enabled and executed when the mouse clicks on the button and releases the button. You can access these options by going to Basic Actions | On Mouse Event from the Object Actions window.
on (release) {
  kirupaSound = new Sound(this);
  kirupaSound.attachSound("coolsound");
  kirupaSound.start(0, 99);
}
In this line, I am creating a
new sound object. I'm calling the sound object I am creating
"kirupaSound". The words
new
  Sound(this);
are
telling flash to create a new sound object. This line of
code is very similar to declaring a variable and giving it a
value. Of course, in Flash, you don't have to declare
variables before using them.
on (release) {
  kirupaSound = new Sound(this);
  kirupaSound.attachSound("coolsound");
  kirupaSound.start(0, 99);
}
Remember the name you gave to the sound file in the Symbol Linkage Properties dialog box? Well, here is where you actually use that Identifier name you entered. You are telling Flash to attach the sound file identified as "coolsound" to the kirupaSound sound object you created in the previous line.
on (release) {
  kirupaSound = new Sound(this);
  kirupaSound.attachSound("coolsound");
  kirupaSound.start(0, 99);
}
This line tells Flash to
actually play the sound. The original syntax is
kirupaSound.start();. Why
am I not using the original syntax? The original form of the
start sound control,
objectName.start() is
very limited in its use. The sound starts, plays once, and
stops. That method is great for short bursts of sounds. What
if you have a loop?
The expanded version is
objectName.start(offset, loops);.
The
offset
is the number of the seconds in the sound file that Flash
will start from. The
loops
is the number of times the sound will continue playing. In
my example, the sound will start from its default position
of 0 and loop 99 times before stopping.
Never to leave you surprised or confused, I have provided the final source file for this tutorial. If you still have questions, you can post them in the forum by clicking the Message Board link near the bottom of the tutorial.
This is just the beginning of your journey to using sound in Flash. In corollary tutorials that I will create, you will expand upon this method of adding sounds. You will learn how to control the sound volume coming from each individual speaker and more! Before I forget, I'd like to give credit to Asim Khan for creating the Asian sound loops used in both the tutorial and in my example.
Just a final word before we wrap up. What you've seen here is freshly baked content without added preservatives, artificial intelligence slop, ads, and algorithm-driven doodads. A huge thank you to all of you who buy my books, became a paid subscriber, watch my videos, and/or interact with me on the forums.
Your support keeps this site going! 😇


:: Copyright KIRUPA 2026 //--