Creating
a Listbox
written by ilyas usal a.k.a. pom
Flash Components,
as you know, are supposed to make our life easier. Well,
that's true, but you have to know how to use them. This
tutorial will try to teach you how to use the Listbox
Component. It involves several important functions:
Component.addItem()
Component.getSelectedItem()
Component.setChangeHandler()
We will create here a list of events, and
clicking on them will display their date in a dynamic
textbox.
The following is an example of the List Box you will create
by following this tutorial:
[ you will
create the above animation ]
Creating a List Box The following steps will explain how to setup the movie
for creating the above animation:
Open the source file provided with Flash MX. You'll see 4
layers : code, dynamic text, list box
and background.
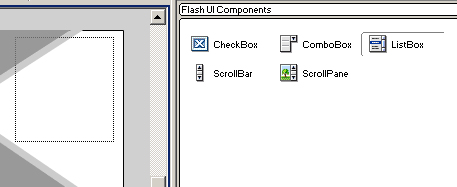
Open the Component Panel and drag the List Box Component
on the list box layer like shown on the screenshot
below.
[ click the
list box component and drag it on the scene text tool ]
After the list box has been put there, we have to give it
an instance name. In the Properties Panel, enter the
instance name list.
Now we need to populate it. One possibility would be to
use the little menu of the Properties Panel. You can see 4
things : Labels, Data, Select Multiple and Change
Handler. But we won't enter the data here, we will do
it with Actionscript. We use the Component.addItem ()
function I was mentioning earlier.
In the code layer, write this code:
[ add the above code
to a frame on the code layer ]
Let's explain this code a bit. The structure is quite
complicated.
list. indicates that
addItem is a method of the
Object list, which is a listbox Component. Basically, it
means that addItem applies to list. You may have
encountered this notation if you've written this.move();
where move() was a movie clip prototype (check the
elasticity tutorial for instance).
"Flash MX Release" is the label
that is going to appear in the list box.
new Date(2002,2,15) : this field
isn't compulsory. The Flash Help says that Data (that's
it's name) is an array of Strings defined the values
associated to the labels. Here we created a new Date
Object. But we could have as well declared a new Array (I
made another file to demonstrate that, and also how to get
to display numbers, in the download files).
The second step is the definition of the function that
will be executed when we click on one of the entries of
the list box. Here, what we want to display the date we
entered as data. First you need to put a dynamic textbox
in the dynamic textbox layer. Name it textbox.
Next to the code you wrote, add this one:
OK, I admit it doesn't doesn't look good. But it's not
very complicated. The first thing we do is declare an
array containing the months of the year. We'll use this in
the getMonth method.
function displayDetails(c){
This is the function declaration. The parameter c
is a component. It will be the component that calls the
function (list).
trace (c.getSelectedItem().label+":");
traces the corresponding label. Note how we use the class
method getSelectedItem on the
component c, and that we get the property label,
just like we did with addItem. This function allows us to
access the label, and the data, as we'll see now.
var j = c.getSelectedItem().data;
This is a temporary variable we use to make it easier for
us to write. Doing so, j.getDate will be equivalent
to c.getSelectedItem().data.getDate. You see now how
practical it is.
trace (j.getDate()+" "+
mois[j.getMonth()]+" "+j.getFullYear());
This displays the date with the usual methods of the Date
Objects. If you don't know them, I suggest you look up the
Help, Jubba's tutorial about the Analog Clock and the Best
of Kirupa forum.
The last thing we need to worry about is easy to forget.
We created the list, we created the function, but now we
have to make the list call the function we defined.
There's the code to do that:
It should be much more simple for you now that you have
understood the concept of class methods. Note that the
function is call between "" and that you don't need to put
the (). Actually you must not put them or it will come out
as an error.
You have just completed creating your List Box. I have
provided the source code to the animation so that you can
compare your fla to mine. Click the Download FLA link below
to download the source file:
I hope the information
helped. If you have any questions or comments, please don't
hesitate to post them on the Message Board. I should be
there, along with others flashers to help you.
![0]](http://www.ezboard.com/intl/aenglish/images/emoticons/alien.gif)


