 Tutorials
Books
Videos
Forums
Tutorials
Books
Videos
Forums


This is an archived tutorial from the kirupa.com legacy collection. It covers software that may no longer be available, but it is kept online because the ideas still hold up.
Textfields are an important form of displaying information in many Flash animations. While you can manually adjust the properties of a textfield within Flash, there are times when you will be unable to control the properties of your textfield. For example, you may prefer to dynamically create a text field. You may also decide want to change the properties of a textfield based on user interaction. You have to use ActionScript.
This tutorial addresses the above situational...situations! Here is an example of an animation that changes the sample text by clicking on the various buttons:
[ click the above buttons to modify the sample text; press Reset to reset ]
The following instructions for Flash MX 2004 should work well in Flash MX also:
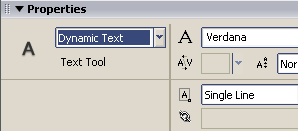
[ ensure dynamic text is selected ]

[ your text field ]
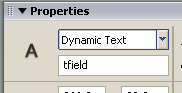
[ give your text field the instance name tfield ]
tfield.text ="There is no spoon!";To apply your text formatting, you will be using be using the TextFormat() and setTextFormat() functions and classes. The following is a generic example of how you would use both of these functions in formatting text:
format = new TextFormat();
format.bold = true;
tfield.setTextFormat(format);
In the first line, you create a TextFormat object using the
code new TextFormat(). This
allows you to use the cool features that the TextFormat class has hidden inside
its sleeve.
In the second line, you dig inside the TextFormat class's sleeve and set the bold property to true. The bold property is a method contained within the format TextFormat object. There are many more properties besides bold, and you will learn all of them in time.
The third line applies the formatting to your textfield. If
you recall, our text field's instance name was tfield. Therefore, it is
only appropriate that we use the
setTextFormat() code to apply the results of our format endeavor to the
textfield, tfield.
The above summarizes what you would need to do in order to format a textfield. The next section will summarize all of the properties of the TextFormat class and how you can use them in formatting your textfield.
So, on to the next section!
In the previous section you created your animation and learned about the basic code structure used to format a text field. In this page, I will list all of the textfield properties you can modify and its simple usage.
Feel free to copy and paste the code in your Actions window in order to test the movie.
 |
Important |
|
When using the TextField's properties,
only one line of code will change provided your textfield's instance
name is tfield. The first and third lines will always be the
same:
The above highlighted line is the only one that will change in our example. If you were using the above example in your own animation, make sure that the instance name of tfield is replaced with whatever the instance name of your text field is. In the following example, I will only change the middle line of code. The first and third line are implied. Also, remember that format is the name of our TextField object specified in the code. If your TextField object has a different name, make sure you use a different name! |
|
The code for displaying Bold formatted text is:
format.bold = true;
Replace the true
with a false if you choose to no
longer have bolded text.
The code for displaying Italicized text is:
format.italic = true;
Replace the true
with a false if you choose to no
longer have italicized text.
Bulleted List ItemDid you know that you could make your textfield have a bullet similar to a bulleted list item? Well you can! Here is the code for it:
format.bullet = true;
Replace the true
with a false if you choose to
remove the bulleted item.
Changing the color of your text is something that you may find very useful. Besides, I am sure you are interested in typing something other than true and false after your properties.
The basic structure for formatting color is:
format.color = 0xCOLOR;
Where COLOR
is the hexadecimal value of the color you want your text to have. Here is an
example of how to use the color property:
format.color = 0xFF3366;Remember, you must have 0x (zero and x) typed before you enter your color value. Flash doesn't like it when you use just the color value.
You can also specify or change the font your text in the textfield displays in. This the code that you would use:
The basic structure for formatting color is:
format.font = "Font Name";For example, if I want to use the Courier New font, the code would be as following:
format.font = "Courier New";The font name has to be entered using quotation marks. If you don't use quotation marks, Flash won't pick up your font name as a string.
Indent is the space between the text and the left margin. Lead is the vertical space between subsequent lines.
The basic structure for adjusting the above two properties are:
format.indent = 10;
format.leading = 5;
In the above example, I used the values 10 and 5 for the indent and leading properties, respectively. You can set them to any value that you want - including 0. In fact, if you don't even include the above code, Flash will simply leave the values as undefined!
Flash allows you to adjust the font size of your text using the TextField class. An example of the code for formatting the font size is:
format.size = 24;In the above example, I set the font size to be 24. Whatever size you use, ensure that the height of the text field is less than the height of your text after adjusting the font size. If your text is larger than your text field, you will find that only a portion of your text is displayed. In our situation, where we drew the text field on our drawing area, you can resolve that problem by manually resizing the text field.
While indenting only adjusts the leading space of one line in your textfield, the right and left margin property adjusts the space between the left and right sides of your text field on all of the lines.
Here is an example of using the left margin and right margin properties:
format.rightMargin = 5;
format.leftMargin = 5;
In the above example, I have the values for both the left and right margins set at 5. You do not have to use both properties in concert. You may use just the rightMargin property or just use the leftMargin property. Likewise, you can set each to a different value.
Hopefully this reference helped. I listed a few of the properties that I believe you will use. There are a few more properties that I did not cover, but those properties are listed in your AS Reference in Flash MX 2004's Help.
 |
Just a final word before we wrap up. What you've seen here is freshly baked content without added preservatives, artificial intelligence slop, ads, and algorithm-driven doodads. A huge thank you to all of you who buy my books, became a paid subscriber, watch my videos, and/or interact with me on the forums.
Your support keeps this site going! 😇


:: Copyright KIRUPA 2026 //--