 Tutorials
Books
Videos
Forums
Tutorials
Books
Videos
Forums


This is an archived tutorial from the kirupa.com legacy collection. It covers software that may no longer be available, but it is kept online because the ideas still hold up.
Many people use external swfs these days, because they are a very good way to keep a site structured and manageable, and also because they keep the file size low. These swfs also divide a site into sections: each external swf stands for a section. These movies are dynamically loaded into the main movie when entering a section of the site. But a question that gets asked a lot lately is how to create smooth yet functional transitions between these external swfs? That’s what this tutorial will cover.
Here is an example of what we are hoping to create:
[ click on each of the buttons to load a new movie ]
Each swf will have an intro animation, a frame at which it stops, and an outro animation. When the main movie is loaded, the first swf will be loaded. It will play it’s intro animation and stop at a certain frame. When the user now presses a button (located on the main timeline) for a different section to load, the swf will be told to play it’s outro animation. When this outro animation has finished, the new swf is loaded and will also play it’s intro and stop at the frame before the outro. When a user now presses yet another button, this process is repeated. This results in transitions between each swf.
The system is based on two variables: midframe
and _root.currMovie.
midframe is a variable on the first frame of
the main timeline of each swf. This variable holds the
number of the frame at which the swf stops. Each swf has
this variable, and it can be different for each swf, but it
doesn’t have to. This variable will be used with the
buttons: when you press a button of another section, it will
check if the current swf is at it’s midframe. If so, then
the current swf will be told to play() – that means it
starts its outro animation, because the outro animation
begins at the frame after the midframe.
_root.currMovie is a variable that holds the
name of the currently viewing section. It is created in
_root, because this variable has to be accessed by both the
swfs and the main movie. This variable is used for three
purposes:
The first involves the buttons: when you press a button on
the main timeline, that button must check if the requested
section is not the one being currently viewed, or, if no swf
is being loaded automatically at the start of the main
movie, if _root.currMovie is undefined. If it is undefined,
then there has been no section loaded yet, and the one
corresponding with this button must be loaded, and
_root.currMovie must be set to the name of that section. It
will first check if it is undefined or not, and if it is not
undefined, then check if it’s different than the currently
showing section.
The second use goes together with the first. A button is
pressed, and the code on the button checks if the requested
swf is different than the one in place. If this is true,
then we must check if the current movie is at or further
than it’s midframe. Checking also if it’s further than the
midframe enables the user to change the movie to be loaded
when the outro is already playing (see the third purpose),
for example when they accidentally pressed the wrong button.
So if the current frame is the midframe or somewhere in the
outro (further than midframe), then _root.currMovie must be
set to the name of the new section, and the swf currently in
place must also be told to play – if it’s at midframe, it
will start playing the outro animation, and if it’s already
playing it’s outro animation, the play() will have no effect
because it is already playing.
You might be wondering how the new swf is being loaded by now. This is the third purpose of _root.currMovie : when a button is pressed, _root.currMovie is being updated to the new section name and the swf in place is told to play. Because of this, _root.currMovie will be the name of the new section at the end of the outro animation. This is what we will use to make the swf load the new section swf at the end of it’s outro animation. We will be loading an swf with as name value of _root.currMovie, plus “.swf”. That means that the values you give _root.currMovie have to be the names of your swfs, without “.swf”.
The above explains the code used on the
buttons, further on in this tutorial.
Example: if you have the swfs “main.swf”, “about.swf”,
“work.swf” and “contact.swf”, then the values you give
_root.currMovie must be “main”, “about”, “work” and
“contact”. If not, the transitions will not work.
The next section will outline how to re-create the animation you saw earlier:
This tutorial continues from what you have understood from the previous section. If you stumbled here without having first completed the previous section, click here. If not....excellent!
The following steps will help you to create
the transition effect for externally loaded SWF files.
Main Movie
If you already have buttons and a holder movieclip, skip
these two steps.
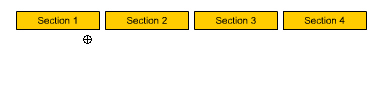
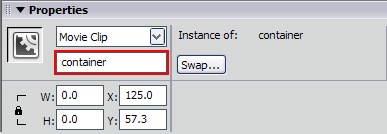
on (release) {
  if (_root.currMovie == undefined) {
  _root.currMovie = "main";
  container.loadMovie("main.swf");
  } else if (_root.currMovie != "main") {
  if (container._currentframe >= container.midframe) {
  _root.currMovie = "main";
  container.play();
  }
  }
}
This is the code for the button that will check if everything is ok for the outro to be played and the next swf being loaded. Notice that the value given to currMovie is the name of the swf without the “.swf”.
 |
Note |
|
If your buttons are not located on the main timeline, you will have to change the path to the container movieclip. In this example the buttons are located on the main timeline, therefore 'container' targets the container movieclip correctly. Though, if they are not on the main timeline, you must change container to the appropriate path. |
|
on (release) {
  if (_root.currMovie == undefined) {
  _root.currMovie = "work";
  container.loadMovie("work.swf");
  } else if (_root.currMovie != "work") {
  if (container._currentframe >= container.midframe) {
  _root.currMovie = "work";
  container.play();
  }
  }
}
The explanation of this code was given when describing the three purposes of _root.currMovie above.
_root.currMovie = "your_first_section_name";
container.loadMovie(_root.currMovie+".swf");
The SWF
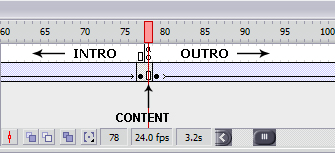
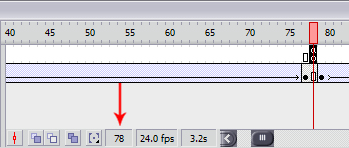
stop();
midframe = yournumber;
_root.container.loadMovie(_root.currMovie+".swf");
Adding Preloaders
A question people have been asking a lot as
well is how to add a preloader to these SWFs, and how to make
the transitions work after having added the preloader. Well,
it’s quite simple actually. You can follow
this tutorial to create a preloader for each swf. After
having completed this tutorial, you will have two extra frames
at the beginning of your swf, before your intro animation. All
what’s left for you to do is to add the midframe definition to
the preloader code you already have on the first frame by now.
Be careful though – now that you’ve added two extra frames, your
midframe will no longer be the same. Be sure to update the
midframe number.
The preloader code on the first frame will now look like this:
midframe = [yourupdatednumber];
bytes_loaded = Math.round(this.getBytesLoaded());
bytes_total = Math.round(this.getBytesTotal());
getPercent = bytes_loaded/bytes_total;
this.loadBar._width = getPercent*100;
this.loadText = Math.round(getPercent*100)+"%";
if (bytes_loaded == bytes_total) {
  this.gotoAndPlay(3);
}
For your own convenience, I have provided the source files for both MX and MX2004:
That’s it! You are finished with this tutorial. I know from experience that these transitions aren’t exactly the easiest thing to understand. If you are left with any questions, please don’t hesitate to post them on the forums.
 |
Voetsjoeba Voetsjoeba.com |
 |
Just a final word before we wrap up. What you've seen here is freshly baked content without added preservatives, artificial intelligence, ads, and algorithm-driven doodads. A huge thank you to all of you who buy kirupa's books, became a paid subscriber, watch the videos, and/or interact on the forums.
Your support keeps this site going! 😇

:: Copyright KIRUPA 2026 //--
