 Tutorials
Books
Videos
Forums
Tutorials
Books
Videos
Forums


This is an archived tutorial from the kirupa.com legacy collection. It covers software that may no longer be available, but it is kept online because the ideas still hold up.
An ultra-simple touch of action script can turn an otherwise-still image or even a whole swf into a liquefied, stretchable rubbery treat !... If you're anything like me, you just love imposing contortions onto perfectly innocent loaded images! So if you're ready follow me!
Observe as you move the pointer slowly around the eyes and nose of this guy:
[ move your mouse over the above animation ]
We'll go over the concept of creating a basic 'lens' effect in flash, and then expand that idea into creating what you see above. We're assuming here that you have at least some idea of what a 'mask' is (other than the kind you wear on your face), but even if you've never masked an image in flash before, we'll go over that in this tutorial too : )
What you need:
Flash MX 2004 (the style of coding we'll use is reflective of the action script 2.0 paradigm of writing code).
Any image that you'd like to apply this effect to. (the one included in the Downloadable Source file ZIP (link at bottom of this page) works just as well as any other.
 |
Note |
|
This effect can
be applied to any movie clip or image in
your movie. Whether you load it in at
runtime using loadMovie() or the
MovieClipLoader() class, or if the image
lives in the library at author time. For
now, we'll build this gummy contraption
using an image that's in your movie's
library.
|
|
First let's set up our movie: open up your Flash (as if it's not ALWAYS open 24 hours a day!)
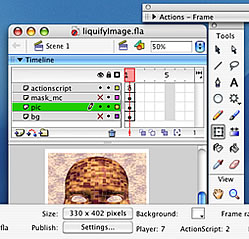
Set up your movie with layers and size as
shown above. The image used in the downloadable source file
is a .jpeg of about 312 pixels wide and 364 pixels high so I
set this movie's Stage size at 330wide and 402 high. (oh
yeah: while you're setting the Stage size, make the Frame
Rate of this movie 31 fps).
|
|
Tip |
|
Some movies'
animations look 'quirky and not smooth', and
some look smoooooth and sweet. why? The
Frames per Second setting in the movie.
Sometimes I use 60fps, sometimes 31. I've even seen some people use 90! (but they disappeared and no one can find them now), If you test a movie developed using 90 fps, and your sounds are sync 'd up nicely with your visuals, that movie running in a web browser will play quite differently, and you'll get mad. A Motion
picture made in Hollywood plays at 24 or
31fps...31fps gives a nice smoothness of
motion and cpu-friendliness. |
|

|
|
Practice Observing Subtlety |
| If something is present in a design, (such as this 'meaningless' black rectangle with a drop shadow) and it's not noticed right away as a 'prominent feature', that's a pretty good sign that it is contributing to the whole in some important way; providing depth or structure. I'm not saying that this silly little black rectangle is a great work of art, but I am saying that something like this does make a difference when it's there, even though it goes unnoticed right away. | |
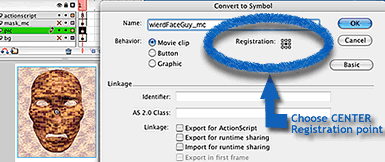
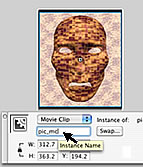
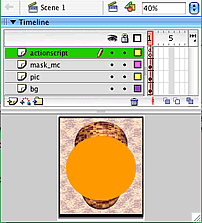
Select the 'mask_mc' layer and draw a big oval shape on frame1. It should cover a large portion of the center of pic_mc, which is on the 'pic' layer. Make it a solid color fill with no outline (no Stroke). This will be one of the elements that follows the mouse around and makes the image look rubbery...
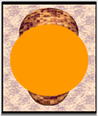
The movie's setup is complete and we're ready to talk about 'lensing.' Then we'll script this whole thing up.
If you're already well-versed in using masks, dynamically-created masks, and creating a basic 'lens' effect, you could skip the next section and go straight to part 3. Otherwise, the next section and all its goodies is for you!
Making an image look liquidly involves a tricky bit of 'masking'. A basic mask in Flash can be created two ways:
|
|
Note |
|
A mask is a 'window'. You can
see only the areas of the object which it is
covering. The word 'mask' is tricky because
of what we know about 'real-life' masks (put
a mask on and it hides you).
In flash (and graphic art in general) a mask does the opposite: if you lived inside a flash movie and masked your leg, the only thing a user would be able to see is your leg. |
|
[using action script to set one movieclip as the mask for another]
Above, you have two normal MovieClip's on the Stage, and the buttons cause one of them to mask the other, using the setMask() function.
instead of empty space behind the masked image, there were another image behind it? That other image behind it would show through. And with some sneaky layering:
Now you know
How to create a basic lens effect using some easy layering
tricks and how to use setMask().
|
|
Note |
|
Instead of using
the same image on the middle layer,
you can use a completely different one.
Click on the moving lens in the movie above
to see what that looks like.
|
|
We can expand on the 'lens' idea to finish our mission here: a rubbery-looking liquefied image.
The action script used to make this effect is amazingly SHORT (only 26 lines of code). We'll apply the basic lens effect we saw in part 2. Let's do it.
Here's what
the movie should look like right now:
//Liquefy an image ////////////
//make an empty movie clip
var theRubberizer:MovieClip = this.createEmptyMovieClip("theScene", this.getNextHighestDepth());
//set up the max num of copies to make (20 is comfy)
var maxImages:Number = 20;
Pretty self- explanatory
We created an empty movie clip called 'theRubberizer', and a Number variable named 'maxImages'.
dupeAndPlace = function(image:MovieClip):Object{
  var arrHolder:Object = new Object();
  arrHolder.pics_arr = new Array(0);
  arrHolder.masks_arr = new Array(0);
The function takes one argument called 'image' and returns an Object. Flash will expect that whatever we pass into this function as 'image' will be a MovieClip.
Created a new Object called 'arrHolder', and stuck two arrays onto it. This is the Object that the function will return.
for(var i=1; i< maxImages; i++){
  var dnm = "image" + i;
  var mnm = "mask" + i;
A simple beginning to a 'for...loop'. Note we didn't close the '{' bracket yet. Every time this loop iterates (repeats), it creates a new variable called 'dnm' and another 'mnm'. And this loop will iterate 20 times, since that's what maxImages is set to.
There's also a reason we started the loop with 'var i=1' instead of the usual 'var i=0'. We'll mention that later.
var imgObj = {_x:image._x, _y:image._y, _xscale:100+(i*1.5), _yscale:100+(i*1.5)};
var maskObj = {_xscale:Math.floor(100/i+3), _yscale:Math.floor(100/i+3)};
var theDupedImage = image.duplicateMovieClip(dnm, theRubberizer.getDepth()+i, imgObj);
var theDupedMask = mask_mc.duplicateMovieClip(mnm, theRubberizer.getDepth()+ (i*50), maskObj);
theDupedImage.setMask(theDupedMask);
Explanation
(Keep in mind that every line up there happens 20 times in a
row, extremely quickly since it's inside a for..loop):
First we make an 'init object' to stick inside the
duplicateMovieClip() call. It tells
each duplicate where to be placed:
var imgObj = { _x:image._x, _y:image._y,
_xscale:100+(i*1.5), _yscale:100+(i*1.5) };
(the same _x and
_y of the image we'll pass into the
function, at _xscale and
_yscale of 100% + (whatever i
is at *1.5). (slightly larger each time the loop repeats)).
The second init object tells the duplicates of mask_mc what to
look like:
var maskObj = {_xscale:Math.floor(100/i+3),
  _yscale:Math.floor(100/i+3), _x:this._xmouse,
_y:this._ymouse};
Same _x and _y as the mouse, and
slightly smaller than the original mask_mc with each
repeating of the loop.
|
|
Infinity |
| When you're using a loop and using the loop's own 'i' to divide, be careful of 'Infinity', it's what you'll get when you divide by 0. But that's not the only reason we're using 'i=1'. | |
In the next line we duplicate
image, giving it an instance name of 'dnm', a depth of 'i'
above the Rubberizer's depth, and use the imgObj to place the
copies:
var theDupedImage = image.duplicateMovieClip(dnm,
theRubberizer.getDepth()+i, imgObj);
We duplicate mask_mc, giving it an instance name of
'mnm', a depth of the Rubberizer's depth + (i*50), and use the 'maskObj'
to place the copies:
var theDupedMask = mask_mc.duplicateMovieClip(mnm, i*100, maskObj);
We didn't use the shiny new '_root.getNextHighestDepth()' to place the copied mc's ? If you apply this effect to one image, and then to another, you'd have copies of images and masks created at progressively higher depths every time you applied the effect.
Then:
theDupedImage.setMask(theDupedMask);
Which sets each 'theDupedMask' as the mask of each
'theDupedImage'.
|
|
Easy Enough |
|
Remember the
'basic lens' effect in part 2? We took an
image, put a copy of it on the layer above
at a slightly bigger size, and then masked
that copy. Well that's exactly what we're
doing above, but we're doing it 20 times.
Every time our for...loop repeats,
it puts a copy of image on top of
the original image at a slightly larger
size. And gives each copy a mask of a
slightly smaller size.
|
|
arrHolder.masks_arr.push(theDupedMask);
} //the loop is closed
mask_mc._visible = false;
mask1._visible=false;
image1._visible=false;
//return the object
return arrHolder;
}; //the function is closed
In the first line, we push 'theDupedMask' into the
arrHolder Object's 'masks_arr' Array. ('push' adds
something to the end of an array)
arrHolder.masks_arr.push(theDupedMask);
Then push 'theDupedImage' into the arrHolder Object's 'pics_arr'
Array.
arrHolder.pics_arr.push(theDupedImage);
and close the for..loop with a '
} '
Then we made mask_mc, mask1, and image1
invisible. 'mask_mc' is on the Stage, this function did not add
it to the array of masks, so we can hide it. Then close the
dupeAndPlace function with a '
} '.
And lastly, return the arrHolder Object:
return arrHolder;
You have 20 duplicated images, masked by 20 duplicated masks. What's left to do? MOTION.
Let's go to the next section.
Let's make a function to do the moving.
|
|
A basic scripted motion tween |
|
Here's a cool
little tweening function for you. It's
pretty well-known, easy-to-use, and we can
use it to make our masks move:
my_movieClip.onEnterFrame = function(){
'destinationX' is where you want 'my_movieClip' to go, and the number '10 at the end is how fast it'll get there. A higher number creates more eeeeasing...and a slower movement, a low number makes it move fast. |
|
//make waves
makeWaves = function (masks_arr:Array) {
  for (var i = masks_arr.length; i>0; i--) {
  masks_arr[i]._x += (this._xmouse-masks_arr[i]._x)/maxImages*i;
  masks_arr[i]._y += (this._ymouse-masks_arr[i]._y)/maxImages*i;
  }
};
'makeWaves()' loops through every
item in the 'masks_arr' array we pass to it and tells each one
of them to adjust their _x and _y location according to where
the mouse is. It uses the basic scripted tween explained above.
The key to the speed of each mask's movement lies in the number
at the end (15*i): a lower number is a faster movement, so the
mask will move faster if it's at the beginning of the array
(i.e. higher in depth and smaller in size).
///the func to call /////////
liquefyImage = function(theImage:MovieClip){
  var arrHolder:Object = dupeAndPlace(theImage);
  theRubberizer.onEnterFrame = function(){
  makeWaves(arrHolder.masks_arr);
  }
}
//
takes an argument 'theImage', passes it into the dupeAndPlace
function, and stores the result in its own 'arrHolder' variable.
Then it tells 'theRubberizer' mc we created to call makeWaves
ever frame.
*Try passing 'arrHolder.pics_arr' when calling
makeWaves() here, it'll look a bit odd because of this image's
size, but when used in other ways, it can be made to look pretty
cool.
You are finished! You can download the source files here:
There's no friendlier or more brilliant group of peeps I've ever met online than the ones in kirupa forums. If you ever have any questions, post them in there.
Cheers!
 |
Just a final word before we wrap up. What you've seen here is freshly baked content without added preservatives, artificial intelligence, ads, and algorithm-driven doodads. A huge thank you to all of you who buy kirupa's books, became a paid subscriber, watch the videos, and/or interact on the forums.
Your support keeps this site going! 😇

:: Copyright KIRUPA 2026 //--