


This is an archived tutorial from the kirupa.com legacy collection. It covers software that may no longer be available, but it is kept online because the ideas still hold up.
You've all seen those menus where you roll over one of the buttons and an object slides into place right underneath it, right? Well, in this tutorial you will learn how to create one of those. We will be creating a very basic example, but like everything else, once you learn how to do it you can create something better!
We will be using:
Here's how our finished product will look and act:
[roll over each button]
Let's begin:
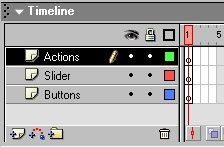
[this is what your timeline should look like so far]
In the Buttons layer draw four (4) boxes and turn each one into a Button Symbol. What you name them is up to you. Give each button an Instance Name, like this (Instance Name in Bold):
1st Button - button_1
2nd Button - button_2
3rd Button - button_3
4th Button - button_4
Next, in the Slider layer draw your "sliding" object. I used a rectangle with an arrow on it. Turn your object into a Movie Clip Symbol, what you name it will be used in the Action Script. So for this tutorial, name it: slider_mc and give it an Instance Name of: slider. Place your slider underneath one of the buttons in your menu. It'll slide horizontally from this position. Here's what your Properties Panel should look like with the slider_mc selected:
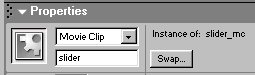
[properties for slider_mc]
ActionScript:
With your slider_mc selected, open the Actions Panel (F9) and copy and paste this:
onClipEvent (load) {
  xMove = _x;
  easeSpeed = 5;
}
onClipEvent (enterFrame) {
  _x += (xMove-_x)/easeSpeed;
}
Next, in the Actions layer select the blank frame and open the Actions Panel (F9). Copy and paste this (notice your button's Instance Names in the script):
easeSpeed = 5;
//slider_mc is your Movie Clip's name, not the Instance Name.
slider_mc.onEnterFrame = function() {
  this._x += (xMove1-this._x)/easeSpeed;
};
button_1.onPress = function() {
  xMove = button_1._x;
};
button_2.onPress = function() {
  xMove = button_2._x;
};
button_3.onPress = function() {
  xMove = button_3._x;
};
button_4.onPress = function() {
  xMove = button_4._x;
};
Select your first button (button_1) and again open the Actions Panel (F9). Copy and paste this:
on (rollOver) {
  // slider - Movie Clip's Instance Name. button_1 - Button's Instance Name.
  slider.xMove = button_1._x;
}
Repeat the previous step for every button, but remeber to change the code where it says "button_1._x;" to match the Instance Name of every button (button_2, button_3, button_4).
In my example I added a line underneath the "slider" to make it seem like the object was actually sliding on that line. This of course is optional.
You're done!!! Test your movie out to see if it functions properly.
Well, you have successfully completed the "Menu with Slider"
tutorial. Congratulations! In the next section I will explain the
ActionScript code that makes our menu work.
In the previous section you created the actual menu, but I did not explain why the menu and slider work. I'll do that on this page plus provide you with the source files.
You'll notice that a lot of the code has to do with moving your object along the x.
slider_mc.onEnterFrame =

  function() {
This performs a function on the
slider_mc onEnterFrame. onEnterFrame is an action triggered
continuously at the frame rate of the movie.
this._x +=

  (xMove1-this._x)/easeSpeed;
This is the function which moves the
slider_mc along the x axis.
xMove = button_1._x;
This is the task in relation to the
above line which is performed. The slider_mc will slide to
the center of button_1.
on (rollOver) {
Self explanatory, when the user
moves his mouse over the button.
slider.xMove = button_1._x;
"slider" is the Instance Name of the
slider_mc. When the button is rolled over, the "slider" will
move along the x (horizontally) according to where you
placed it on the stage.
onClipEvent (load) {
When this appears in the Timeline,
execute action: load.
easeSpeed = 5;
This is where you can control the
speed at which the "slider" moves. The lower the number the
faster it moves. The higher the number, well you get the
idea.
Incase you're having problems, or you just chose not to do it yourself, I've provided the Source File for you to look at:
And of course, if you have any questions, complaints, or arguments, do not be afraid to post them in the kirupaForum. I promise we won't bite.
Your friendly Forum wizard,

|
Bryan Arciniega aka wizard |
 |
Just a final word before we wrap up. What you've seen here is freshly baked content without added preservatives, artificial intelligence, ads, and algorithm-driven doodads. A huge thank you to all of you who buy kirupa's books, became a paid subscriber, watch the videos, and/or interact on the forums.
Your support keeps this site going! 😇

:: Copyright KIRUPA 2026 //--
