 Tutorials
Books
Videos
Forums
Tutorials
Books
Videos
Forums



This is an archived tutorial from the kirupa.com legacy collection. It covers software that may no longer be available, but it is kept online because the ideas still hold up.
Virtually every Flash web site ever created has a menu of some sort in it. Most are quite simple, possibly just a row of buttons. Others, however, are more complex, offering not just buttons but also incorporating submenus via drop-down as well. That's what this tutorial will focus on, a drop-down menu. But not any drop-down menu. No. The menu created here will be driven by one (or more) external XML files which, when read into Flash, will determine the makeup and behavior of that menu. Something like the following.
[ menu in Flash defined with XML ]
XML (Extensible Markup Language) is a prime candidate for defining drop down menus of this sort because the nature of the organization of XML is defined in the same way as the drop-down menu itself. Both are organized in a hierarchical manner where you have a base collection of items which then can contain further collections of more items or more collections. Consider the following XML snippet. Can you imagine what this might like as a real functioning menu?
<?xml version="1.0"?>
<mainmenu>
  <home/>
  <portfolio/>
  <contact/>
  <friends>
  <joe/>
  <karen/>
  <bob/>
  </friends>
</mainmenu>
The mainmenu here represents, obviously, the main menu portion of this menu design. Under that XML are the primary menu options. These options include home, portfolio, contact and friends. The friends element (or node) here, however, as you can see, contains more nodes of its own. It has contained within it another menu. This makes friends a submenu of the main menu. The final result would look something like this.
[ working mainmenu example ]
With XML you have, basically, a text version of your menu to define it. This makes it well organized and easy to interpret. But probably more importantly is its potential for customization and ease when changing or updating. By having your Flash menu defined by an external text-based XML file, you can change its options and its behavior easily without ever having to open Flash!
This tutorial is presented with the following goals:
The format of the XML defining our menu will have to accommodate the specifications indicated. This includes defining a name, an action and a differentiation between a normal clickable menu item and one which opens up a submenu. Certainly there are many ways to fit these in an XML document, and that all depends on preference. For today, we'll use the following.
<?xml version="1.0"?>
<menu name="">
  <item name="" action="" variables=""/>
  <menu name="name"/>
  <item name="" action="" variables=""/>
  </menu>
</menu>
Here we have a hierarchy set up of menu and item XML nodes. Each menu node represents a collection of more item or menu nodes - or a submenu of the current menu. Item nodes are basic menu options. Both menu and item nodes contain a name attribute specifying that node's name, or display value. Each item node then also gets an action and a variables attribute which will determine what happens when that item is pressed. An action could also be associated with a menu node if desired, but since their purpose is often just to open up a submenu and nothing more.
This, or a version of this, will be used in the final
Flash menu created.
This XML file represents a menu of links. The very first XML node is a menu node representing the main menu. This was given the name links, but since you will never see this name, it is mostly irrelevant though it can serve to help you know what kind of menu this is when editing it. The first two options under this main menu, macromedia and kirupa, are submenus which lead to a collection of other links followed by one basic link item. The kirupa submenu, contains yet another submenu called tutorials. It has its own collection of links. You might be able to see this a little better given the XML excluding the attributes. Then you have this.
<menu>
  <menu>
  <item/>
  <item/>
  <item/>
  </menu>
  <menu>
  <item/>
  <item/>
  <menu>
  <item/>
  <item/>
  <item/>
  </menu>
  </menu>
  <item/>
</menu>
The attributes, however, are needed to help define the menu. Within each node , both types, you'll find a name attribute. If an item node, an action and variables attribute is included too. Since this particular menu is a menu of links, the action given was "gotoURL" and the variables included a URL string. That gives you something like the following.
<item name="google" action="gotoURL" variables="http://www.google.com"/>When this particular item, google, is clicked, this menu item will open up google.com in a browser window. This action, as well as any other for that matter, needs to be interpreted in Flash, though. Just having "gotoURL" in an XML document means nothing by itself. Its up to you to extract that and make something happen when its read into Flash - actually have that gotoURL mean go to a URL. Lets begin working on that next.
We have our XML format mapped out. Now its just a matter of interpreting the XML so that Flash will know how to construct a menu based on information provided. This is often the more difficult part in dealing with XML. It's not too hard to write the XML or even look at it with your own eyes to tell what's going on in there. But once you start to try to extract its contents using some programming language like Actionscript, you can start to get confused. If you're brand new to using XML in Flash, you may first want to read some other beginner XML tutorials here on the site to help you get acquainted. Otherwise, we'll just jump right on in.
Loading an XML file is easy. The concept of having to wait for it to load can be difficult. Often people want to use it directly after the load command which is just not possible. Being an external file, it will take some time, frames even, to completely load into the Flash player. Only then can it be used. Understanding that, we know enough to not have any actions aside from the loading of the XML until the onLoad event called in receiving file. Because of this, and because of portability and reuse of code, everything done will be based around a series of functions that will be called when needed.
Once loaded, there will be 2 basic types of information needed from the XML. This includes the node name for each node and values of the attributes of that node (i.e. name, action and variables). Whenever a particular menu is created, whether it be the main menu or a submenu these values will need to be extracted and used in the creation of a menuitem movieclip. Before doing so, however, we'll need to get to all the XML nodes, or at least those associated with whatever menu we're dealing with at the time. The best way of doing this is to simply loop through all the childNodes of a particular node in the XML object. This of course will start at the first node in the XML which is the main menu. This is represented as
Child nodes are given through that (or any) node's childNodes array. This is what is looped through in order to reach all menu items for any menu node.
For name of a node, we can use the nodeName property.
Attributes of a node are extracted from an attributes object contained within the Flash node. The values of the attributes can then be retrieved by specifying the attribute by its name within the attributes object.
With that, here's an Actionscript example looping through and showing the needed values of all the contents, or items, of the main menu (the first menu node) as specified in the XML file.
xmlNode = xmlObject.firstChild;
for (var i = 0; i < xmlNode.childNodes.length; i++){
  // either "menu" or "item"
  xmlNode.childNodes[i].nodeName;
  // name of the item
  xmlNode.childNodes[i].attributes.name;
  // action of the item
  xmlNode.childNodes[i].attributes.action;
  // variables for that action
  xmlNode.childNodes[i].attributes.variables;
}
Not too hard right? This is probably the hardest part, just extracting the needed info from the XML file. With this, its time to get Flash to put it to work. The XML information is just text at this point. Further Actionscript will be needed to make it all function.
Everything's looking good up to this point. We've gotten most of the XML cleared up and outlined how what's needed can be extracted using properties of the XML object in Actionscript. Now all we need is the script to actually physically make the menu based on all of that.
With the nature of this menu being created, you have not just a single menu, but a menu with drop-down submenus as well. What we can do to streamline this a little bit is to make a single function to take care of the generation of a single complete menu. This includes all the items in one menu node but not including submenus. Submenus would also be created with this function, but independently of any other menu as a separate process. So the same function that creates the main menu will create all of its submenus and any submenus in those submenus etc. Lets call this function GenerateMenu.
GenerateMenu();Call this once to make the main menu then again for each submenu when needed (when rolling over a menu item that contains a submenu). When making a menu, the GenerateMenu function will need to know a few things. Things like where and how to make the menu and what xml node the menu should be based. These can all be passed in as parameters to that function. Once in there, GenerateMenu can read through the XML node, attach menu item movieclips for each node and assign them all actions corresponding with those specified in the XML file.
GenerateMenu(container, name, x, y, depth, node_xml);We'll work our way into the specifics as we go.
The GenerateMenu function, when creating the menu, will need to assign the appropriate actions to each menu item as its made. There will be 3 kinds of actions here. One is the action for a basic item when that item is pressed as defined in XML. A second action is the opening of a sub menu if that item is of the type menu. The third action, which may not be as obvious initially, is the closing of submenus. Once a submenu is opened, it's not supposed to remain forever. There are certain circumstances where that submenu will have to be closed or another submenu will have to be created in its place to accommodate for a separate submenu opening. That all depends on how you define your submenus (or menu in general) to behave.
Submenus are a special entity in navigation. Many have unique behaviors. This can differ from application to application as well as operating system to operating system. How yours behaves is up to you. Beware, programming for them can get out of hand. For the purposes of this tutorial, I'll try to keep it simple. The big challenge with submenus is when to open them and when to close them. Some navigations, which you may or may not have encountered in your adventures throughout the web, are plagued with early the termination of submenu windows. Often they close before you can even use them. Others can remain for an annoyingly long time making navigation difficult and cumbersome. Here's how this one will be set up.
| object | event | action |
| menu | rollOver | open up a submenu, replace any pre-open submenu in the current menu if exists |
| press | run XML defined action; close all submenus | |
| item | rollOver | close any submenu in the current menu if exists |
| press | run XML defined action; close all submenus that may be open | |
| anything else | mouseUp | close all submenus that may be open |
Lets look back to a working version of the menu system we're developing. How does it compare to others? Hopefully fairly well since it isn't changing! :)
[ menu in Flash defined with XML ]
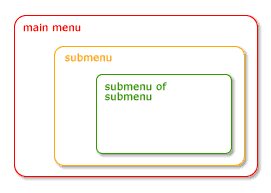
When a submenu is created, its created within the movieclip of the menu that opened it. This is much like its very organization, and the organization of the XML for that matter. This also makes it much easier to manage, especially when submenus of that submenu is created within that submenu's movieclip. This way, if you were to remove any one submenu, all submenus of that submenu are removed with it.
[ submenus kept in menus which created them ]
Notice from the diagram, if you were to remove the submenu, the submenu of submenu would be removed with it as it is a part of that menu movieclip - attached within it. And when might that submenu be removed? It would be removed whenever you click on any menu option (item or menu), when another menu item other than the one which opened the submenu is rolled over or when the user clicks anywhere other than on the menu.
No problem right? Now lets translate all this into working functional code.
Let's start with order of operations. What comes first? Loading the XML of course. It decides what the menu is.
                        menu_xml = new XML();
menu_xml.ignoreWhite = true;
menu_xml.onLoad = function(ok){
 if (ok){
  Createmainmenu(10, 10, 0, this);
 }
};
// load first XML menu
menu_xml.load("menu1.xml");
Here, a basic XML object is created called menu_xml. Whitespace is ignored and "menu.xml" is loaded in. Once the loading of menu.xml has completed successfully, remember, you'll have to wait until the XML is loaded into Flash before you can do anything with it, Createmainmenu is run. Whats that you ask? Its this.
                        Createmainmenu = function(x, y, depth, menu_xml){
 GenerateMenu(this, "mainmenu_mc", x, y, depth, menu_xml.firstChild);
 mainmenu_mc.onMouseUp = function(){
  if (mainmenu_mc.submenu_mc && !mainmenu_mc.hitTest(_root._xmouse, _root._ymouse, true)){
  CloseSubmenus();
  }
 };
};
Createmainmenu is more or less just a function used to call GenerateMenu - the function which makes any menu - but does so for the main menu and includes the addition of a mouseUp function too. This mouseUp event is what lets the menu close if something other than the menu is clicked. It checks to see if a submenu first exists within the main menu by looking for a submenu_mc in the mainmenu_mc (noticed in the GenerateMenu call, the main menu was created with the name "mainmenu_mc" - submenus will be created with the name "submneu_mc") then uses hitTest to see if the mouse is touching the menu at all. If not, then CloseSubmenus is called which, if you couldn't tell by its name, closes all the submenus for in the main menu. That function is as follows.
                        CloseSubmenus = function(){
 mainmenu_mc.submenu_mc.removeMovieClip();
};
You can see that all this does is simply removes the submenu_mc movieClip in the main menu. Because all submenus of that submenu exists in that clip, all submenus are removed.
Now for the biggie. The GenerateMenu function. This one will have all the XML interpreting as well as action assignment. Its as follows.
                        GenerateMenu = function(container, name, x, y, depth, node_xml) {
 var curr_node;
 var curr_item;
 var curr_menu = container.createEmptyMovieClip(name, depth);
 for (var i=0; i<node_xml.childNodes.length; i++) {
  curr_item = curr_menu.attachMovie("menuitem","item"+i+"_mc", i);
  curr_item._x = x;
  curr_item._y = y + i*curr_item._height;
  curr_item.trackAsMenu = true;
  curr_node = node_xml.childNodes[i];
  curr_item.action = curr_node.attributes.action;
  curr_item.variables = curr_node.attributes.variables;
  curr_item.name.text = curr_node.attributes.name;
  if (node_xml.childNodes[i].nodeName == "menu"){
  curr_item.node_xml = curr_node;
  curr_item.onRollOver = curr_item.onDragOver = function(){
  var x = this._x + this._width - 5;
  var y = this._y + 5;
  GenerateMenu(curr_menu, "submenu_mc", x, y, 1000, this.node_xml);
  };
  }else{
  curr_item.arrow._visible = false;
  curr_item.onRollOver = curr_item.onDragOver = function(){
  curr_menu.submenu_mc.removeMovieClip();
  };
  }
  curr_item.onRelease = function(){
  Actions[this.action](this.variables);
  CloseSubmenus();
  };
 }
};
Its pretty hefty; we'll go through it piece by piece. But skimming it quickly, you can see some familiar functions like another GenerateMenu and CloseSubmenus being used. You may also notice that there's an attachMovie call. This attaches a menu item movieclip or option movieclip used to make up the menu.
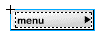
[ menu comprised of these movieclips ]
These will have to be made first. We can go through that now right quickly before continuing.
This movieclip symbol consists of 3 parts. A background movieclip (the gray area), an arrow movieclip - used to distinguish regular menu items and those which open up submenus, and a text field used to display the menu item's name.
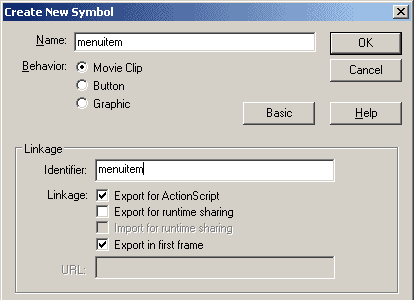
[ single menu item movieclip symbol ]
[ notice center in upper left ]
With that out of the way, we can get into the workings of GenerateMenu.
The GenerateMenu function follows these steps:
var curr_node;
var curr_item;
var curr_menu ...var curr_menu = container.createEmptyMovieClip(name, depth);for (var i=0; i<node_xml.childNodes.length; i++) {curr_item._x = x;
curr_item._y = y + i*curr_item._height;
curr_item.trackAsMenu = true;curr_node = node_xml.childNodes[i];
curr_item.action = curr_node.attributes.action;
curr_item.variables = curr_node.attributes.variables;
curr_item.name.text = curr_node.attributes.name;if (node_xml.childNodes[i].nodeName == "menu"){
curr_item.node_xml = curr_node;
curr_item.onRollOver = curr_item.onDragOver = function(){
var x = this._x + this._width - 5;
var y = this._y + 5;
GenerateMenu(curr_menu, "submenu_mc", x, y, 1000, this.node_xml);
};
}else{ // node is an item node
curr_item.arrow._visible = false;
curr_item.onRollOver = curr_item.onDragOver = function(){
curr_menu.submenu_mc.removeMovieClip();
};
}
Notice how here, too, that the arrow movieclip in the
attached menuitem is set to have 0 visibility for
non-submenu opening menus. The arrow serves as a
visual indicator that the item opens a submenu. By
having it in the menuitem movieclip, its assumed that
all items start as menu-opening items. For those that
are not, it is simply hidden.
curr_item.onRelease = function(){
Actions[this.action](this.variables);
CloseSubmenus();
};Notice how the actions are executed. You have some sort of Actions object with a reference to the action of the node with the variables passed in to it (as its being called as a function).
Actions[this.action](this.variables);The Actions object is, in fact, a custom object. This is the object to handle your actions, obviously. It contains functions with names that are similar to that which would be passed in to the action attribute of an XML node. The variables value is then passed in along with that. Consider the gotoURL action from previous examples. You would end up with a call such as.
Actions["gotoURL"]("http://www.google.com");This calls the gotoURL function in the Actions object passing http://www.google.com along as an argument. You of course would need to make an Actions object and define what gotoURL is before being able to use it. Here's an example that will open the passed url in a new window.
Actions = Object();
Actions.gotoURL = function(urlVar){
getURL(urlVar, "_blank");
};For any action you wish to be able to use, you would create a function in the Actions object in this manner. Whatever functions you have there can then be used in the XML definition to specify what is to happen when a menu item is pressed.
In the final menu example, a textfield is placed at the bottom of the screen. An action in the Actions object is then used to change that text. The function for that is as follows where message_txt is the name of that textfield.
Actions.message = function(msg){
message_txt.text = msg;
};There's one more action that I want to include, and thats an action that will load a new menu XML file into the XML object used to handle the menu.
Actions.newMenu = function(menuxml){
menu_xml.load(menuxml);
};When loaded, any XML that was within the menu_xml object will be replaced and the onLoad event of that object will be called. Remember what's in the onLoad event? That's right, script used to generate the main menu. Whenever you load a new XML file into that object and re-call that main menu generating script, any existing menu is replaced and the new menu is created in its place. This means a simple load command is all that is needed to completely change your menu. If you didn't already notice, the last menu in the posted example does this (titled load menu).
That pretty much completes things there. We load XML, interpret the first node into menu whose items are then given actions either opening another menu and/or calling commands from an Actions object. Not too bad once you think about it.
We can still tweak things a little bit, though. The attached menuitem movieClip is made out of movieclips. There are no buttons within it at all. However, if you use the menu, you'll notice that there is a rollover effect. This is controlled by actionscript. It's nothing special, but its good to have to help keep yourself oriented when using the menu - so you can visually tell which menu item you're hovering over more easily. This effect can be added fairly easily using the color object in some of the events we set up for each item thereby giving the button rollover effect. The one thing to be careful of is to not apply the color to the entire item movieclip. Instead, we can just apply it to the background clip so the title of that menu item is still very easily discernable.
var col = new Color(this.background);
col.setRGB(0xf4faff);In the end, the final complete script looks like the following.
GenerateMenu = function(container, name, x, y, depth, node_xml) {
var curr_node;
var curr_item;
var curr_menu = container.createEmptyMovieClip(name, depth);
for (var i=0; i<node_xml.childNodes.length; i++) {
curr_item = curr_menu.attachMovie("menuitem","item"+i+"_mc", i);
curr_item._x = x;
curr_item._y = y + i*curr_item._height;
curr_item.trackAsMenu = true;
curr_node = node_xml.childNodes[i];
curr_item.action = curr_node.attributes.action;
curr_item.variables = curr_node.attributes.variables;
curr_item.name.text = curr_node.attributes.name;
if (node_xml.childNodes[i].nodeName == "menu"){
curr_item.node_xml = curr_node;
curr_item.onRollOver = curr_item.onDragOver = function(){
var x = this._x + this._width - 5;
var y = this._y + 5;
GenerateMenu(curr_menu, "submenu_mc", x, y, 1000, this.node_xml);
var col = new Color(this.background);
col.setRGB(0xf4faff);
};
}else{
curr_item.arrow._visible = false;
curr_item.onRollOver = curr_item.onDragOver = function(){
curr_menu.submenu_mc.removeMovieClip();
var col = new Color(this.background);
col.setRGB(0xf4faff);
};
}
curr_item.onRollOut = curr_item.onDragOut = function(){
var col = new Color(this.background);
col.setTransform({ra:100,rb:0,ga:100,gb:0,ba:100,bb:0});
};
curr_item.onRelease = function(){
  Actions[this.action](this.variables);
  CloseSubmenus();
};
}
};
Createmainmenu = function(x, y, depth, menu_xml){
GenerateMenu(this, "mainmenu_mc", x, y, depth, menu_xml.firstChild);
mainmenu_mc.onMouseUp = function(){
if (mainmenu_mc.submenu_mc && !mainmenu_mc.hitTest(_root._xmouse, _root._ymouse, true)){
CloseSubmenus();
}
};
};
CloseSubmenus = function(){
mainmenu_mc.submenu_mc.removeMovieClip();
};
Actions = Object();
Actions.gotoURL = function(urlVar){
  getURL(urlVar, "_blank");
};
Actions.message = function(msg){
  message_txt.text = msg;
};
Actions.newMenu = function(menuxml){
  menu_xml.load(menuxml);
};
menu_xml = new XML();
menu_xml.ignoreWhite = true;
menu_xml.onLoad = function(ok){
if (ok){
Createmainmenu(10, 10, 0, this);
message_txt.text = "message area";
}else{
message_txt.text = "error: XML not successfully loaded";
}
};
menu_xml.load("menu1.xml"); And that, combined with 3 xml files, menu1.xml, menu2.xml and menu3.xml, gives you this as a final result.
[ menu in Flash defined with XML ]
That wraps up this tutorial. A huge thank you to all of you who buy kirupa's books, became a paid subscriber, watch the videos, and/or interact on the forums. Your support is what keeps writing like this online! 😇
This tutorial was written by senocular, also known as Trevor McCauley. He has been one of this community's most generous teachers since the early Flash days, and he is still around: find him on senocular.com and on the forums.

:: Copyright KIRUPA 2026 //--

 Senocular