Creating the Movie Clip
If you're creating a new animation from scratch, it would be helpful for you to know how to go about creating the actual movie clip with the actions inside it. So, here is a quick overview of how to create your own supporting movie clip for the Advanced Rollovers.
Here's how:
- In Flash, insert a new movie clip (Insert > New Symbol). You may name it whatever you like. I named mine (from the source code on the previous window) "movie_actions". The name of the symbol doesn't matter here; it's just so you can locate it more easily. You may add as many layers as you want in your movie. Since I have 3 buttons, I've inserted 3 Layers in my movie clip. This is so each rollover effect will be in it's own little screen.
- Here
are the key elements that should be included in each supporting movie clip
for a rollover effect.
- A blank keyframe at the beginning of the movie with the action stop. Right click on the first Frame > Actions. Then simply go to Basic Actions and choose Stop. This will keep the movie from playing automatically. You only want the movie to play when the mouse moves over the button, etc.
- The next step would be to create the actual animation sequence. For the example in the tutorial, I had 2 tweened animations. One animation was when the mouse rolled over the button, and the second animation was when the mouse rolled off of the button. So, with that said, there needs to be a way of stopping the first animation from continuing to finish the second animation. You only want one animation to play for each mouse action. So, you need........a Stop action between the two sequences. I always insert an extra keyframe between the two animation sequences and add the Stop action. See image below:
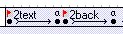
- Now that you have added the stop action between the two sequences, it's time to add another stop action after the second movie sequence. This is so the movie will not continue and play the animations of the other sequences as well. Note, that the two movie sequences are on the same layer.
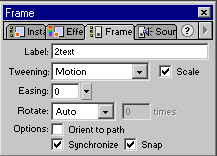
- Now, comes the part of naming the frame. From the Instance panel window (if you don't have that on your screen, simply press Ctrl + I or go to Window > Panel: Instance) select the first frame of the first sequence. From the Instance window, select the tab marked Frame. Under label, give it a name that you can remember. Yes, the name you give here will be used for the code when creating the rollovers. You'll need to repeat it for the first frame of the second sequence as well. See image below:
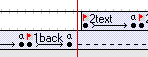
- The final and minor step, is to have the animations separated away from each other for multiple sequences. For the 3 buttons on my tutorial, I have made sure that the animations sequence on each layer are not near or on top of the other animations. For doing so can cause 2 animations from a different button action to play at the same time. You don't want that. See the image below for a glimpse of how I separated the animations away from each other on other layers.
- So, here is a brief checklist of what you need for a animation:
- Stop action at first frame.
- The first animation sequence.
- Stop Action after the first animation sequence.
- The second animation sequence.
- Stop Action after the second animation sequence.
- Add frame labels to the first frames of both sequences.
- Insert additional animations on other layers a few frames away from the last frame of the animation layered below (or above) it.
- Add the instance name for the movie so it can be called upon from other movies. For information on naming movies, click here.
Just a final word before we wrap up. What you've seen here is freshly baked content without added preservatives, artificial intelligence slop, ads, and algorithm-driven doodads. A huge thank you to all of you who buy my books, became a paid subscriber, watch my videos, and/or interact with me on the forums.
Your support keeps this site going! 😇