by
kirupa |
18 January 2009
By default, the content you create in Flash is set to
appear at a fixed width. Fortunately, you have the
ability to override that default, and with some
ActionScript, be able to have your content take
advantage of available space. For an example of what I
am referring to, click on the below image to launch a
new window:
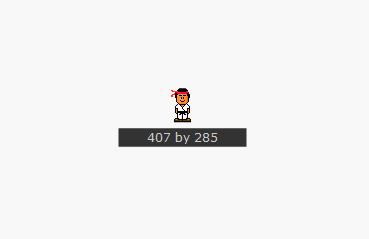
[ click on the above image to launch the
example ]
With the window launched, resize it to see how the Flash
content inside it adapts to the changing available space.
In this article, you will learn how to set your Flash
application to have a background that resizes to take up all
available space, and you will also learn how to have content
that is centered perfectly at the middle of your screen.
First, create a new Flash AS3-based application. Once you
have done that, create two rectangles in separate layers so
that they look similar to the following:

[ two rectangles drawn - one large and one small! ]
After you have drawn your two rectangles, convert each
into movie clips. The last thing you need to do is provide
instance names so that you can refer to them. For this
article, I am going to give the smaller rectangle the name
centerRectangle, and I will give the
background rectangle the name backgroundRectangle:
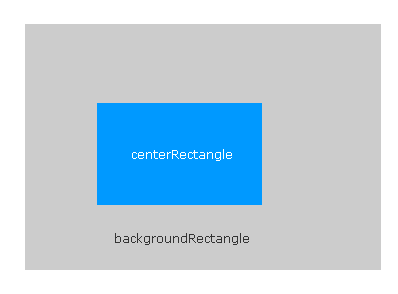
[ the rectangles are now movie clips with instance names ]
Right now, your application should contain two movieclips
with the instance names centerRectangle and
backgroundRectangle. That's all you need to worry about from
a design point of view.
Now,
let's get to the interesting part where we add some code.
Create a new layer called Action, and in the keyframe
created for you, press F9 to launch the Actions window. Go
ahead and copy and paste the following code into the Actions
window:
- function
init()
- {
- stage.align=StageAlign.TOP_LEFT;
- stage.scaleMode=StageScaleMode.NO_SCALE;
-
- stage.addEventListener(Event.RESIZE,
updateSize);
- stage.dispatchEvent(new
Event(Event.RESIZE));
-
- backgroundRectangle.x
=
0;
- backgroundRectangle.y
=
0;
- }
- init();
-
- function
updateSize(e:Event)
- {
- //Set background's size
- backgroundRectangle.width
=
stage.stageWidth;
- backgroundRectangle.height
=
stage.stageHeight;
-
- //center content
- centerRectangle.x
=
stage.stageWidth/2
-
centerRectangle.width/2;
- centerRectangle.y
=
stage.stageHeight/2
-
centerRectangle.height/2;
- }
If you test your application by pressing Ctrl + Enter,
the Flash Player will appear. As you resize the Flash
Player, notice that the background is filled with your
backgroundRectangle, and (as expected) the centerRectangle
stays in the center:
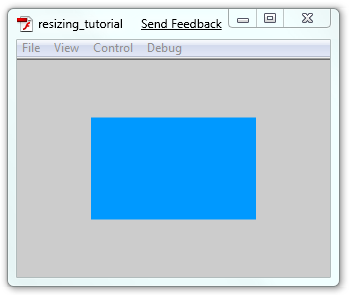
[ you can resize the Flash Player window to see what happens
]
If you preview in your browser, you will not see the scaling
because by default, the size of your content is fixed to the
pixel size of your stage. To fix that, go to File | Publish
Settings. The Publish Settings window will appear, and from
this window, click on the HTML tab. For Dimensions, set the
value to be Percent, and in the width and height fields,
enter a 100:

[ set the width and height to a percentage to support
dynamic resizing ]
Once you publish as a percent, your Flash content will scale
to take all of the available space provided.
The code for making all of this happen is fairly simple.
Let's look at the init method first:
- function
init()
- {
- stage.align=StageAlign.TOP_LEFT;
- stage.scaleMode=StageScaleMode.NO_SCALE;
-
- stage.addEventListener(Event.RESIZE,
updateSize);
- stage.dispatchEvent(new
Event(Event.RESIZE));
-
- backgroundRectangle.x
=
0;
- backgroundRectangle.y
=
0;
- }
This method is run initially when your application
starts, and it is responsible for setting up everything to
work when you begin to resize your Flash movie's viewing
area. To do that, you first need to set some baseline
properties on how your scaling will work.
The first two lines define that:
- stage.align=StageAlign.TOP_LEFT;
- stage.scaleMode=StageScaleMode.NO_SCALE;
I am setting the align
and scaleMode properties
on our stage instance. The align property specifies where
the contents in the stage are aligned from. In our case,
that is TOP_LEFT since we didn't change any defaults
relating to this.
The scaleMode property is a little bit more important. It
define how the contents inside your SWF file will scale when
more space is available. The values you can put for this are
EXACT_FIT, NO_BORDER, NO_SCALE, and SHOW_ALL. We don't want
any scaling, for that causes the contents of your
application to appear larger than what they really are.
Instead, I set the scaleMode to be
NO_SCALE. I want to be
able to control the positioning and size of my elements
manually without having them be skewed and stretched.
- stage.addEventListener(Event.RESIZE,
updateSize);
I set the scale mode to not scale the Flash contents
automatically because I want to take care of that myself. To
help do that, you have the ability to listen to Resize
events. Whin your Flash file gets resized, as it will when
the available area varies, this Resize event fires allowing
you to write some code to handle this.
In the above line of code, I am registering the
Event.RESIZE event with
the udpateSize event
handler on my stage instance. Each time a Resize is
detected, the updateSize event handler will get fired. We'll
look at updateSize shortly.
- stage.dispatchEvent(new
Event(Event.RESIZE));
When you run your application for the first time, there
is no resizing going on. Yet, you may have code that
manually positions and resizes all of your content that
needs to be run initially. You cannot force the user to
resize your application unless they really want to. The
solution is to manually make a call to the method that
handles your layout, and in our case, that is the
updateSize event handler.
If the solution I want is so simple, then what am I doing
with this line of bizarre code? What I am doing is forcing
the resize event to fire. This has the wanted side-effect of
causing updateSize to be called. This is just considered a
cleaner way of calling an event handler without having to
force the user to fire the event or call the event handler
directly.
- backgroundRectangle.x
= 0;
- backgroundRectangle.y
= 0;
In these two lines, I am setting the x and y position of
my backgroundRectangle to
be 0,0 - essentially the top-left corner. This ensures that,
if I didn't have my backgroundRectangle perfectly positioned
on the stage inside Flash, I can ensure that when someone
views the final SWF, the positioning would be correct.
- function
updateSize(e:Event)
- {
- //Set background's size
- backgroundRectangle.width
=
stage.stageWidth;
- backgroundRectangle.height
=
stage.stageHeight;
-
- //center content
- centerRectangle.x
=
stage.stageWidth/2
-
centerRectangle.width/2;
- centerRectangle.y
=
stage.stageHeight/2
-
centerRectangle.height/2;
- }
The final bit of code we will look at is the updateSize
event handler. This method gets called every time a resize
event is fired, and this method is responsible for properly
positioning and sizing the background and center rectangles.
The code is pretty simple. In the first two lines, I set
the width and height of my backgroundRectangle to be the
size of my stage:
- //Set background's size
- backgroundRectangle.width
=
stage.stageWidth;
- backgroundRectangle.height
=
stage.stageHeight;
To get the size of my stage, I use the stageWidth and
stageHeight properties on the stage instance. For centering
content on the stage, I use the following two lines to set
my centerRectangle's x and y properties:
- //center text
- centerRectangle.x
=
stage.stageWidth/2
-
centerRectangle.width/2;
- centerRectangle.y
=
stage.stageHeight/2
-
centerRectangle.height/2;
Notice that I am not doing a simple division of the
stage's width and height. To take into account the space
used by the centerRectangle itself, I am dividing the
centerRectangle's width and height properties by two and
subtracting them from the center of the stage.
Well, that is
all there is to resizing and centering content in Flash.
Just be sure to set the scaleMode to not scale
automatically, and ensure your have your resize event hooked
up to an event handler. Everything else should be pretty
straightforward. I have provided the source files for both
the example at the top of the page along with the rectangle
example you created as part of the tutorial:
Just a final word before we wrap up. What you've seen here is freshly baked content without added preservatives, artificial intelligence, ads, and algorithm-driven doodads. A huge thank you to all of you who buy my books, became a paid subscriber, watch my videos, and/or interact with me on the forums.
Your support keeps this site going! 😇

|


