 Tutorials
Books
Videos
Forums
Tutorials
Books
Videos
Forums


While scanning through the various threads in the Flash MX 2004 forum, there was a question asking whether it was possible to tile a background in Flash. This tutorial is an extension of the answer I wrote for that question, and I think there are some interesting concepts in the code that may benefit you in more applications beyond simple background duplication.
The following is an example of a small background image automatically tiled using some ActionScript in Flash:
[ an example of what you will create ]
Here's how:

[ pattern courtesy of squidfingers ]
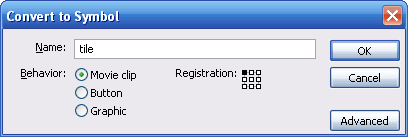
[ the Convert to Symbol dialog box ]
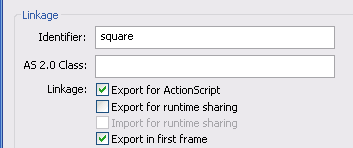
[ enter square in the Identifer field for your tile movie clip ]
[ copy and paste the above code into your Actions window ]
ActionScript Explained
Let's take a look at the code and what
causes our image to tile. There are some interesting concepts that you
might find useful for other uses beyond just tiling!
- tileBG = function () {
I create a new function, and I call it tileBG. Notice that the function takes in no arguments.
- tile_width = 34;
- tile_height = 34;
In the tile_width and tile_height variables, make sure to enter the width and height of your background tile. In our case, the tile graphic was conveniently 34 pixels wide by 34 pixels tall.
- x_max = Math.round(Stage.width/tile_width);
- y_max = Math.round(Stage.height/tile_height);
In the above two lines, I determine the total number of tiles that will be needed to cover the stage horizontally (x_max) and vertically (y_max). I do that by dividing the total width and height of our stage by the width and height of your background tile. I use Math.round() to round our values to the nearest whole number.
- for (x=0; x<=x_max; x++) {
- for (y=0; y<=y_max; y++) {
- bg = _root.attachMovie("square", "bg"+x+y, this.getNextHighestDepth());
- bg._x = tile_width*x;
- bg._y = tile_height*y;
- }
- }
The two for loops conduct the horizontal and vertical sweep for creating our grid that will contain our background tiles. Let's arbitrarily set x_max to be = 3, and y_max to be 4. First, x is set to zero. For x = 0, the for loop for the y runs all the way until y <= y_max. Then x is set to 1, and the y loop runs again. The loops run until x <= x_max or, occasionally.
A good way to picture this would be to imagine the x value representative of the top row of a puzzle. For each x piece laid, a series of y pieces go straight down and fill up all the vertical spaces below the x piece. That process goes until you reach the end of your puzzle and can't lay any more x pieces.
That is similar to our code above. You will lay pieces symbolic of our background tile until you reach the edge of our stage.
- bg = _root.attachMovie("square", "bg"+x+y, this.getNextHighestDepth());
In this line, I invoke our background tile by using the attachMovie function combined with our movie's linkage identifier, square. The attachMovie function called to a target (_root for us) takes in the following three arguments: the movie clip's identifier, the new movie clip's name, and the movie clip's depth.
For the depth, I use the getNextHighestDepth() function. It automatically places newly attached or created movies at one depth higher than the elements around it. You could use an arbitrary value incremented by x or y, but if you are working on a large animation with lots of dynamically created "stuff" occupying precious depths in your timelines, letting Flash keep track of the depths sounds like a good thing to do.
One last thing to note is that I am storing our newly attached movie clip in the variable bg.
- bg._x = tile_width*x;
- bg._y = tile_height*y;
Since bg represents our newly attached movie clip, I can use the _x and _y properties to specify the horizontal and vertical position of our bg movie clip. tile_width*x ensures that each subsequent image is shifted over by x. The same is true in the code used for shifting our movie clip in the vertical position.
Wrapping Up
If you want to learn more about grids,
Pom's tutorial on
grids and senocular's tutorial on
isometric grids
should help you out immensely.
You may be wondering, why go through the hassle of tiling an image when you could just take a screenshot of the tiled background, save it as an image, and then just import that one large image as opposed to tiling one small image dynamically in Flash!
You can create photo thumbnail galleries where each square in the grid is actually a small preview of a larger picture. For a project I was working on at MIT, I used the grid as a representation of a larger map to use as a minimap. Almost all of senocular's Isometry tutorials involve manipulations of the basic grid.
What I hope to convey through this tutorial, is that grids allow you to divide your stage area into small parcels of pixels that you can manipulate and use to your will. I have provided the source zip file that contains a working FLA of my example.
|
Just a final word before we wrap up. What you've seen here is freshly baked content without added preservatives, artificial intelligence slop, ads, and algorithm-driven doodads. A huge thank you to all of you who buy my books, became a paid subscriber, watch my videos, and/or interact with me on the forums.
Your support keeps this site going! 😇


:: Copyright KIRUPA 2026 //--
