by kirupa | 29 September
2005
Like I have been doing for the past few versions of
Flash, I have decided that my first tutorial for Flash 8
would be the "Creating a Simple Animation" tutorial. If you
are new to Flash or Flash 8, this tutorial will serve as a
good introduction to simple animation effects and the tools
you will use to create those effects.
The following animation is an example of what you will
have created by the end of this tutorial:
[ a simple animation created
quickly in Flash 8 ]
Let's get started:
- First, launch Studio 8. Once you have launched the
program, you will see your stage. The stage is the area
in the middle that takes up most of your screen. Right
click anywhere on your stage and select Document
Properties:
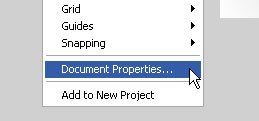
[ the document
properties menu item ]
- The Document Properties window should
appear. Under Dimensions, enter 300 for the width and
200 for the height. In the text field labeled Frame
Rate, enter 25. Press OK to apply those values.
- Let's add some text to our stage. Click on your Text
Tool icon from the toolbox:
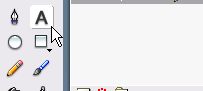
[ click on the Text
Tool from your toolbox ]
- Once you have clicked the Text Tool icon,
place your mouse cursor in your stage, click your mouse
and drag to the right. Releasing your mouse after
clicking and dragging should create a rectangular area
where you can enter your text.
- Type the word #kirupa. You should see the
text you type display in the text field that you have
created. After you have entered you word, click outside
the text field to finalize the word you entered.
- Select your "#kirupa" text by clicking on it with
your mouse. Look down towards the bottom of your screen
where the Properties panel resides. You should see a lot
of Properties used for editing text.
- From your Properties panel, you can adjust the font
size, style, and more! Select any font that you like,
but set the font size to something large like 36. You
can make other text modifications from here also:
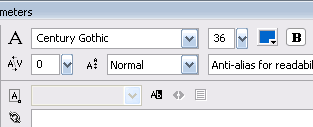
[ my Properties
panel for the selected text ]
- We are currently working on our main timeline. It
will be easier if we convert the text to a movie clip
and work from the movie clip's timeline. Make sure your
text is selected and press F8 or go to Modify | Convert
to Symbol.
The Convert to Symbol window will appear. Select the
option for Movie Clip and press the OK button:
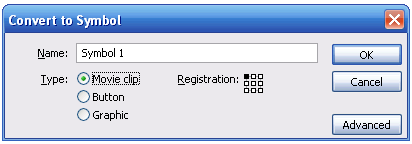
[ from the Convert
to Symbol window, select the option for Movie Clip ]
- Once you have converted your text into a
movie clip, right click on your text and select the
option for Edit in Place. You won't really see anything
drastically different, but your timeline is now
localized to this movie clip.
- So, as of now, you have created some text, modified
it the way you want, and converted it into a movie clip.
We want to animate each letter, so let's break our text
apart into individual letters. Right click on your text
and select "Break Apart".
Your text is now divided by letter:

[ our text is now
broken apart ]
- Each of your letter now has its own
little box when you select it. Make sure that all of
your letters are selected. You can simply select all of
the letters by clicking and using the Shift key or just
lassoing them by clicking and dragging over all of your
letters.
- Once all of your letters are selected, right click
on any of the letters and select "Distribute to Layers."
Your timeline should now have one layer dedicated to
each letter of your text:
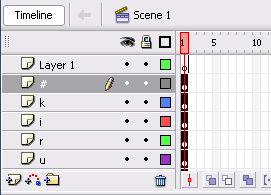
[ how your timeline
looks after each letter has been distributed to layers ]
In this page we have created and setup our text so that
each letter of text is on its own layer. In the next page I
will explain how to animate our letters in our text.
Onwards to the next
page!
|


