Drawing isometric views is based around one important
tool. Your 30/60/90 triangle. What this is, is a
straight-edge tool that helps draw lines on your drawing
paper. Its called a triangle because its in the shape of a
triangle. A 30/60/90 triangle is a triangle that has angles
of 30 degrees, 60 degrees and 90 degrees. This lets you draw
lines straight up (90 degrees), lines at 60 degrees, and
lines at 30 degrees. The 30 degree lines are the important
ones. Below is an illustration of how the previous cube
would be drawn on the drawing table with a 30/60/90
triangle.

You can see that the lines that make up the cube are all either up and down or
30 degree lines (going in either directions), easily made with the triangle.
This is the basis for virtually all isometric drawings. When you hear "isometric
view" you should immediately think "30 degrees!" This isn't always the case, and
we'll see that a little later on, but in terms of understanding what isometry
is, the 30 degree angle concept is the one to associate it most with.
For drawing in Flash, however, you don't have triangles such as the 30/60/90
triangle. What you do have is the transform panel. This panel allows you to not
only scale clips and shapes within Flash, but also rotate them. So in drawing
isometric images (in this manner) in Flash, start off with a single vertical (or
horizontal) line and duplicate/rotate it fitting it in to place where ever it
needs to be to create your isometric view. Because the measurements in the
isometric view are consistent, duplicating the same vertical line and reusing it
for your 30 degree angled lines is perfectly acceptable. In fact, its preferred
since it assures that your lines are of correct length and therefore will fit
together as they should in the end.
Grids
Before getting more into isometrics in Flash, we need to first get a brief
foundation in grids and grid systems. Chances are you know what a grid is
already. A grid is a cross-referential table of positions, sometimes in
themselves containing values or just posing as a possible a position within that
grid. Easy enough, right?
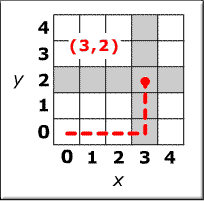
Graph paper is a grid. Flash with View > Grid > Show Grid
selected...is a grid. All x, y positions are based on a grid. The grid you see
in Flash is a grid based on x and y locations within the Flash work area with
the upper left being 0,0 and the lower right being document width and document
height passed in pixels. Each position in a grid is determined by the x value,
or the distance left and right, followed by the y value or the distance up and
down.

In terms of Flash, as y increases, the position on the screen becomes lower in
lower. In math, on the cartesian plane, the opposite is true. On the cartesian
plane, the typical representation of the x and y coordinate space (grid) as y
increases, y gets higher. Here's where you have to make a choice Neo. Either you
chose to follow suit with Flash's flipped y or, in your constructed mechanisms
of movement (scripted), you opt for the more traditional y is up understanding.
I personally prefer the cartesian method, where an increasing y
means movement up, and that will be how I utilize it in the bulk of the isometry
covered here, though in one technique I show you, it just may be easier to use
Flash's perception of y movement. That, again, will be covered a little later
on.
For dynamically populating a grid in Flash, loops come in good use. Having two
loops, one embedded in the other, allow you to loop through and access each
position in the grid by looping through its width and height. In looping through
both, you cover the entire area of the grid. For example, if you wanted to make
a 10 x 10 grid, you would have something like this:
Just copy and paste the above code into Flash and test. This loops through a 10
x 10 grid (of spaces 20 tall by 20 wide) and creates a text field in each
position. That text field text is set to the x and y value so you can see how
the loops executed as they run through the grid. For any kind of cycling through
grid spaces, this is the way to go about it. I don't want to spend too much time
on grids since this is about isometric perspectives. However, those isometric
perspectives are based around grids, so a base understanding of what a grid is
and how a position is defined is needed.
Now lets get back to the drawing of isometric views in the next tutorial.


