The button rollovers and simple
text effects do not provide the level of control you need
for creating killer animations. Using Tell Target with a
Button can create navigational elements with custom rollover
effects that are simple yet aesthetically appealing. Before
we begin, please make sure you have a basic understanding of
how to use the following technique below:
The example below will
highlight what you will do and have done at the end of this
lesson.
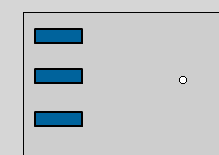
Rollover
the Blue Buttons
Advanced Rollovers:
Before we start, please
download the partial source below. Don't worry, the partial
source will not have the key elements to make it
work...you'll do that with the information found below.
Click here to
download the source.
Here's How:
First, you know that for
each action of the button, the movie clip that I have
targeted is going to have to respond. So, there are
separate frames for when the mouse rolls over the button,
and when the mouse rolls of the button. In other words, we
had to define how each and every action of the mouse was
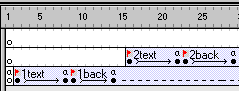
going to define the movie. So, on the drawing area, you
should see a small hollow circle. Right click on that, and
choose "Edit in Place". You can tell that each and every
frame has a label attached to it, that makes it work. See
image below:
From that, you
can tell that there are 6 main frame labels.
1text, 1back, 2text, 2back,
3text, 3back. That is
what you will be using in the code in a few seconds. 1text
will play the first text effect. On rollout, 1back will
play to undo the first text effect. The same for 2 text,
etc. If you don't fully understand, it's ok. Once you add
the code in, you should be able to understand it better.
Click on the Scene 1 icon on the top left of the timeline.
You should know be back at the main timeline-window. It's
time to add the actions to the buttons.
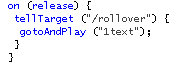
Right click on the first blue button, and choose
"Actions". From there, click on the "+" and choose Basic
Actions > Tell Target. Once you have done that, click on
the "target" syntax and enter the following in the input
box for target: /rollover
Then click back on the "+" and choose Go To. Select Frame
label, and enter "1text".
Your code should look like the image below:
Now, you need to copy all that code and
paste it below in the same location. Highlight all the
code and Right Click: Copy. Then click on the last line of
the existing code (you'll highlight the bracket) and
choose Paste. You should now have exact replicas of the
same code. Of course, you will need to modify it. Click on
the second piece of code on the "gotoAndPlay" line. From
the box for Frame label, change that information under
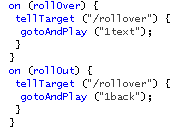
Frame to: 1back. Now, we need
to do one more major detail. On the top lines of the code,
it says "on (release). It needs to be changed. Click on
the first onRelease statement, then Uncheck the box for
release and check the box for Roll Over. Repeat the
same step for the second on (release) statement. Except,
instead of checking the box for Roll Over, check the box
for Roll Out. Your code should look like the following:
You can preview that, and test to see if the
first button works. It should. Now, copy all that code,
and right click on the second button and choose actions.
Paste this code in there. Change the 1text and 1back to
2text and 2back respectively. Preview the animation. The
second button should work. Bamm!!!! (As Emeril Lagasse
would say). Now, let's get the third button working. Right
click on the third button, and choose Actions. Paste the
code. Replace the 1text and 1back to 3text and 3back.
Preview the animation. It should work. Amazing isn't it?
Below should be the code for each button:
First Button
on (rollOver) {
tellTarget ("/rollover") {
gotoAndPlay ("1text");
}
}
on (rollOut) {
tellTarget ("/rollover") {
gotoAndPlay ("1back");
}
}
Second
Button
on (rollOver) {
tellTarget ("/rollover") {
gotoAndPlay ("2text");
}
}
on (rollOut) {
tellTarget ("/rollover") {
gotoAndPlay ("2back");
}
}
Third Button
on (rollOver) {
tellTarget ("/rollover") {
gotoAndPlay ("3text");
}
}
on (rollOut) {
tellTarget ("/rollover") {
gotoAndPlay ("3back");
}
}
That is all there is to
creating advanced rollover buttons. For the final source
code, please
Click Here If
you would like to know how to create the movie clip with all
the actions,
click here.
Just a final word before we wrap up. What you've seen here is freshly baked content without added preservatives, artificial intelligence, ads, and algorithm-driven doodads. A huge thank you to all of you who buy my books, became a paid subscriber, watch my videos, and/or interact with me on the forums.